Note: I haven't used Bryce in years; so these tutorials are archived "as is." I can't accept questions, because I don't remember the answers.
This is page 6. If you haven't finished page 5, please do so before starting this page.
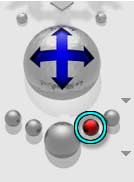
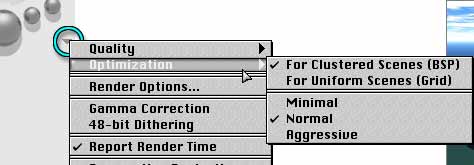 You can change the Optimization level by using the flippy at the bottom of the Camera Control palette. (Right below the line for Quality, that lets you choose how good the anti-aliasing will be, and right above the Render Options that opens the whole dialog box!)
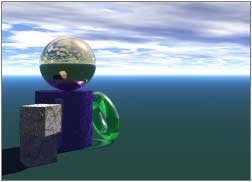 |
Clustered Primitives: BSP Grid
|
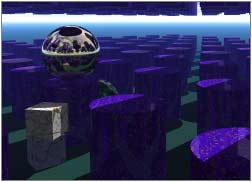 |
Primitives on Grid:
BSP Grid
|
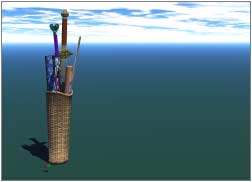 |
Clustered Imported Objects:
BSP Grid
|
First, you can choose between Clustered Scenes (BSP), or Uniform Scenes (Grid.) Choosing the correct one can have quite an impact on your render time.
Basically, it's a choice between two different rendering algorithms. The first one is best for objects that are grouped or overlapping. The second, according to the manual, works better if the objects in your scene are evenly spaced on the internal Bryce grid. (In my tests, however, I found that BSP works better for virtually everything. You can see some of the results in the table.)
In addition, you can choose how the optimization algorithm is utilized.
For some scenes, Minimal optimization takes less time than Aggressive optimization; for others it's the other way around. For the average scene, Normal will be the fastest.
In all cases, Bryce figures out where the objects are in a scene before it starts to render. What is does with that information is determined by what mode you have chosen.
For Minimal mode, it shoots rays only through the areas with objects in them. It works best in very simple scenes, such as those with 5 or fewer objects.
For Normal mode, Bryce looks for concentrations of objects once it has determined where the objects are, and doesn't shoot any rays that aren't necessary. Which sounds about the same, but it takes a little longer for simple scenes, and less time for the complex ones. It's best for most things.
Aggressive is like Minimal, only more so. It works best when the scene is full of stuff, but the stuff is concentrated in a small area. It can also speed up renderings with imported objects.
I find that the renders made with the different methods are indistinguishable from each other. Only the render time differs.
So, if you are faced with a long render, it may be worth it to make a tiny thumbnail of it at the different settings to see which one will be best. That thumbnail will probably only take a few minutes to render in any case, and it could save you hours and hours.
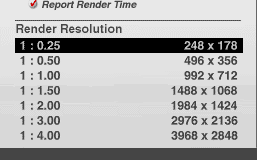
Do set Bryce to report the Render time, though. No point sitting around with a stopwatch waiting for it to finish! (You enable or disable it in the bottom flippy, once again. You can see it in the picture at the top of this page.)
 Finally, if the scene is just too complex to render quickly under any conditions, or if you really need to see the reflections and things, render smaller. You can change the render size (either up or down) in the Document Setup dialog. If your renders are taking too long, you might want to consider rendering at half or quarter size.
 Eventually, though, you will have finished all the test renders, and you will have to render your masterpiece at full size, and sometimes with things that require Premium Rendering. In such cases, there are still things you can do to keep from going without your computer for several days while your render renders.
First, if you have several computers connected via a TCP/IP network, you can use Bryce Lightning to farm the render out to all the computers you choose on the network. It's not difficult to set up, assuming your computers are already connected and you can get your family members to let you hog their computers while you render. All the instructions are in your manual. Since not everyone will be able to use this, I'm not going to repeat them here.
 You can also render over a period of nights, while you sleep, and not render during the day when you are awake and need your machine for other work. Doing that is simplicity itself. Just click anywhere on the screen to stop an active render, save the file, and do whatever you need to do. You can close Bryce completely, and nothing will happen to your file. When you are ready to start rendering again, open it and click the Resume Render button (if it doesn't automatically resume rendering by itself.) Then you can walk away and leave it to its own devices again.
 Finally, if you have a number of small images to render, and you don't think any of them will take the whole night but several of them might take a few hours, you can batch render them.
Once again, batch rendering is absurdly simple. Just put all the scenes you want to batch render into the same folder for convenience. When you are ready to render, open the folder, select all the files you want rendered, and drag them onto the Bryce icon.
It doesn't matter whether Bryce itself is open or closed. If it's closed, it will launch itself, and Resume Rendering on the first file. When it finishes the render, it saves it and moves on to the next. It continues until all the files have been rendered, at which point it stays up, with the last scene loaded, but saved.
Since it resumes rendering, instead of beginning the render over again, you can render the first few passes to make sure you like what you have, then close your scene and work on something else until you are ready to leave the computer for a while. Then batch render everything at once! So you can leave the anti-aliasing of your homework until you are ready to go to dinner, and then do 'em all while you eat!
 Which brings us to the last thing I want to talk to you about before the end of the class. I probably should have brought it in earlier; but it didn't seem to fit anywhere. So here it is now!
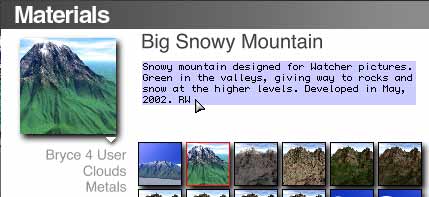
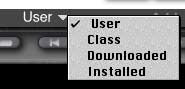
You have probably noticed that the presets all have thumbnails, and that there are two folders available (Installed and User,) and 14 categories in the Installed folder.
Did you know that you can change the appearance of those thumbnails at any time, as well as change the text that accompanies them? It's easy to do.
Go to the Material Lab, and make a quick material to play around with (unless you happen to know that you have a preview that you just hate, and want to change that. Then just go there.)
Add it to the presets, and a thumbnail will appear, as usual. Click on another material, just to get the effect, and then click on this one again. Manipulate that preview until you have exactly what you want in the window. When you like it, hold down Command+Shift on a Mac, or Ctrl+Shift on a PC, and click on the little thumbnail in the preview menu. The one you have just made will replace whatever is there.
 Click on the text to replace it with an editable text field. Type in whatever you want, and click anywhere close the field and return to the format of the preset text.
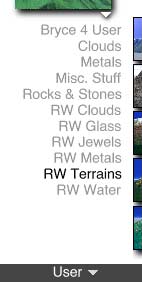 In addition, you can add new folders, and you can add up to 14 categories in any folder. Which all makes it much easier to get (and stay) organized.
To add a new category from inside of Bryce, select a preset, any preset, and click to export it. When the save browser appears, navigate to your Bryce folder, to the Presets folder within Bryce, and then to the correct folder for the kind of preset you are adding (Materials, Objects, or whatever you need.) Inside that are the folders that you see in the Presets; Installed and User by default.
Open whatever folder you want to create your new category in, and change the name of the .mat file you are saving to the name you want as the category name. (Waterfalls.mat, for instance.)
Save, and the new category will appear in the correct folder. You can build on it from there, or delete the thing you added and add others.
 To make a new folder, proceed as if you were adding a category (select a preset, export, browse to the correct folder) but instead of opening one of the existing folders, create a New one, however your system does it, and name it whatever you want the name of the new folder to be.
Open it, if your system requires that, and save the preset; changing the name to the name of the new category as before. This time when you save, however, you won't see the new folder until you close whatever Preset dialog you were working in, and reopen it.
Naturally, if you want to do this while you are not working in Bryce, it's actually much easier. Just browse to the correct folder on your drive (Bryce > Presets > Desired Folder) and add folders, change their names, copy .mat files and change their names etc. as desired. When you do open Bryce, everything will be however you set it up to be.
| Place Any Thumbnails Where You Want Them | ||
 |
 |
 |
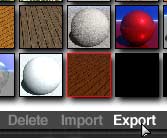
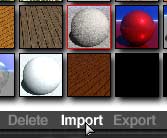
| Select and Export | Select Place After; Import | File / Files Added in Place! |
Organizing the files inside of the categories is a bit more cumbersome, but it can be done. To do so, select the preset or presets you want to move, and Export. You can name them if you want, or just leave the default name since this is only a temporary file.
Select the thumbnail just after the one where you want them to be inserted, and Import the very file you just Exported. All the thumbnails will appear, in front of the selected thumbnail. Delete the extra files, and there you go. Repeat if necessary.
This works for any Preset category that has folders within folders in the Preset folder. (In other words, not for Skies or Trees.) Neat, huh?
Well, that does it for the Intermediate Bryce lessons.
In the original lessons, I provided links here, but most of them are dead now. However if you run a Search for Bryce Tutorials in your favorite browser, you're sure to find some. After all, you found these!
Learn all you can! Good luck, and above all, remember to have fun!