Note: I haven't used Bryce in years; so these tutorials are archived "as is." I can't accept questions, because I don't remember the answers.
This is page 5. If you haven't finished page 4, please do so before starting this page.
 We were working with the Tennis Ball in the Material Editor. You had just applied the Tennis Ball picture map to the Sphere.
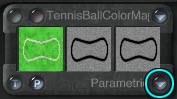
Look at the preview now, and you will see that it looks like a tennis ball. It has probably defaulted to Parametric mapping, which might work. But we want to use Spherical mapping, because I designed this map to be used that way.
Look at the Component Palette. See the little flippy triangle on the bottom right corner? This is the Texture Mapping Mode button. The mapping mode being used will be displayed to the left of it. Click on the triangle to display the available mapping modes. Click on Spherical in the list. (You can play with the others, as well, if you want to see what they do. Keep an eye on the preview to see how it changes. Just end with Spherical, OK?)
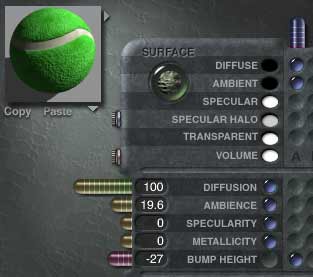 In order to have the richest possible color on the Tennis ball, we are going to assign the same texture to the Ambient color channel. So click the dimple in the A column there, too.
There is no specularity on tennis balls, and they aren't transparent, so we will skip the other Color channels, and move down to the Value Channels.
Tennis balls, because they are fuzzy, absorb much of the light that hits them. So we will set the Diffusion to between 90% and 100%, and bring the Ambience down to 15 or so. There is no Specularity or Metallicity, so we'll leave those at zero. But we do have a bump, and it's in the same component as the color. Click to put a dot in the A column next to Bump Height.
That will cause Bryce to use the information in the Alpha channel of that component to calculate how to draw the object. It will do this by changing the normals, or angle at which the virtual light hits the surface of the object, as if the dark places on the bump maps were actually dents in the surface, and the light places were ridges. Bump maps allow you to have all kinds of detail in your images that would be difficult to model, and they let you have it at a very low rendering cost. Especially if the object is not very close to the camera, it's a good idea to use a bump map instead of modeling to add texture to the surface of your objects.
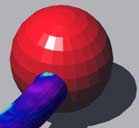
You are about to see how it works. Grab the slider in the Bump row, and pull it out to the left. Keep an eye on the tennis ball while you do this. That is a bump map in action. Now, because of the way that Bryce interprets the bump maps, sometimes they work backwards; the dark places, which are supposed to be low, appear high and vice versa. You also may have dents in some procedural textures which you want to make into bumps, or the other way around.
Because of this, Bryce allows you to reverse the bump by simply pulling the slider the other way, into negative numbers. Try it and see.
Then adjust it so it looks the way you think a tennis ball should look, and click on the checkmark to close the Material Lab and change the texture of your ball.
 Resize it, so it looks like it's the correct size in relation to the wagon and the other things in it, and position it inside the wagon bed, and not interpenetrating any of the other toys. (Don't hesitate to rearrange them, if you want, to make room.) You might want to spin it a bit, too, so it's not exactly lined up.
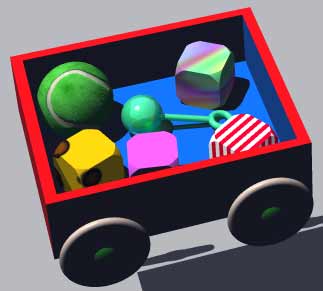
Do a test render, to make sure it looks right.
 Looks like this pull toy has everything it needs, except the string!
That would be really hard to make in Bryce. (It could be done, with Metaballs, but we won't be going there for another two lessons.) So we are going to import a string that I made in a different program.
Importing things into Bryce is very simple. Go to the top of the window, and wait a moment for the menu bar to appear. Then go to File > Import Object. A dialog box will open that will allow you to import an object in any format that Bryce can read. (There are a lot of them, and you can find them in your manual on page 364.)
The one we want right now is PullString.obj, which you should have downloaded along with your lesson. Navigate to it, and open it now.
Bryce will import it, and place it at the world center.
You still need to texture it, and put it on the pull toy.
We will start with positioning it. View it from the top, rotate it to taste, and line it up with the pull toy.
 But now we have a new problem. The string will have to be lying on the ground, and the whole wagon, toys and all, is still floating in the air. Change to the Right orthogonal view, if you aren't there already. Draw a selection marquee around the wheels, wagon, and toys (but not the string,) and group them by hitting Command/Ctrl-G.
Click on the arrow at the bottom of the Icon Column to land the toy.
It's important that you group it first, or each part will land on its own. Use the undo key, if you like, and try it to see. Just undo that, and land it correctly afterwards!
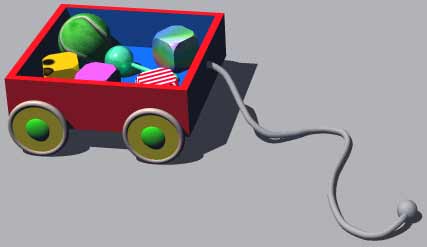
Now, click on the string, and land that. Then grab the corner Control Handle over the ball on the end of the string, and resize it so that the end near the wagon is whatever you feel the correct height is for a pull toy string. (You will probably have to change to the Top view and center it again after this.)
Do a quick test render, to make sure it's really positioned where you want it.
 Alright. Now all we have to do is texture the string. Select it, and name it if you haven't already done so.
Go to the flippy triangle on the Selection Palette, and Select Meshes... This is where imported meshes will all be found. Once again, they don't have very meaningful names, which makes them hard to select. Select the first one, and give it a name that you will recognize later. I chose "String." While it's selected, go to the Material Lab, and get or make a texture for it. Do the same for the ball at the end.
Now, do another test render.
Does the ball look a little faceted to you? As if you could see the polygons that made it up? Well, you can, and that's a common problem with imported objects.
![]() Let's fix that now. Select the ball, and click on the E at the end of the Icon Column.
Let's fix that now. Select the ball, and click on the E at the end of the Icon Column.
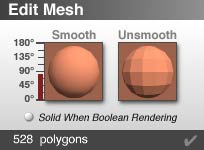 The Edit Mesh dialog box will show up. It looks like this. Here you can choose to Smooth, or Unsmooth objects, or make them solid when you are using them for Boolean operations (if you don't check this, they will just be shells.)
Models are all made up of flat surfaces called polygons. A whole lot of them put together can give the impression of a curved surface, but every polygon costs memory and rendering time. So Bryce can fudge a little on the rendering, and act as if two adjacent polygons were really one single smoothly curved shape. The angle below which this fudging takes place is called the Smoothing Angle. You can set it very high, so that any two polygons that join at less than 180° are smoothed. But that will give you odd looking cubes and things.
Normally, the default, which is around 80°, is good. That means that the corners on cubes will still be sharp, but things like this sphere can be made of fewer polygons, and still look smooth.
 Do a test render. If it doesn't look smooth enough, just click again. Each click smooths a bit more. Keep going until it looks right.
You can also unsmooth things, if you have gotten them too smooth, (which causes strange shadows,) or if you want them to be sharper. Once again, all the angles below the high mark on the slide will be unsmoothed, and the more you click, the sharper things will get.
Remember this when importing stuff. It can solve a lot of problems.
 Well, that's it for the little pull toy wagon! If you want to, you can go ahead and finish it as a picture. Perhaps pile some of the blocks on top of each other, or add a ground plane, some things in the background, etc.
You might also want to put in some other toys, now that you know the basics of how to build them. Yo-yos, tops and hula-hoops are all fairly simple. Just remember to use the Boolean functions to make complex things out of simple shapes.
There are a bunch of Boolean shapes in the Preset Objects. (The flippy triangle next to the title of the Create palette.) Take a look at how they have been constructed for more ideas. (Just click to load them. The primitives they have been made of will all be right there.)
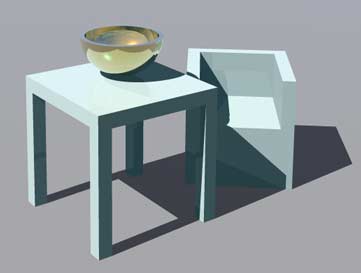
Try to make other things, too. A table and chair. A bowl on the table. Look at the things around you, and try to see the simple shapes inside them. Not everything can be made this way, of course, which is why there are other modeling tools. But many things can.
Here is a challenge; can you make a table out of three primitives, and nothing else? Can you make a chair out of just two primitives? This picture shows one way to do it.