Note: I haven't used Bryce in years; so these tutorials are archived "as is." I can't accept questions, because I don't remember the answers.
In the next six Tutorials, originally used as an online course at Eclectic Academy, we are going to be diving further into Bryce, exploring Animation, the Deep Texture Editor, and intermediate Terrain Tricks. Along the way, I'll be giving you all kinds of hints and tricks to make your experience in Bryce less time consuming, and more productive.
I am assuming that you have a good working knowledge of your computer, and that you have either successfully completed the Beginning Bryce 5 lessons, or know the basics of how to use the program. This includes knowing the use of all the buttons and icons, how to set up scenes and navigate within them, and how to use the various labs.
If you don't know how to use all of the labs, or don't know what I mean when I say "Terrain Editor," please go through the first lessons, and come back here when you have completed them.
These lessons tend to be long and you many find the material presented complex. They weren't designed to be finished in one sitting, nor do I expect you to absorb all the information the first time it's presented. I will be reminding you of much of it as we use it again. The rest, I expect you to look up whenever you need it. I highly recommend that you print the lesson pages, so you can easily refer back to them.
The main point in all of this is to have fun!
If you did the previous lessons, you know that I decided to teach you the basics of scene building, and not to approach animation until you knew how to realize the still picture.
Well, now is the time to start learning about animation. As I mentioned before, it is a complex topic. We will be spending the next two lessons learning about the most basic aspects of it.
If you aren't interested in animation at all, you might want to read this through anyway. It is surprising how many of the techniques that are necessary in animation can also make still pictures easier to compose, especially when you decide to tweak this or that.
Besides, it's just plain fun to see your pictures moving!
I'll be sprinkling these lessons with hints and tips to make working with Bryce as a whole easier; things I didn't cover before, because you were already working with enough new material. But keep an eye out for them now.
If you want to follow along, you'll need the files in LessonI-1.sit or LessonI-1.zip.
Shall we begin?
 |
 |
| Storyboard of Movie | Finished Movie (Click to Play) |
First, a bit of theory.
As I'm sure you all know, animation works because of persistence of vision. When we see something, that thing stays in our minds eye for a moment after its image leaves our physical retina. If it's replaced rapidly with something else, our minds interpret the replacement as the one changing into the other.
If the two things are similar images, our minds interpret the replacement as motion.
So, in order to trick our minds into perceiving motion in what are actually still images, we replace one with another in rapid succession.
The individual images are called "frames."
The more of them there are in a second of time, the smoother the motion appears to us. The fewer, the jerkier the motion. But, of course, especially when working with computers, the fewer frames, the smaller the file. You guessed it; it's a trade off.
Computer animation consists of arranging objects in space, moving them around or changing them in other ways, and then rendering sufficient frames to show the motion when they are viewed.
In the simplest terms; you place an object somewhere, make what is called a keyframe, move it someplace else, and make another keyframe. The computer extrapolates the motion from the keyframes you have set, and renders both keyframes and as many frames in between as you tell it to render.
Of course, you can show the computer the path through space that the object takes, and more than simple motion can be rendered, but we'll get into that as it comes up.
Alright. Everyone got that? Good.

Open a new scene, and create a sphere.
Drag it to the left side of your working area.
Now, look at the Animation Controls below the window. (If you don't see the Animation Controls, click on the Swap Button to toggle from the Selection Palette to the Animation Controls.)
Right under your window, you will see a long light gray bar with a bunch of white tick marks on it. This is the Timeline, and those tick marks are frames.
On the extreme left side, you should see a little blue-grey slider, with what looks like metallic silver ends, and a white mark in the middle. That's the Scrubber. It allows you to move anywhere you want along the timeline.
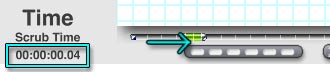 Look at the bottom of the Text Display Area. It should have a bunch of zeros. This is the Time Display, which shows you the current time.
Place your cursor on the Scrubber; it should turn green. Drag it to the right, about to the middle of the timeline, and release it. Notice as you drag that the numbers are changing.
The default time format for Bryce is SMPTE (simptee.) That stands for the Society of Motion Picture and Television Engineers, which set the standard. Reading from left to right, the numbers stand for hours, minutes, seconds and frames. The number of seconds and so on, of course, depends on the number of frames per second (fps) you have set. We'll talk about it more later; for right now, using the default of 15 fps, notice that as you move the scrubber the frames number goes up until it hits 14, then 1 second appears on the Time Display, and "frames" drops to zero, and so on.
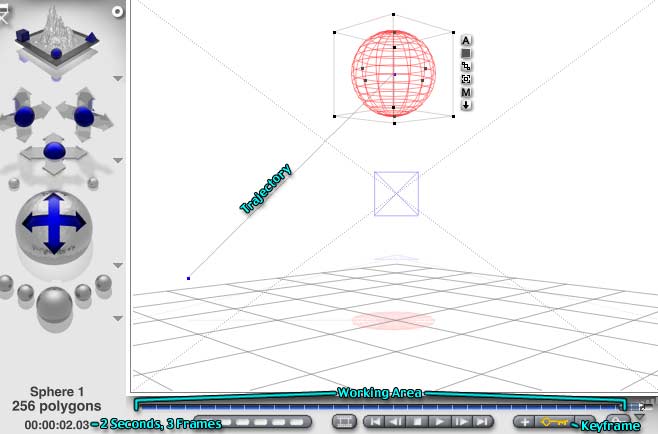
Move to about the middle of the default screen, around 00:00:02.something (Two seconds, give or take a few frames.)
Select your sphere, and drag it to the top center of your screen.
You will notice that a line appears, starting with a tiny blue square where the center of the sphere was, and ending in a tiny blue square in the center of the sphere where it is now.
That is the Trajectory. (If you don't see it, then you have changed the defaults. If you have played with animation before, please make sure that you have trajectories showing, and Auto Key enabled. If you have no idea what I mean by that, then please change the Preferences under the Edit menu to "Launch to default state," close the program, and relaunch it. Try it again. This time, you should be able to see the Trajectory.)
Notice that the gray timeline to the left of the Scrubber has turned bright blue. That shows that animation is happening. The bright blue is the Working Area. Also notice that the little key icon at the right side of the Animation Palette has turned yellow. That shows that there is a Keyframe at this point in time.
You set up keyframes to mark the time for events. Bryce fills in the frames between keyframes to make an animation. This way, you don't have to set up each frame, just the keyframes. Bryce will do the grunt work. It's not only a pretty powerful way to animate, it's the way that nearly all computer animation is done. (Which means that you can use the knowledge you gain here to move on to other programs, if you are so inclined.)
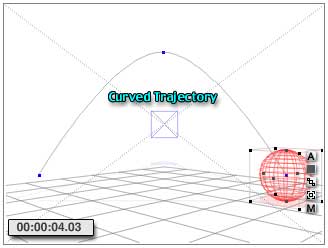 Drag the Scrubber to the right again, and move the ball to the lower right corner of the area. You should see another part of the trajectory appear, and you will notice that the line between the two parts becomes curved, to show smooth motion.
Which is all very well and good; but it doesn't look much like animation, does it? Want to see it move?
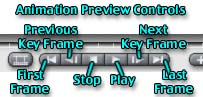 You will notice that there is a set of controls that should look familiar if you have ever used a tape recorder, VCR, DVD player, or anything of that nature. These are the Animation Preview Controls.
Click the arrow that you would expect to be the "play" button.
There you go. Animation! Simple, huh?
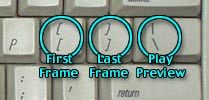
Click the button to the far left. Your animation will move back to Frame 0, the first frame. (Frame counts always start at zero, not one.) Click the button to the far right, and your animation will move to the last frame.
The buttons to the right and left of those move to the previous or next keyframe. Try them out. The square button stops a playing animation, as you would expect it to, and returns you to the first frame.
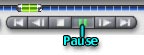 As you may have noticed, the play button turns into a pause button once it's been clicked. Use it, of course, to pause an animation in progress.
 Once you are familiar with those, It's time to look at the button to the left of the Animation Preview Controls, the one that looks like a snippet of movie film.
That's the Movie Preview button. Click on it.
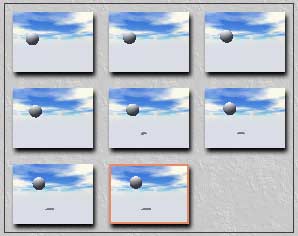 Your screen will fill with little preview pictures, called the Storyboards. (If you don't see them, you have changed the settings from the default. In that case, you can set them to play again using the button explained below.) Storyboards let you see every single frame in your movie, which can be a good way to catch trouble spots. You can also jump to any frame by double clicking on the storyboard for that frame. The timeline will automatically move there, and you will be returned to the working window. Try it out, and then click the Movie Preview button again to play the preview once more.
Look at the Nano Preview to see your movie actually running.
Notice that the Movie Preview uses whatever view you have selected in the Nano Preview, no matter which view you are currently using in the Working Window.
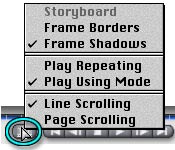 Now, click and hold the Movie Preview button. You will see a popup menu with a number of choices. The first one, Storyboard, should be dimmed. That's because you are using it, and you cannot disable it right now.
You can choose to show the storyboards with or without shadows, and with or without borders. This is a personal taste thing. You will want to set it up however it makes it easiest for you. You can't have both borders and shadows, but you can have neither one. With neither, it's harder to tell one frame from another, but they take up less room. Which of these you choose is entirely up to you. Try them all out, and see which one you like best.
You can also choose to Play Repeating, or Play Using Mode. Check Play Repeating, and then click twice on the Movie Preview button. (The first time will return you to the normal screen, the second will start the Movie Preview again.) This will give you lots of time to look at the Nano Preview, watch the red outline on the storyboards show which frame you are looking at, and so on. When you are playing in Repeating mode, you can click anywhere in the storyboard screen to stop the movie, and examine the storyboards. To play again, click the Movie Preview button twice. To return to the working screen either click the Movie Preview button once, or double click on one of the storyboards to go to that frame.
Depending on how your sky is set up, you may also be able to see the clouds move in the Nano Preview. Take a look. When you are ready, click the button again to stop the preview.
Play Using Mode plays the Movie using whatever Play Mode you are using to look at the wireframe preview. Since we haven't quite gotten there yet, you will have to wait a tick to experiment with this one.
Line Scrolling and Page Scrolling, as you would expect, cause the Storyboards to scroll either one line at a time, or one page at a time. Once again, use whichever you prefer.
Okay. Let's look at the Timeline again for a moment. You will notice that your entire animation is blue now. As I mentioned, that blue shows the Working Range. Right now, it's no problem that it's the whole animation, because the whole animation is very short. But when you start to make longer animations, you may want to concentrate on only a short span within the longer timeline.
That is what the Working Range is for.
You can change it by placing your cursor on either end, clicking, and dragging toward the middle. Do that now. You will see that the area that contains animation remains dark blue, to show the length of the total animation.
Click on the Play button of the Animation Preview. You will notice that only the frames contained in the Working Range will play.
 Make sure that the Working Range begins somewhere near the second keyframe. Hit the Left Square Bracket key ( [ ) to move to the first frame of the Working Range. Now hit the Backwards Slash key ( \ ) to preview the animation. Hit [ to return to the first frame, and then hit the Right Square Bracket ( ] ). The scrubber will move to the last frame of the Working Range.
Hit [ again, and then hit the period key. You will play the next frame. Hold the period key down, and you will step through all the frames, continuing on past the end of the working area, and then past the animation length marker, and out into the area that has no animation at all.
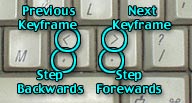 Hit the comma key, and you will step backwards, frame by frame, all the way to the beginning. Remember these keys. (They are easier to remember if you notice that they are really the lower case of the < and > keys, which you can think of as arrows pointing forwards and backwards.)
You should be back at the first frame. Make sure that your sphere is selected. Hold down the shift key, and hit the period again ( > ). You will move to the next keyframe. Shift and comma, or < moves you back to the previous keyframe. Try it a bit, to get used to it.
 |
 |
| Sphere selected - Trajectory showing | Ground Plane selected - Trajectory hidden. |
Now, click anywhere to deselect everything, and hit < (shift comma) and > (shift period) again. You will find that you are moving to the first and last frame of the animation. That is because nothing is selected, so there are no keyframes.
Keyframes are attached to objects. Some objects in your scene can be animated, while others are not. For instance, in this scene the ground plane has no keyframes; nothing about it changes for the whole course of the scene. If you select it, and use one of the methods to move to the next keyframe, you will move to the end (or beginning) of the animation.
Trajectories are also connected to objects. Notice that when the ground plane is selected, the sphere's trajectory vanishes. But, when you select the sphere, it becomes visible again. (This is the default behavior, and it can be changed. But it does show that the trajectory is attached to the object.)
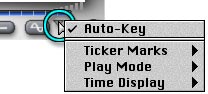 Still with me? Good. Look to the right of the Animation Palette. There is a little flippy triangle there which has a number of choices.
The first one is Auto Key.
When Auto Key is enabled, Bryce automatically makes a key frame each time that you change something in your scene. It also makes keyframes at frame zero for everything it is possible to animate, just in case. This can mean a lot of keyframes, and that can mean a large file.
The alternative is to disable Auto Key by unchecking it. If you do that, though, you have to manually make keyframes for everything that you want to animate. If you don't, and you move away from the time when you changed something, the change will simply be lost. From the point of view of Bryce, those changes never existed.
 |
 |
| Covert the Sphere to a Cube | It's a Cube forever, beginning to end! |
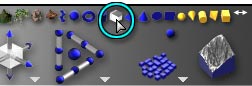
Most of the things in Bryce can be animated. In fact, the only things that cannot be animated are states. For instance, this sphere is a sphere. You cannot animate it so that it changes into a cube. If you change it to a cube, using the Conversion part of the Edit palette, it will be a cube for every frame of the animation.
Try it out. Make sure the Sphere is selected, and move to the end of the animation. Click on the double headed arrow at the right of the Edit palette, and change the sphere to a cube. Drag the Scrubber to the left to see the animation. You will notice that the cube remains a cube for the whole thing.
The material, position, rotation, scale, shear, origin; anything about the object can be changed. But it cannot be changed into another object, nor can its Boolean properties be changed. (Although they can be used or not used.)
Anything but the actual state of things.
Go to Page 2 for more about animation.