Note: I haven't used Bryce in years; so these tutorials are archived "as is." I can't accept questions, because I don't remember the answers.
This is page 3. If you haven't finished page 2, please do so before starting this page.
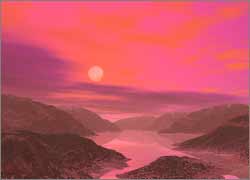
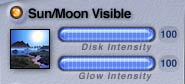 Okay. We've been using this one, and making the Sun/Moon Visible. But now we're going to look at the control. Move either the sun or the moon so that you can see it in the preview. Enabling or disabling this control lets you see an actual disk for the sun or moon.
 |
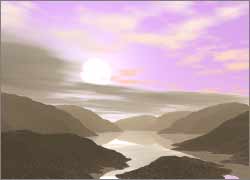 |
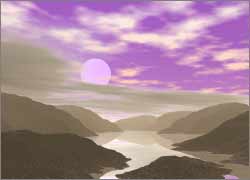
| Sun Glow 6 | Sun Glow 60 |
You can control the brightness of that disk with the Disk Intensity slider, of course. The glow around the disk is controlled by (surprise) Glow Intensity. This glow is the one that interacts with all the other things, so being able to control it can give you some wonderful effects. As you can see, though, if the glow is too intense, you can't see the disk at all. Which, when you think about it, is pretty realistic. (By the way, these were done with all the colors left at the default, which is not the way to make sunsets. But it makes it easier to see the glow effect.)
The color of the disk is tinted by the Sun color; but it's only a tint. Higher intensity lightens the color, as it brings it closer to white. Unless you are using a Custom Sky, the glow also takes on the Sun color. So, if you want a blazing red sun, you will have to not only have the sun color red, but you will have to turn the disk intensity down, and the glow intensity up. Try it out. If you want a red sun with a yellow glow, or something like that, use the Custom Sky in the Sky & Fog palette, and set the Sun Glow to yellow. As long as the glow is high, it will still have the sun color directly over the sun disk. You will probably have to play with the size and intensity to get just what you want.
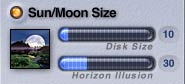 The next controls allow you to change the size of the visible Sun or Moon.
Disk Size is pretty self explanatory.
 |
 |
| Horizon Illusion 4; Disk Size 10 | Horizon Illusion 94; Disk Size 10 |
Horizon Illusion is the illusion that the sun or moon is actually larger when it's near the horizon. The higher this number, the stronger the illusion. Try it out by setting it fairly high, and pushing the sun slowly over the horizon. (Remember that the preview will only redraw when you release the mouse button.) Using both together you can get enormous suns and moons, that take up most of the sky.
(See what I mean about changing the colors for the various things? This is exactly the same scene as above. Only the colors and Horizon Illusion were changed.)
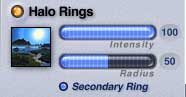 Halo rings are the rings around the sun and moon caused by ice particles in the upper atmosphere. While you still have the sun on the horizon, check this out.
 They take on the color of the Sun Glow, and become brighter as the glow is brighter. (Remember, the Sun Glow will be the same color as the sun, unless you have set it to be a different color using a Custom Sky.) These rings, like the rainbow, have their own size which can't be changed. The Radius control changes the width of the band, not the radius of the circle formed by it.
You can also enable or disable a faint secondary ring.
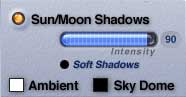 Sun/Moon Shadows, of course, controls the density of the shadows cast, just like before. You can turn them off altogether by disabling them. So if you have been playing in here, and suddenly nothing is casting a shadow, take a look at this control or the thumbnail on the Sky & Fog palette. If the thumbnail is gray, they have been disabled. You can enable them by clicking on it, or coming in here and turning them on.
 |
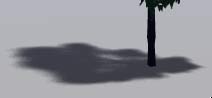 |
| Default Shadows | Soft Shadows |
Soft shadows creates soft shadows, such as you might see on an overcast day. It's a lovely effect but very, very render intensive.
The Ambient and Sky Dome swatches control those colors, of course, just like the palette.
 Okay. Let's leave the sky lab, and go back to your scene.
Now, you may have noticed that it's quite hard to get the sun exactly where you want it on the horizon. There is a way around that, and it's been around for years, but it just got into the documentation for the first time with Bryce 5. This is a Good Thing, of course, because features this great should be documented.
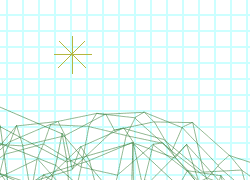
Go to the wireframe, using the perspective view that you would like to use to render your scene. Call up the Sky & Fog palette. Now, hold down Control/Option on a Mac, or Ctrl/Alt on a PC, and double click the Sun Position Dome.
Without letting go of the keys, click anywhere in your picture. A big yellow eight pointed asterisk will appear where you click. That is your sun. Look at the Nano-Preview. As long as you hold those keys down, you can click anywhere you want, and the sun will go there. If you let go, just hold them down again, and click some more.
If you want to position the moon, instead, add the Shift key to the combination. (Or you could toggle between the sun and moon, but that takes longer.)
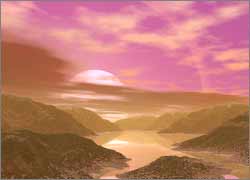
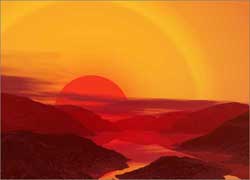 Using that method, and the trick I taught you about the sun disk intensity and the glow from a custom sky, you can easily get sunsets like this one. (I always use Custom Sky for sunrises and sunsets. It allows you to set the sky color, which means that you can avoid the odd purple colors in the sunsets above. See the difference?)
 Alright. Now you know enough about the Sky & Fog palette to find your way around there, and you can use the Sky Lab, and place the sun exactly where you want it in your picture.
Don't forget that you can also use infinite cloud planes, to add another level of clouds (and realism) to your work.
So; I promised to show you how to use a Picture Object for the moon, so let's do that now.
Open the Create Palette, and click on Leo to make a Picture Object. You will find yourself in the Picture Editor. (You go there before the actual creation, because the proportions of the object are decided based on the image you use.)
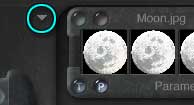
 Click on the square after Leo to add a new picture to the library, just as you did in Lessons 2 and 3. Browse your disk, and find the Moon.jpg picture that you should have downloaded with this lesson.
It will load into the first thumbnail. Click on Copy under that thumbnail, and then click Paste under the thumbnail in the middle. (It will ask if you want to delete, because it assumes that there is something in that middle thumbnail Alpha channel that you might want to keep. There isn't, so say yes.) We are going to use the same picture as a transparency map. The black areas will become completely transparent, and the gray areas will become semitransparent so that the color we are using for the sky will show through. This is just what we want.
Click the checkmark to close the dialog.
 You will find yourself back in your scene, with the picture object now visible. But, as you can see in the Nano-Preview, it's not a white glowing moon at all. It's a sort of dark smudge in the middle of your scene. We need to finish working on it in the material lab, and then we need to put it in the correct position in the sky.
So, click the M to enter the material lab.
If you look, you will realize that there is quite a bit of Diffusion Value, and very little Ambience Value. This is the opposite of what we need. We don't want any lights in the scene to affect the moon at all, because it's supposed to be too far away for anything but sunlight to reach, and we are faking the sunlight. We do want it to glow. So, turn the Diffusion Value all the way off, and slide the Ambience Value to 100%. Presto, a glowing moon.
While we are here, I want to show you a couple of other things.
There is a flippy triangle next to the row where the Component Palettes appear. Click on it.
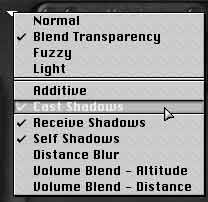 These are the Shading Modes. Notice that in the first section, Blend Transparency is enabled. This is what makes the transparency mask work. Whenever you want to have parts of your object completely transparent, not like glass but like there was nothing there, you will need to enable this.
In the second section, there are more choices. The three that we are concerned with here are Cast Shadows, Receive Shadows and Self Shadows.
Cast Shadows lets objects cast shadows on other things in the Bryce universe. We don't want the flat moon to cast its shadow on anything, so click to disable that.
Receive Shadows allows other objects to cast shadows onto this one. We don't want that, either. Disable it.
Self Shadows lets things cast shadows onto themselves, such as the ridges in your mountains casting shadows into the valleys, or a figure's outstretched arm casting a shadow onto her body. The moon can't really do that, because it's two dimensional. But we may as well tell Bryce not to look for them, to shave every nanosecond off the rendering time that we can shave. So disable that, too.
OK. The Moon looks like a moon. A flat, low one, but a moon. Close the Material Lab.
 Rotate the moon until it looks roughly square to the camera. (We will fine tune this in a few moments.) Then position it where you want in your scene by holding down the constraining keys (x and z,) and moving it in a zigzag along the X and Z axis until it's back behind your terrains, raising it on the Y axis when needed.
Or you can look at it from one of the Orthogonal views, and just drag it; but it's very hard to drag a 2D object lying in the same plane as the view. If you want to go that route I suggest that you tilt it a bit first, so you can grab it. (If you drop it, remember that it's easily selected from the square 2D Face object on the Selection Palette.)
Or you can go to the Top view, and use the Reposition tool on the Edit menu. Just grab the axis you want to move it on, and drag. Your object will move in the view. Pull it until it's as far as you need in one direction, then change to the other axis, and pull it into position.
 Change the Nano-Preview to Camera, Wireframe so you can see where it is, and pull it up on the Y axis the same way.
Then use the Rotate tool to rotate it so it faces the camera, if necessary, and the Resize tool to make it whatever size you want.
 You want the moon behind the other things in your scene so that the aerial perspective will work correctly. But you cannot move it behind the clouds; so we will be using cloud planes instead of the generated clouds for this picture.
Once you have it behind everything else, you will probably find that you need to enlarge it a good bit. Go ahead and do that now.
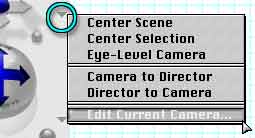 Alright. In order for it to look like a real, round moon it needs to be exactly square to the camera. We are going to do that numerically. Click on the second flippy triangle, next to the Camera Cross controls, and choose Edit Current Camera from the list.
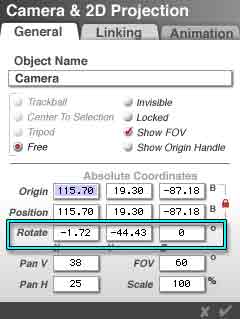 A dialog box appears, titled Camera & 2D Projection. This has the Attributes of your camera, just like the attributes of an object, although some of the choices are different.
The ones we are interested in right now are the Rotate settings. They tell us the exact angle of the camera. Write them down somewhere. (I keep a small white board next to my computer for writing things like this on. This cuts down on the amount of scrap paper that I use, and also makes sure I'm looking at the current set of notes.)
Cancel out of the dialog by clicking on the X.
Now open the Object Attributes of the moon by clicking the A in the Icon Column. Type the same values into the Rotate settings there. Close the dialog.
 There it is! Your moon is set exactly square to your camera.
You can use this trick whenever you use a 2D picture object, to make sure that it's lined up perfectly with the camera. If you change the rotation settings of your camera, you will have to change the ones for the object, too. So it's faster not to add a 2D picture object until the rest of the scene, including camera angle, has been set. But there you go.
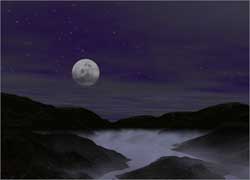
Add some cloud planes, if you want to, set up a night sky, and you can have a picture with a bright moon. Or you can have the moon visible in the sky during the day, or have two moons. This is the one I did. In this example, by the way, I used a volume material on a huge squished cube for the mist on the lake. Once again, explaining that is beyond the scope of this course; but the materials are there if you want to experiment.
Volume materials are very render time intensive, though.
A faster way to get ground fog, low lying clouds, and so on is to wrap a cloud texture around a sphere.
 To see how that works, remove the moon from your scene, and return to the default sky. (Don't forget, you can use "Save As..." to save a copy of your moon scene, if you want, so that you don't loose it.)
Create a sphere, and give it one of the Cloud preset textures. Bright and Bumpy works well. Just make sure, when you are looking at the Material Lab main palette, that the settings are what you are used to, and the round icon in the upper left corner says, "Surface." If it says, "Volume" click on it, to use the preset as a surface texture.
Do a test render, just to see what you have.
Now, enlarge the sphere, and nestle it down between two mountains, or anywhere else you want to see some mist. Squish it on the Y axis if your mist is too high for your scene.
Duplicate it with Command/Ctrl D, and put that sphere somewhere else in the scene where you want mist.
Continue, until you have all you want.
As you are doing this, keep a couple of things in mind. First, remember that the texture itself actually permeates the Bryce world. Dragging a sphere won't move the mist you see in it to another place; it will move the sphere to another patch of mist.
If you want mist stuck in the spheres, you need to change the mapping mode to Object in the materials lab, just like we did for the Metaball spoon.
Also, don't forget that you know how to resize and move textures. If the mist patches are too small, just go into the Material lab, click the greenish button at the top left corner of the Component palette, and enlarge the texture. (Remember, the smaller the number, the larger the texture.)
It that patch of mist would be perfect if it were moved just a hair on the X axis, move it.
Look at the preview set to Actual Selection to see what you are really getting.
You can also change the brightness of the mist by changing the Ambience Value. Don't forget that the color of the Ambient Light, set in the SkyLab or on the Shadows thumbnail of the Sky & Fog palette, controls the ambient color of everything in your scene. Or you can tint everything in your scene at once by changing the Sky Dome color.
 Also, don't forget that you can select all the spheres at once, using the Selection palette at the bottom of the window, if you want to reset the size of the texture on all of them at the same time.
Sometimes, when you are using this technique, you will be able to see the actual shape of the sphere. When this happens, first try resizing the sphere. That frequently solves the problem. (Resize it both up and down; either one may work.)
If that doesn't clear it up, try moving it slightly, or moving the other spheres around it. The spheres do interact, and sometimes that is where problems come from.
If all else fails, you can set it to Object Mapping mode, and move the patch of mist so that it's not against the edge of the sphere.
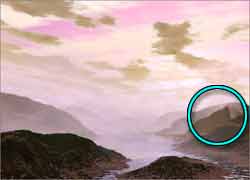
Be careful, because these problems can be pretty subtle, as well as glaringly obvious. And they can take forms you wouldn't expect. For example, in the middle of this picture of morning mist rising off the lake, there is a section of missing mist on the right.
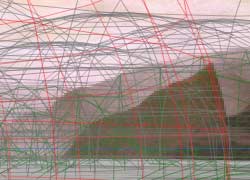 Looking at the Combined Display, render and wireframe at the same time, you can see the sphere that is doing it. (I've selected it, in case you might miss it.)
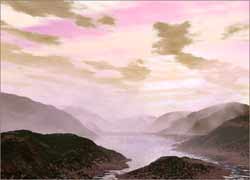 Shrinking the sphere took care of the problem.
 Now, I can hear you saying, "But Robin! There are dozens of spheres! How do I know which one to select from the list?"
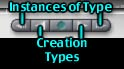
Simple. See the controls to the far right of the Selection menu? They are called the VCR controls, remember? Well, the buttons with the large arrows to the right and left cycle through all the types of things from the Creation palette in your scene. Those with the small arrows cycle through all instances of a type.
Select a sphere. Now, click on the button with the small arrow. Bryce selects your spheres, one after the other. Just stop when you get to the one that has an edge that fits the problem.
You can also step through all the objects in your scene, whatever their type, by using the tab key. Just start hitting Tab, and keep going until you select the thing you want.
You can use the Shift key to add objects to your selection, but only objects in sequence. In other words, you can select something, and hold down Shift while going to the next, and they will both be selected. But you can't skip the next thing, and select the one after that. You can select all four, or any one.
Things to remember about adding clouds wrapped around spheres. Keep 'em big. Watch for the way they interact. When in doubt, resize them.
Rain in Bryce! See Page 4