Note: I haven't used Bryce in years; so these tutorials are archived "as is." I can't accept questions, because I don't remember the answers.
This is page 4. If you haven't finished page 3, please do so before starting this page.
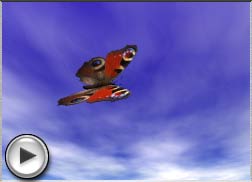
 Remember last week, when you were animating the butterfly, and I told you that there was a way to show the lag you would get if you had a camera actually trying to track a butterfly, instead of a computer doing it? I promised that we would go into that this week.
Well, the time has come.
The trick is not to track the butterfly at all, but to track a Null Object instead.
Null Objects are things that are invisible in the render; but which you can see in the wireframe view. They make the whole animation process much more flexible, because you can track them, and parent things to them, and use them as place holders, and change all kinds of things about your animation with hardly any more work!
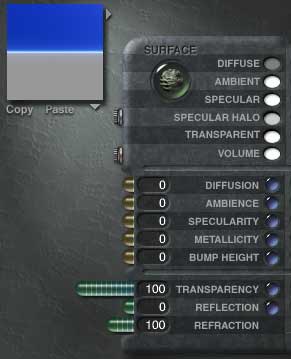
To make a null object, just set the material of the object to be totally transparent. Do that by taking the object you want to be a Null into the material lab, and setting all the Values to Zero. Set Transparency and Refraction to 100. Go to the Blending Mode flippy, change the mode to Blend Transparency, and turn off all the shadows. Your object will be invisible in all renders. But it will be there, and will be visible in the wireframe view.
Usually, you will want to just use a flat plane for the null object, since it's the smallest poly count. But, for some things, you might want a sphere or some other shape. Decide what is the smallest thing you can get away with when you need one, and don't forget that you can change primitives into other primitives.
For now, let's follow that butterfly again, but this time with the camera linked to a null object.
 |
 |
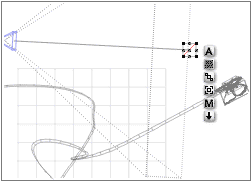
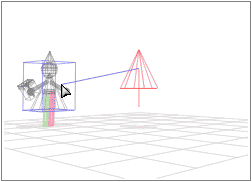
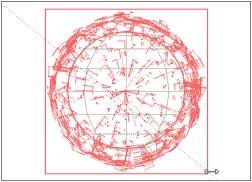
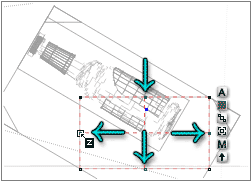
| Null Placement; Top View (The Null has been angled to make it easier to select.) |
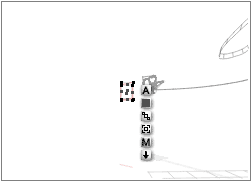
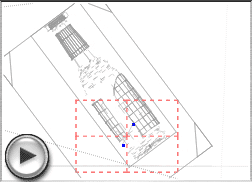
Null Placement; Camera View |
Open the Butterfly animation from last week.
Create a null object by clicking on the 2D Face object, and setting all the Values to zero, Transparency and Refraction to 100, turning off all the shadows, and setting Blend Transparency as the shading mode. Save this material as a preset; call it Null Object Material. We will be using it again.
Set the Camera to track the null by dragging from the Track icon in the camera Icon Column to the null object.
Finally, go to Frame Zero, and put the null nearly (but not quite) in front of the butterfly. (Don't forget, if you have any panning on the Camera, that you will need to set it back to zero in the Edit Current Camera dialog, so it won't be applied to the tracking.) Make a key frame for Position, if you don't have Auto Key enabled.
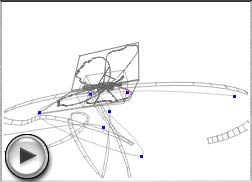 |
 |
| Wireframe Movie | Rendered Movie |
Step ahead a five or six or seven frames, using the comma key, and move the null so it's in the same general place as the butterfly. Make another key frame.
Continue in this fashion, moving a different number of frames each time so the motion isn't too regular, until you have gotten to the end.
Now, play the movie, and you will see that the butterfly is being tracked; but it's not perfect. It's far more like a hand held camera tracking the butterfly than like a computer generated animation. And that, of course, makes it look more realistic.
This same technique can be used all over the place, to make animations look far more real.
 Let's try it with spotlight set up to be a following spot. Following spots are lights that follow a specific object. That, of course, means Tracking in Bryce.
Put something in your scene to light, we'll call it the Actor. You can use anything you like; an imported figure, something you made in Bryce, or just a simple primitive. Make a set, if you feel so inclined. You don't need one to see how this works, but it might be more fun if you have one, so do whatever you like with it.
Set up the animation by disabling the sun, and setting the fog, haze, etc. to dark colors. Turn off the Ambience on the Ground Plane. Create a spotlight, and give it an Intensity of around 12, an Edge Softness of about 20, and No Falloff. (Or use whatever Intensity and Edge Softness suit you for your scene, of course. I'm just giving you a jumping off point here.
Set the Spotlight to Track the Actor, either by dragging from the Spotlight's Tracking icon (fourth down in the Icon Column) or choosing the Actor's name from the Track Object Name menu in the Linking tab of the spotlight's Object Attributes.
Drag the Spotlight up and behind the Camera, to imitate a spotlight in a theater. Give it a small half angle by shrinking it, and then pulling it out on its Y axis. (It is far easier if you use Object Space in the Edit menu for this, since it is already pointing at the actor. If you set the Nano Preview to Camera, you can see how much of the actor you are catching in the light as you change the angle.)
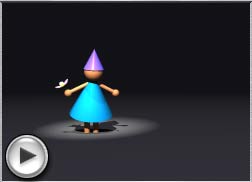 Now, move your actor around the set. The spotlight will follow perfectly, because it is tracking that object. It will never stray from the exact center of the light. If you go ahead and render the animation, you will see this.
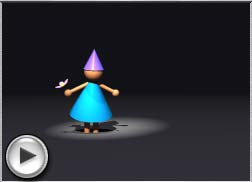 Try it again, but this time, track a Null Object, just the same way that you did for the butterfly. See how much more realistic that looks? You can even build gags and things in, where the following spot misses the actor, and then swings rapidly to catch up. As always, have fun with it.
I'm sure that you can figure out many more ramifications.
 Another thing you can do with Null Objects is use them as place holders for objects that will be added to the animation later. This is especially useful if you are working on a project for a client, or if you are inclined to change your mind.
You can set up the whole animation using a Null Object, and then parent the object you are actually going to animate to the null.
For instance, say you had a bouncing ball animation all set up, and then your client, or your boss, (or you,) decided the animation would convey the idea of Dog Toys better with a bouncing squeaky toy hamburger, instead of a ball. You can't change a ball into a squeaky toy using the Conversion palette! So you would have to set the whole thing up all over again. (Sigh.)
Unless the ball was actually the child of a null object, or a null object itself. Then all you would have to do is make the squeaky toy the child, and the animation would be intact, but with a squeaky toy bouncing around, instead of a ball!
Let's take a look at how easy it is. Open your Bouncing Ball exercise from earlier. Select the ball, and change its material to the Null Object Material.
Import the Squeaky Toy Burger from the ToyBurger.opb in this week's download into your Object Presets, and add it to your scene.
 Lock the ball, select the ball and the burger, and hit the blue sphere in the middle of the Align tool on the Edit palette to align them perfectly.
Zoom in, select just the burger, hold down the shift key and rotate it 90° on the Z axis. (It will roll better if it's on its side.)
Hold down Option/Alt, so it will scale from the center, grab a corner, and scale it so it matches the ball. The edge isn't smooth, so it won't be perfect, but it doesn't need to be. Make the bun about the same size, and don't worry about the stuff that sticks out.
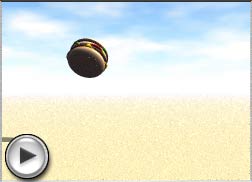 Finally, open the burger's Object Attributes, and choose the Ball as its parent.
That's all there is to it.
Preview your animation. You will notice that the burger bounces in exactly the same way the ball did, with the same rotation, the same squash, the same Time Mapping; everything is exactly the same. Do check it, though, to make sure that it doesn't need to be tweaked at the bottom of the bounce. (If it does, remember to tweak the null, not the burger.) Go ahead and render, and you will have a Bouncing Burger, instead of a bouncing ball.
(If I was really doing this for a client, by the way, I would change the lighting a bit. The light that was perfect for showing off the transparency of the beach ball doesn't work as well for the solid burger. But that is very minor. As it stands, I didn't tweak this animation at all, just to prove a point. <g>)
That was easy, wasn't it? And you can use it for any animation where you aren't sure what your final object or actor will be. Set it up with a null, and you can polish the actual object to your heart's content, without losing any of the animation. (In most cases of this kind of use, you will probably be better off using a primitive. Choose one that is roughly the same shape that your actor will be; but don't sweat over it too much. You can easily change one primitive into another, remember.)
I'm sure that you can see the enormous practical applications of this one. It's not quite as important for paths, because you can put anything on a path. But for trajectories, it's wonderful. You can change one species of butterfly into another, or into a fairy. You can change a car into a tractor into a bike. The list goes on and on.
This also works very well if there are several people working on the same project. One can set up the animation while another is creating the model, and when the time comes it can just be plugged in with very little additional work.
You can also nest nulls that you are using in this matter, so that the wings on the butterfly or the wheels on the car could be nulls that will take any kinds of wings, or any kinds of tires, so you don't even have to rework that. You can also add different motion to different nulls, and parent them, so that you could have a space ship that vibrates as it moves forward through turbulence, and still change the ship on the fly. (Null one with forward motion, null two as the child of null one, that has a repeating motion, and the ship as the child of null two. The ship would inherit the motion of both nulls, so it would vibrate and move forward.)
Nulls are also great to make realistic walk throughs of virtual rooms and spaces. Don't put the camera on a track; put the null on the track, make the camera its child. If you do that, you can control the alignment of the camera, which can give you much more realistic animations.
We'll be looking at that one when in Lesson Four, when we study terrains.
Nulls have endless uses, and I can't really say that we have covered them here; but I've introduced you to them. What you do with them now is up to you.
 There is just one more thing to cover this week; and that is animating using Booleans. There are all kinds of fun things you can do with them, based on the fact that Bryce booleans are Rendered Booleans. In other words, when you make a boolean in Bryce, you don't actually change the geometry of any of the objects; you only change the way they are rendered.
This means that you can move booleans through objects as you animate in Bryce. Why would you want to? Because you can get some pretty neat effects that way.
Let me show you what I mean.
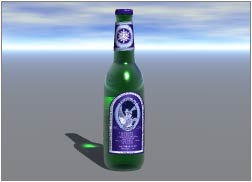
Import the Bottle.obp file that was included in this week's downloads to your Object Presets, just like you did for the burger, and load it into an empty scene.
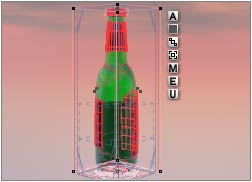
You will notice that it's a closed bottle of Ginger Brew.
We are going to make it half filled, and then slowly tip the bottle, and watch the liquid move inside of it.
This is possible because when I made the bottle, I made it with a solid insert that is exactly the shape of the inside of the bottle, and just a hair larger. This insert can be used to create an intersecting boolean in Bryce.
 Begin by rotating the bottle so that the labels won't be in the way. (We are doing this now, so when it's ungrouped and regrouped, the rotation for the groups will be zero. That just makes it easier later on.)
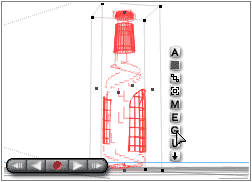
Ungroup the bottle. Hold down Control/Ctrl, place your cursor over the bottle, and choose the part named Bottle Intersect Body. Toggle to the selection Palette, and Select Inverse, so everything except the Intersect Body is selected.
Click on the red Solo button in the Selection Palette to hide the Intersect Body. (If you see the timeline, not the Selection Palette, click the round toggle button in the lower right corner of your screen.) Group the rest of the bottle again, and name it "Bottle Group."
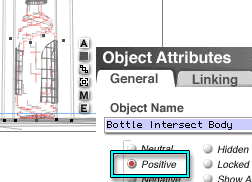 Click on the Solo button to unhide the Intersect Body. Select it, open its Attributes, and give it a Positive Boolean attribute.
 Create a cube. This will be the ginger brew level, so make it large enough to cover the bottle on the X and Z axis, and a nice level on the Y axis. (You don't want it to be up in the neck, unless you want to try making bubbles as it tips.)
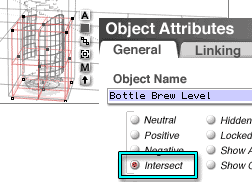
Name it "Bottle Brew Level" and give it an Intersect Boolean attribute. Select the Intersect Body and the Brew Level, and group them. Name the group "Bottle Brew Group."
 Open the Attributes for the Brew group, and set the Bottle Glass as its parent. Make sure all the Propagation options are checked. (We are choosing an element, not the group, as the parent, in case it becomes necessary to ungroup later. We won't have to redo quite as much work that way.)
Make sure you are at Frame Zero. Delete the ground plane, and put the sun behind the bottle from the camera's point of view, so you can see the transparency more easily. (This is a matter of taste, of course; and you don't have to do it if you hate it, but it helps.) Make any keyframes for the Sky and Sun, if you don't have Auto Key enabled, just to lock them in.
Alright, we are ready to animate! Make sure that you are still at Frame zero, select the bottle group, and make a keyframe for Rotation, if you don't have Auto Key enabled.
Select the Brew Level, and just click on the Add Key button, whether you have Auto Key enabled or not, to make a Key for All Timelines. (We need everything but Origin, and it's just easier to make them all, and then remove that one in the AML when we are done.) You have to do this manually, because Auto Key won't make keys for things that are part of groups, or children of other objects. You can make all the keys for those things that you want, so you can animate them separately. But you do have to make them yourself.
Move ahead in time, select the Bottle Group, tilt it on the X axis, and make another Rotation keyframe.
 Now to make the Brew Level work.
Change to the Left view, so this part will be easier, and zoom in. Hold down Control/Ctrl to select the Brew Level, and open its Attributes.
Change the rotation for the X axis back to 0. (The others should still be at zero.) At this point, you will probably have to change the shape of the cube so that it will still be larger than the Bottle Intersect Body. Grab the control handles in the middle of each side, and pull it out until it fits. (It's better to have it too large than too small.) Pull the Y handle down, if necessary, until the level looks about right for this tilt with the amount of liquid you had in it. (Liquid in a tilting bottle maintains its own level, so the top of the cube should be at about the same place in both keyframes. You can check for this by putting a sticky note on your monitor to mark the level, and then pulling the Y axis up or down to match.)
Check it from other angles, to make sure the whole bottle is covered. When you don't have any divots or corners out of your ginger brew, tap the Add Key button to make another set of keyframes.
 Now, scrub slowly through the animation by dragging the scrubber, or preview it while watching carefully, to make sure that the Brew Level cube is large enough to cover the Intersect Body for the entire length of your movie. If it's too small at any point, go to either end and pull it out a bit more, so that it will fit. It doesn't cost more memory to have a large cube, but it does cost more to have extra keyframes, so you want to keep them to a minimum.
Check from another angle, just to be sure. (It should be fine, but sometimes Bryce adds keyframes for no reason, or commits other strangeness; so it's always wise to check.)
When you've got it, go into the Advanced Motion Lab, and click on the Bottle Brew Level name to open the attributes. Hold down the Shift key, and click on Origin. Choose Delete All Keyframes from the pop up menu, and they will all vanish.
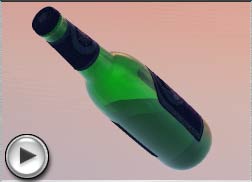 All that remains now is to get a nice camera angle, and render! You will have a bottle full of ginger brew that reacts realistically to being tipped.
I'm sure that you can think of other things to do with this principle. Make the brew slosh around in the bottle, or take the top off, put a straw in, and lower the level. Have water drain out of a tub or sink (or pool!) Blow a bubble, or eat an apple.
The possibilities are endless. Use your imagination, and have fun.