Note: I haven't used Bryce in years; so these tutorials are archived "as is." I can't accept questions, because I don't remember the answers.
This is page 3. If you haven't finished page 2, please do so before starting this page.
 |
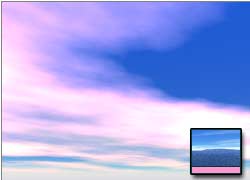 |
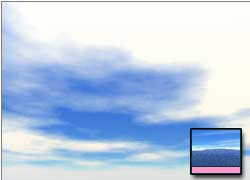
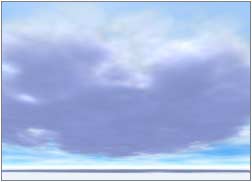
| Stratus Clouds with Pink Cumulus Color | Cumulus Clouds with Pink Cumulus Color |
Open a new scene in Bryce, and use the Pan tool pull the horizon down almost to the bottom of the work area. We are going to be playing with clouds for a little while, so we need to see plenty of sky.
Clouds can make or break your Bryce outdoor scene. The trick is to get clouds that look exciting or serene, fantastic or realistic, depending on your needs.
So, the first thing that we are going to look at is changing the kind of clouds that Bryce automatically generates for the scene.
We'll begin our tour with the Cloud Color swatch on the Sky & Fog palette. For a long time, this confused me. No matter what I did, it didn't seem to make much difference. Then I realized that this tab controls the color of the Cumulus clouds, and only the Cumulus clouds. If they aren't enabled, and you are using only Stratus clouds, you won't see any effect because there won't be any.
To add to the confusion, the default Bryce sky uses only Stratus clouds. So, if you are using that default sky, this swatch does nothing. Now, I know that if you took the Beginning Bryce course from me, you already know this. I'm only mentioning it here in case you didn't, and you found this control as worthless as I did for so long. (A problem that I know a lot of folks have, from the letters I receive.)
 Alright, now to get into some real nitty-gritty.
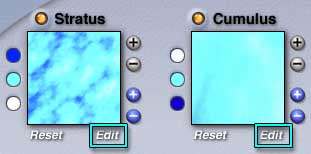
Go to the Cloud Cover tab of the Sky Lab. You will notice that there are two thumbnails there, labeled Stratus and Cumulus. On the left side of each one, you will notice three color swatches. If these do anything, I haven't figured out what yet.
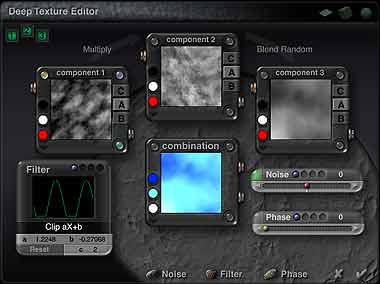
On the other hand, below each thumbnail, you will find a button to Edit the texture. Click on it, and you will be in the Deep Texture Editor.
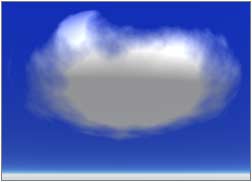
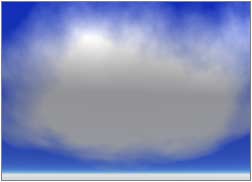
| You can get some beautiful effects by using the DTE to edit Cloud Textures | |
 |

Sky rendered using Stratus material shown. |
Once here, I find it easiest to turn off color and bump, and just work with the Alpha showing. Bryce will ignore the color, anyway; and I haven't been able to see any difference between the result with or without the bump.
Dark areas are clear sky, light values are clouds. Feel free to use more than one component. You can get some really interesting skies that way. Also, try adding some filters to the components.
Or add some phase, to get more turbulence into the clouds.
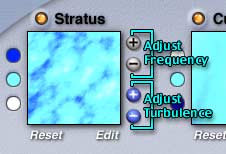 Once you have edited your cloud material it will be used for the rest of the things you do with clouds in this scene. You can go ahead and click the plus and minus signs to increase or decrease the frequency, and it will affect the frequency of the combination, just like using the Texture Editor in the Material Lab.
The turbulence buttons, at the bottom of the thumbnail, will also work on the entire texture, adding phase to the whole thing. (Which, of course, is what turbulence does in the first place.)
You can get some really amazing effects. A lot of them will be very surreal, and not what you want for a realistic scene. But some are great. And in any case, you have a lot more control over the clouds than you might have thought that you did.
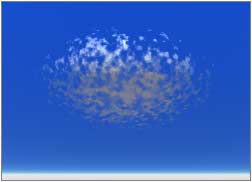
| "Bright 'N Bumpy" Preset, slightly tweaked, used for both examples Frequency Adjusted for size difference. (Second cloud is also farther away.) |
|
 |
 |
| Cloud Size 327.68 B x 155.76 B | Cloud Size 655.36 B x 311.51 B |
Still with me? Good. Let's look at free floating clouds; the kind that you can place wherever you want them.
The two basic rules are; Make them BIG. Whenever you decide to put a free floating cloud in your scene, hit the * key several times when making the first sphere object. (You can just duplicate it to make others.) Four or five times is good. I don't know why; but even when you adjust the frequency, big clouds simply look better.
| "Bright 'N Bumpy" Preset Cloud Material used for both examples. | |
 |
 |
| Frequency 65.9% | Frequency 4.9% |
The second rule; make sure the texture fits the sphere. Render that first sphere, before you duplicate it, and change the size (frequency) of the texture if you need to. Set it in the Material Lab first; but remember, you can also now go into the DTE and change the frequency there if the texture is still too small when you get to zero in the Material Lab.
Besides remembering these two rules, all you have to do is study clouds, and be patient. (Clouds, especially volume clouds, take A Long Time to render.)
 |
 |
| Wireframe | Rendered |
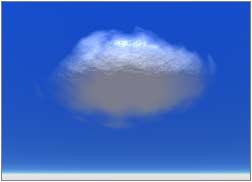
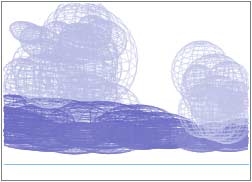
There are two kinds of free floating clouds; surface texture clouds and true volumetric clouds. We are going to look at surface texture clouds first. These will use the various cloud textures wrapped around a sphere. They are a cheap alternative for true volumetric clouds. (Cheap, because they take a fraction of the time to render.)
As with anything else, the more you know about how real clouds behave, the more realistic your clouds will look. So, if you are trying to achieve a towering thunderhead, it's worth going outside and looking at them. If you live in the wrong part of the country, or it's the wrong time of year, you can still look up pictures in books or on the Web. Not as good as the real thing, but better than nothing.
When you start to build them, you may find that you want to use several different frequencies on the different size spheres that you make. You may want some spheres to be squashed, and some not to be.
Do whatever you need to build your clouds.
The big problem with wrapped spheres, of course, is that they often interfere with each other. This problem is most easily solved by finding the offending sphere, and making it larger, increasing the transparency, or editing the texture to change its resolution or placement, whichever works best.
When you are finished, you might have something like the picture above. It's made from all of the spheres shown, using the Cotton Ball preset texture.
 |
 |
| Wireframe | Rendered |
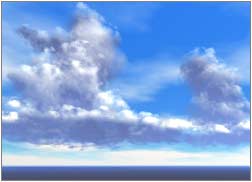
To overcome the problem of interference, you can use volumetric clouds, instead. I'll warn you, though, that they take forever to render. It's best to be very patient (or render overnight.)
We are going to just touch on volumetric clouds. They are fairly simple to set up and use, if you just keep the two basic rules in mind. (Make them big, and make sure the texture fits the object, remember?) But they take a long, long time to render. So use them with care.
Possibly the easiest way to set up volumetric clouds isn't to use a sphere at all; but a huge, flattened cube. Set it up so that the front edge is in front of the camera, to get an impressive cloud bank that looks like a storm front rolling in.
Then just sit back and render. Overnight. Or longer. As with all volumetrics, you can set them to render quickly at a lower quality, or more slowly at a higher quality. In my experience, the higher quality is pretty much necessary in clouds, or you can see a strange sort of layered effect.
 Let's actually set one up, and take a look at how it's done.
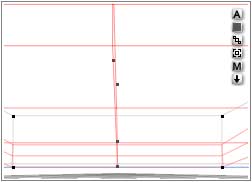
Begin, as always, by opening a new scene. Create a cube, flatten it, and then hit the * key five times. This will give you a big, flat cube.
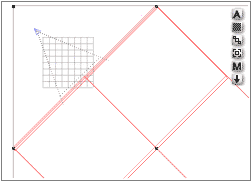
Rotate it 45°, so that it is square to the camera, and pull it back until the edge of the cube is about even with the dotted line at the end of the perspective triangle. In camera view, pan down so that the sky covers most of the view, and there is a little space left above the cube.
Save the scene, and disable Auto-Preview in the Nano Preview. You won't want this to draw every time you try to move; only when you want to see what it looks like. Redrawing the Nano Preview while using Volume objects can seriously cripple Bryce.
Take the cube into the Materials Editor, and make sure that the preview is set to Current Selection so you can see how these clouds will actually look on your object.
Go to the Presets, and choose Soft Cumulus from the list under Volume. (Or something else, if you prefer. I used Soft Cumulus for the ones I did above.)
Now, let's take a look at the choices in the Material Editor. I'm assuming that you already know how to use Volume Materials. Take a look at the bottom, at the Quality/Speed slider. If you push it toward the rabbit, you will notice that your preview updates very quickly. If you push it the other way, toward the turtle, you will find that even the preview slows considerably. That's a hint.
Now that you know how to use the DTE, feel free to go there and tweak these textures. You may decide that they don't need quite that many octaves, for instance, or that the phase isn't worth it. You know how to use it; so use it.
When you are happy with the Material, leave the Material Lab, and click on the Nano Preview to render a thumbnail. Impressive, huh? If you feel so inclined, you can hide this cube while you put a mountain or something under it in the picture. That looks really stunning, if it's well done. (You want to hide it while you are working, because otherwise it will take a long time for the Nano-Preview to update when you click. Bring it out only to check for shadows, etc. Solo Mode is our friend!)
When you are ready to quit for the night, set this to render at the smallest size you can. You will see how wonderful and impressive volume clouds are, and also why you will probably want to save them for special pictures. I don't even want to think about animating them!
But we can animate normal Bryce clouds very easily! Let's see how.
Open a new document, and go into the Sky Lab.
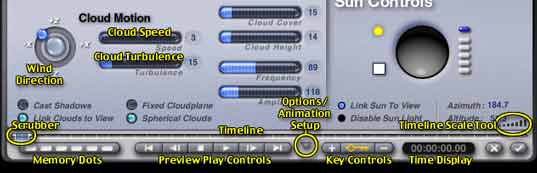
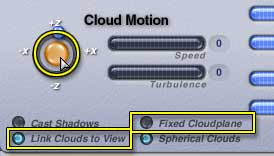
Click on the Cloud Cover tab, and let's take a look at the animation controls at the bottom of the window.
Look familiar? They should! We have the same timeline, the same Timeline Scale tool, the same arrangement to add keyframes, the same play buttons, the same memory dots, the same SMPTE time readout (although it's in a different place) - the same tools.
We also have one new thing; the Cloud Motion controls. One for speed, one for Turbulence, and one that is a little round thing with the X and Z points noted on it, and a little shiny blue ball.
That, as you may guess, controls the direction of the Wind, which in turn blows the clouds around. You can set it and make keyframes just the way you would make them for anything else in Bryce. Be aware as you do so that the ball is showing which direction the wind is coming from, not which direction the clouds will move. They will actually move the opposite of the direction you set here, because the wind is pushing them.
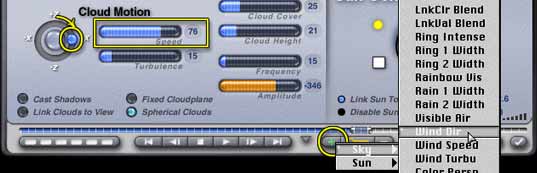
Make sure you are at keyframe zero and that the Cloud Speed is fairly high, set the Wind Direction to +Z, and make a keyframe for Sky > Wind Dir. (Make one for the Wind Speed, too, if there was already a key here.) Move out to three seconds or so, and set the direction to +X. (You will probably have to scale the timeline to do this. Just drag on the Timeline Scale Tool, of course.) Make another keyframe for Sky > Wind Dir.
 Play your animation, and you will see the clouds scudding across the sky, changing direction as they go.
That is all it takes to animate the sky. As you can see from the extensive list of attributes, most of the things here can be animated. Feel free to play with it for a while, and see what you can do! It's lots of fun.
Of course, you can use the same thing to tweak the sky for still pictures. Want that cloud formation to be more to the right? Set the speed and direction, and just run it over there. Want the cloud shadow to cover this hill, and not that one? Same thing. Animate the sky, and just play it until the shadows are where you want them.
I recommend only making keyframes for things that you are actually animating, to keep the file size down. It's easy enough to do. It also makes it much, much easier to edit later if you want to go into the Advanced Motion Lab and work with it. But, if you are animating a lot of aspects of the sky and don't think you will want to edit your animation, you may want to use Auto Key. It's up to you. Like everything else, it's a tradeoff.
If you aren't going to be just clicking the Add Key button to make keyframes, I highly recommend clicking the Subtract Key button to eliminate all the keys in the zero frame. (Depending on the sky you are using, they are likely to all be there.) Not only does that keep the file size down, but it lets you tweak the attributes you aren't animating at any point in time, and they stay tweaked. Otherwise, you are going to be adding and subtracting a lot of keys you don't really need at all.
Also, if you change your mind and load a different preset at any time after you have begun animating, you will probably have to eliminate all the keys for the sky, or it will simply revert to the old one.
 To stop the wind, so the clouds no longer move at all, click in the middle of the Wind Direction button. It will turn amber when you click, and both the Speed and Turbulence sliders will be reset to zero. You do have to make keyframes, as always, if you want the change to stay in the animation (unless you are using Auto Key.)
If you are animating something else, and you want the clouds to look like they are remaining in the same place as you move along the ground (which gives the illusion that they are very far away, as clouds should be) enable Link Clouds to View. If you are rising towards the sky in your animation, and you don't want to actually get any closer to the clouds (same illusion) enable Fixed Cloudplane.
Alright. You can go and play with it now. But don't take too long, because we still have a lot of ground to cover this week.
Ready? So much for earth and air. Let's take another look at water.
 We've already made a couple of streams and waterfalls. I think it's time to head for the sea!
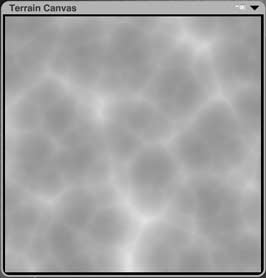
Open a new Bryce document, and create a terrain. This is going to be the surface of the ocean. There are a number of built in fractals that make good ocean surfaces. Choose the one you want to show the nature of the ocean in the scene you are building. My favorites are Pocked, Warped Zorch, and Ridged Multifractal.
As a general rule, Pocked makes the choppiest ocean, and Warped Zorch is best for smooth, rolling waves. Ridged Multifractal is in between. This does vary, of course, depending on the actual random terrain that is generated, but it's what I usually find.
You will want Massive Resolution on the terrain that is going to be the foreground (we'll put in others, at lower resolutions, if we need them later.) So set the grid to at least 1024; more if your scene needs it, or your computer can handle it easily.
 Leave the Terrain Editor, and hit the * key a few times, to enlarge the terrain. After all, Massive Resolution exists so that a terrain will look good when it's very close or very large. This one is going to be both.
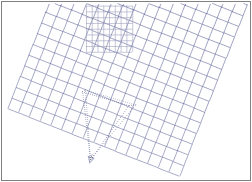
Go to Top view, and place your camera on the edge of the terrain (or the terrain on the edge of the Camera view plane, if you prefer.) Then use Camera view, and move the terrain, the camera, or both until you have wave formations you are happy with in the foreground. Watch the Nano Preview to see what you are getting, and don't be afraid to use banking. After all, with a scene like this, close to the waves, it can be assumed that you are in a small boat; and they do tend to bank with the waves!
 When you are happy with the placement, and like the look of the waves in the view, it's time to set the lighting. This should be done before you create the material for the waves, because lighting can make a huge difference in how transparent and semitransparent materials, like these waves, are going to look.
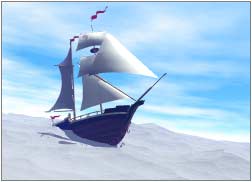
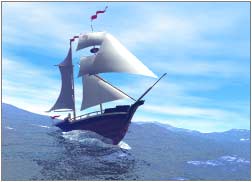
If you are adding an object to the scene, such as an island, ship, water mammal, etc. do it now, and set the lights so they will accomplish what you want for that object. This is especially true if you are using a flat plane picture object, and need to match the lighting to it. (This model, by the way, was made by Chris Bradley. I downloaded it for free from Lannie's 3D Model World at http://3dmodelworld.com when I wrote this course. Sadly, that site now appears to be exclusively Poser content, and I can't find Chris' models anywhere.)
 |
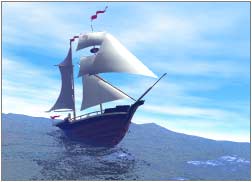 |
| Texture Used: Wave2 Preset |
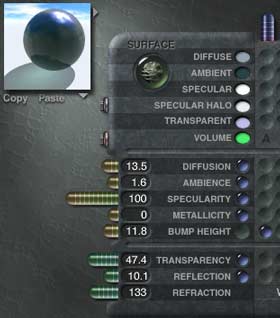
Once the light is perfect, it's time to pick the material for the water. Once again, what you pick depends on both the character of the waves you have chosen, and the feeling you want for your finished picture. The more transparency you have, the brighter the waves will look and the longer the render time will take. With less transparency, you will have darker waves, but shorter render times. As always, it's a trade off.
If you are using transparency, though, I strongly recommend that you make the terrain solid.
When you have it the way you want it, select the ground plane, and give it the same material. (If it's a custom job, and not a preset, it's easiest to simply copy the material from the terrain, and paste it to the ground plane.) That will give you water that goes to the horizon, and matches what you have, always assuming that you can see the horizon line above the water terrain. If you can't, this step is probably unnecessary. But you might want to try it, since it will have an effect on transparent water material.
 Do a test render, and, if necessary add more terrains from the same pattern. (Remember, to get more like this one, just disable Random Extant and Random Character.) They won't need to have as high a resolution, so they will be faster to render, and smaller to store.
Just put them in wherever you think you need them. There is no need to make the edges match up, unless the water is very transparent, and you can see the seams. If that happens, you know how to make a large grid.
 |
 |
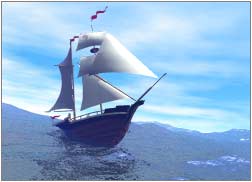
| Wake Attached to Boat |
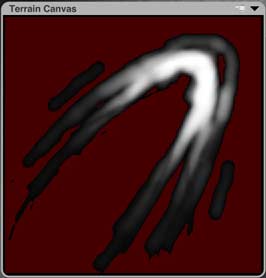
If you are putting a boat in, and want a wake, there are a couple of ways to do it. Both start with creating another terrain, going into the Terrain Editor, and drawing a wake.
If you want to put the wake in first, and then plop the boat onto it, you can do it essentially the way we did the wall earlier in this lesson. Use the same trick we used with the wall that conformed to the mountain to make the wake conform to the water, and then give it a foamy material. (Foamy Seawater from the presets works well, or you can make your own of course.) The disadvantage of this method is that you can't position the boat while in Camera View; you have to stick with the pre-made wake.
If you would rather attach the wake to the boat, simply give it the foamy material, group it with the boat, and you are all set. The disadvantage of this one is that the wake won't float on top of the water; but will sink into it (or, worse yet, stick out rigidly from it) in a most unrealistic fashion. As always, it's a trade off.
(If you want to examine the materials that I used for this picture, I've included them in this week's download.)
Go on to Page 4, and I'll show you how to put a ring of surf around an island.