Note: I haven't used Bryce in years; so these tutorials are archived "as is." I can't accept questions, because I don't remember the answers.
 This page looks at each of the filters available from the Filter dialog in detail. When you are finished looking at them, you can return to Page 3 if you need to.
All of the examples use the same texture; 3D Weird Value, with 1 additional Octave, Standard blending. XY and YZ directions are both 0, and the Frequency is 34 across the board. The colors are shown; the color mode is Linear Interpol3.
The filter settings vary from example to example, but they are all shown. In addition, you can see both the plain Alpha channel, and the Color channel, so you should be able to get a fair idea of what is going on here. Notice that the Red in the top swatch is mapped to the black Alpha, the yellow in the bottom to the white, and the blue to the 50% gray. The blending and mixing of colors, of course, is due to the shades of gray.
| None | ||
 |
 |
 |
 |
||
The first one is None, which is exactly that. When you see it, this component isn't using a filter. (Not all of them do.) If you cannot drag the filter at all, make sure it's not set to None.
| Quantize | ||
 |
 |
 |
 |
||
Quantize (Xa+b, c) is like Posterize in Photoshop. It creates a stair step graph, which also makes stair steps in the values. The number of steps is determined by the value of c.Now, the value of c is tricky to set. There isn't any way to just type a number in any more, so you have to be slow and gentle moving the mouse, and hope for the best. (And write to Corel, and ask for direct numerical entry all over the DTE.) Reset will always return c to 2, if you get hopelessly out far from where you want to go. But it will also set a to 1, and b to zero, so be careful. You have one undo here, remember, but only one.
| SawWave | ||
 |
 |
 |
 |
||
SawWave (Xa+b) bounces the wave when it gets to the top or bottom of the graph, instead of clipping it. This creates an effect that we used to call "Solarization" in my old photography classes. the values that should be light become dark again, and the ones that were dark get lighter, making bands around the shadows and highlights. Be careful with this one, as it can get very noisy with some textures, and slow rendering time considerably.
| Sine Wave | ||
 |
 |
 |
 |
||
Sin(aX)+b is a sine wave, that also creates rings as it bounces back and down from top to bottom. The difference is that the rings are much smoother here, since the wave is gentler. This one is used for things like wood grain, malachite, or raindrops on a puddle; anything where you want rings around rings around rings. The higher the value of a, the more rings you'll get.
| Absolute | ||
 |
 |
 |
 |
||
Abs(aX+b) is the absolute value of the sine wave. It bounces the black values, but clips the white ones. This has the effect of favoring the light areas, since things can only get so dark before they are sent back into light again. Which gives you extra detail in bump maps and things like that. (Check it out by just dragging on b.)
| X Power | ||
 |
 |
 |
 |
||
(X pwr a)+b makes a bell curve, and clips at the top. This leaves points that go towards the bottom as a decreases, so that the darkest areas are decreased, and the middle range is smoothed out.
| Gaussian | ||
 |
 |
 |
 |
||
Gaussian(a(X+b)) makes a bell curve, too, but clips the bottom and bounces the top. This has the effect of making the darker areas a solid color, and causing rings to form in the lighter ones.
| Clip | ||
 |
 |
 |
 |
||
Clip aX+b is the one used the most often, and it's where we started in the main lesson. It's the Contrast filter. Both ends of the curve get clipped; the more they are clipped, the higher the contrast. Of course, you can also smooth it out, as we have seen, and use it for low contrast if you prefer.
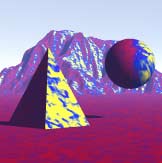
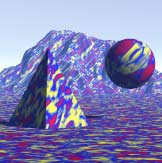
| Altitude Minus Slope 1 | ||
 |
 |
 |
 |
||
| Altitude Minus Slope 2 | ||
 |
 |
 |
 |
||
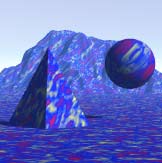
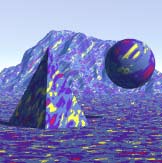
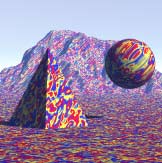
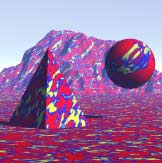
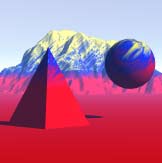
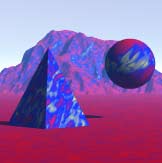
Xb+a(Altitude-Slope) adjusts the noise so it only shows up when slope and altitude are at certain configurations. (You can see this better if you change to a sphere preview.) According to the manual, when a is positive and b is negative, you get noise on flat surfaces at high altitudes. When a is negative, and b is positive, you get the noise on steep surfaces at lower altitudes. In either case, you get the color in the top swatch at low altitudes.
You can see what you are going to get by looking at the preview. The bottom shows what is going at low altitudes. The top left corner shows what happening at high altitudes. The right side shows you what you will have on the slopes. I will admit that I rarely use this one; but when I do, I ignore all the stuff about positive and negative a and b, and simply keep my eye on that preview.
| Slope 1 | ||
 |
 |
 |
 |
||
| Slope 2 | ||
 |
 |
 |
 |
||
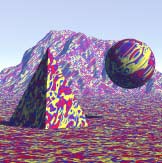
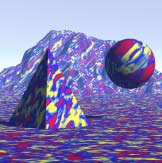
X(a*Slope+b) is what you use to put noise on either flat surfaces or steep ones, depending on what you are looking for. The manual says that a determines the steepness of the noise, with -4 being horizontal, and 4 being vertical. It also says that b controls the starting point of the transition, and recommends putting it between 2 and 1.5. I find it much easier to just go by what I see in the preview, though.
If you want to work primarily with the preview, the stuff on the left side of the preview will be on the flat (horizontal) surfaces. The stuff on the right will be on the steep (vertical) ones. The area in between belongs to surfaces that fall someplace in between, and depends on the angle of the surface. If you let the curve go flat to the bottom on either side, you will get solid color on those surfaces. (Which color you get will depend on the Color Mode you are using, but you'll be able to see it pretty easily. For most modes, it'll be the one in the top swatch.)
| Altitude | ||
 |
 |
 |
 |
||
X(a*Altitude+b) is the one that is used to distribute the noise according to altitude. The a number determines how sharp the transition from noise to no noise (solid color) is, and the b number determines when the noise starts. Usually, if you want the noise to be at the top of something,, you will want a higher than b. In fact, you will probably want b to be negative. For noise at lower altitudes, such as the dark water on the bottom of stones and things like that, you will want a to be lower than b, and quite possibly negative.
When looking at the flat preview, the stuff at the bottom will happen at low altitudes, while the noise you have at the top will occur at the higher ones. On the curve, the right side is the high altitudes, and the left is the low ones. If either end goes flat, it will stop using noise and just use solid color beyond that point.
| Orientation | ||
 |
 |
 |
 |
||
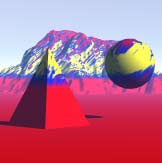
X(a*Orientation+b) does pretty much the same thing, but in respect to east and west instead of up and down. For more noise on the east side, you want a higher than b. For more on the west, b should be higher than a.
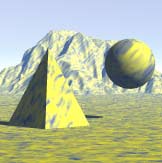
If you want to do this visually, the left side of the swatch is East, and the right is West. (I know. But I didn't write it, I'm just reporting it.) In practical terms, though, unless your object is round, you will get a lot more of the "West" side than the "East." For instance, on a pyramid, the side that is closest to Bryce East gets "East" and the other three all get "West." (Which, I feel, is a pretty high value of "West.") Just be aware of this, and you can make it work for you.
The advantage of using Altitude and Orientation here, instead of with Color Modes, is that you have complete control over where the changes happen, and whether or not things go to solid color. The disadvantage, of course, is that filters take additional time to render.
| Smooth Clip | ||
 |
 |
 |
 |
||
Smooth Clip aX+b is just like Clip aX+b, except that the graph is smoother (naturally) which gives you a kind of ease in and ease out, and softens the difference between the tones in high contrast alphas. It still clips at both top and bottom, though.
| Snow Puddles 1 | ||
 |
 |
 |
 |
||
| Snow Puddles 2 | ||
 |
 |
 |
 |
||
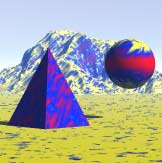
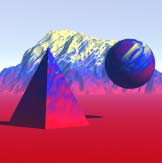
And, finally, Snow Puddles is used for making snow (surprise!) The manual says that the higher a is, the more the noise affects the snow. If a =0, the snow will be smooth. The higher b is, the lower the altitude where the snow starts; the lower b, the higher the snow cap. The higher c is, the flatter the surface needs to be for the snow to cover it, the lower it is, the more easily the snow sticks to steep surfaces.
That part is right, but I think the stuff about a and b is backwards. It seems to me that the higher a is, the smoother the snow becomes. More texture shows through at lower numbers. Low values of b also make the snow start at higher altitudes, not lower ones. Negative b values can melt the snow right off the ground, even if C is very low! (Try using negative values of both for snow that sticks to all the high altitude surfaces, and isn't on the ground at all.)
Once again, I find myself just looking at the Preview. High altitude is in the upper left hand corner. The larger the white space in that corner is, the more snow you have. The less noise is there, the smoother the snow will be. The corner can quickly run all the way down the side; and the farther it comes towards the right, the lower the altitude where the snow starts. If you only want a little, keep it scrunched up there in the top.
The snow color, by the way, will be the one that corresponds to white alpha for whatever color mode you are using. It's not like color mode snow; you can make it any color that you want.
Alright! If you came here from the middle of the lesson, you can go back to Page 3 now.