Note: I haven't used Bryce in years; so these tutorials are archived "as is." I can't accept questions, because I don't remember the answers.
This is page 4. If you haven't finished page 3, please do so before starting this page.
 |
 |
| Keep the brush small and soft, and use the minimum flow. |
The second way, and the only way we had until recently, is to draw a SymLat of the water, and use that.
I'm not going to go into the whole process, because you should be very familiar with SymLats and how to use them at this point. I'm just going to show you one example. Use a small brush with the minimum flow and maximum softness. Set the Brush Behavior to Maximum, and build up the strokes slowly. Every so once in a while, lower the whole thing and brush some more. Continue until it looks about right to you. Study the flow of actual water to get the idea. (Doing the dishes is one way to do this, and pretend to your family that you are, too, doing chores, at the same time.)
You can take it from here, I'm sure.
 |
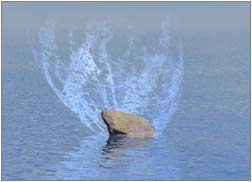 |
For a beautiful splash that is much cheaper to make than the metaball one (both in terms of setup and render) you can use a cone, sphere, or terrain and a splash material. When I wrote this, Peter Sharpe had an excellent one free to download with his splash tutorial, but that's gone now. However, you can use the DTE, so you should be able to make your own without too much trouble.
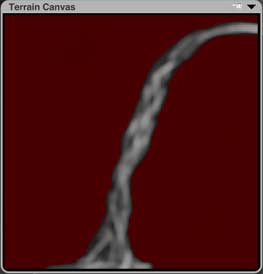
 The other thing I wanted to show you will only take a moment as well. This came up on the IDD boards that I used to frequent when one of the members wanted to make a picture with driving rain in it. A user called Pixel had what I think is a pretty successful answer to the question. Use a terrain!
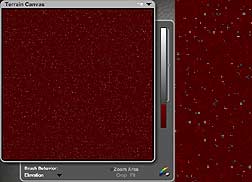
Create a terrain, and take it into the terrain editor. Click on the New button, to start with a flat surface.
Change the grid to Ultra Fine or Massive Resolution for the rain that is close to the camera. (You can use lower resolutions for sheets of rain that are farther away.) Then drag on the Basic Noise slider to make random noise all over your terrain canvas. Add some Spikes to it, too, if you feel so inclined.
When you have a fair amount, clip the bottom so the individual spikes are, well, individual.
 |
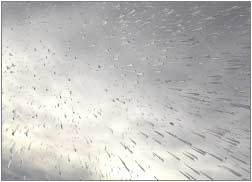 |
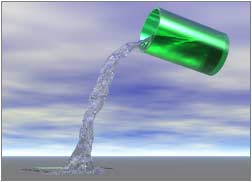
Exit the Editor, and enlarge your terrain. Rotate it, and then pull on the Y control handle to skew it. Finally, give it a Water material and render. You will have a sheet of individual raindrops that actually react to the things around them like water does. Put in several sheets for driving rain.
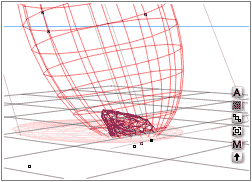
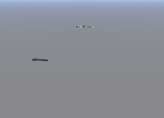
The biggest problem with it is that the terrains are difficult to see while you are setting it up, as you can see above to the left. The solution is simple, though. Just remove or reduce the clipping plane during setup. Put it back when you are ready to render.
A little render intensive, compared to some of the other rain methods, but it can be stunning. It's a trade off, of course, like it always is.
 Alright, now we come to animating a few things that I didn't have time to show you how to animate before. The first one we are going to cover is Materials.
Virtually all aspects of materials can be changed over time, including the texture component that is used to generate the color. Create a sphere, and take it into the Material lab, and we'll take a look.
If you look at the bottom, you will see all the familiar tools to create animations. I'm not going into any of them individually, since you should know what they all do by now.
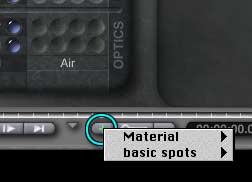
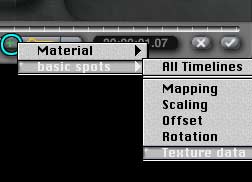
Instead, just click in the A hollows to generate a texture component. Now, look at what is listed under the Create Key button. You will notice that there are two separate choices; Material and the name of the Texture Component you have generated. They are animated separately.
In fact, each texture component will be animated separately. Load a preset with more than one, and you will see that each gets its own line. Furthermore, if the Material you use is from a preset, its name will show up here, too. (If no texture components are being used, no material name will be listed.)
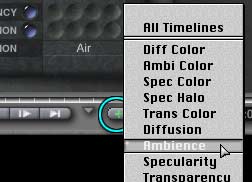
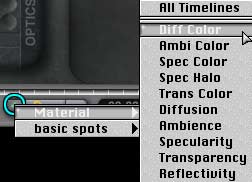 Disable Auto Key, and I'll show you what I mean. Create a key in frame zero for this color (Material > Diff Color, and Material > Ambi Color if you are using the texture in the Ambient channel, too.) Move the scrubber out along the timeline, and choose another texture from the popup available under the flippy at the upper right hand corner of the Texture Component palette.
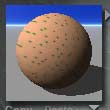
| Color Animation; Texture changes from one to another | ||
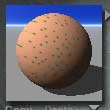 |
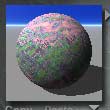 |
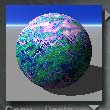 |
| 00:00:00.0 | 00:00:00.11 | 00:00:01.07 |
Make another Diff Color keyframe, and another Ambient if you are using that. Hit the Play button to preview the animation, and you will see the preview window showing the sphere changing from one texture into the other.
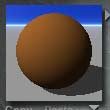
| Color Animation; Texture changes from one to another | ||
 |
|
|
| 00:00:00.0 | 00:00:00.11 | 00:00:01.07 |
Delete the last keys at the last frame, and return to the first frame to force the screen to refresh. Return to the last frame. (Don't be alarmed if the old preview shows. That happens sometimes. Just make sure the correct texture is showing in the Component Palette.)
Open the DTE, and do something to the texture. Anything that will make it look different. (Except turning off a component. That doesn't exactly animate, it just flicks on at the key frame.) Make the Material keys again.
Now, run the animation. Your material doesn't change at all; it remains in its changed state. The change in the texture component wasn't animated.
 Go to the last frame, select the name of the component, and make a key frame for Texture Data.
| Texture Animation; Texture data changes from one to another | ||
 |
 |
|
| 00:00:00.0 | 00:00:00.11 | 00:00:01.07 |
Go back to the first frame, and make another change. This time, add the key. Hit play, and you will be able to see your material animating. (Hit it twice, since the first time it's really building the animation. It plays much better the second time through.)
The example above came from flipping the alpha, by the way. You should try it; it runs through the whole gamut while it goes, and looks really interesting.
Okay. Remember that these things are animated separately, and we'll move on.
 The next thing I'm going to show you, while we are here, is how to make a water texture move realistically. (Yes, we are talking about animated waves, here.)
Clear out all the keys by holding down Command+Option+Shift on a Mac, or Ctrl+Alt+Shift on a PC, and clicking the Remove Keyframe button. (The alerts don't show up here. Presumably because you are only removing the keys for materials.)
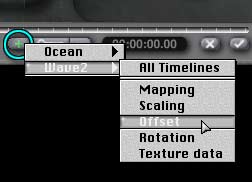
Load a water material. Any one will do. Make a keyframe for the Texture > Offset at frame zero.
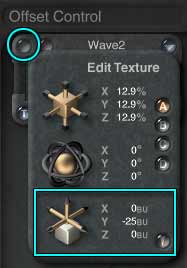 Go to the last frame, and open the Edit Texture dialog (the greenish button.) Drag down on the offset icon, to offset around -25 B or so on the Y axis. Make a keyframe for Offset, and play it. You will see your water animating. Neat, huh?
You can use that later if you want. It makes much more realistic water than moving it along on either of the other axes does.
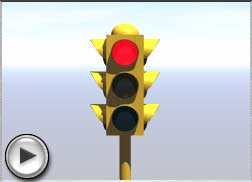
 Let's practice animating materials by animating a traffic light. Load the Traffic Light.obp that was in this week's downloads.
Select the Traffic Light Green 1 mesh, and bring it into the Material Lab. Change the Diffusion and Ambience values to around 6 or 7.
Make a keyframe at frame zero for Ambience. Make another at one second, and a third at two seconds.
Go to the second one, at one second, and step forward two frames using the period key. Change the Ambience to 100, and make a keyframe.
Hit Shift+Period to go to the next keyframe, at two seconds, and step backwards two frames using the comma key. Change the Ambience back to 100, and add another keyframe.
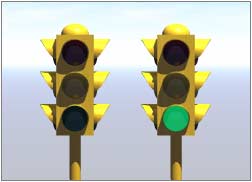 Play the preview, and you should see the light go from off, to on, back to off. Before you leave the material lab, hit the Copy button under the preview. Exit and save.
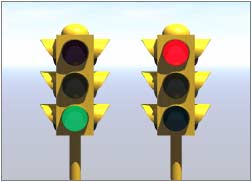
 Select the Traffic Light Yellow 1 light, and take it into the Material Lab. Use the Paste button under the preview to paste the green light in here.
Change both the Diffuse and Ambient colors to traffic light yellow, and change the hue of the Specular Highlight color. Play the animation, and you will see the light here changing, too. (See why we only make keyframes for the things we need? If we had made them for everything, we wouldn't be able to change the color this easily.)
The problem is that the sequence is wrong. If we use it like this, the green and yellow lights will be on at the same time, and traffic will snarl like everything.
So, go to the keyframe two frames before the green light went off; frame 00.00.01.13. Change the Ambience to 6.7, and make a keyframe.
Scrub out to Frame 00.00.02.07, thirty seconds later, and make another.
Go back to the one where the green light turned off, at two seconds, and turn the yellow on by changing the Ambience to 100.
Skip to the next keyframe (00.00.02.07,) go back two frames, and make another at Ambience 100. Finally, go to the frame where the green light turned on, at 00:00:01.02, and turn the yellow off by changing the Ambience back to 6.7.
Play it, just to make sure it's all as it should be. It should be off from the beginning, turn on for the keys at 00:00:02.00 and 00:00:02.05, and then be off for the remaining key. (We'll remove the extra frames soon; but first we want to make the red light.) Copy this texture, and leave the Lab.
Preview the animation, and you should see the light change from green to yellow. The red light is still missing, of course; but not for long. Select it, and take it into the Lab.
 Paste the material, and change the color to traffic light red, of course.
Now, since both of the other lights started off, the red light has to start by being on, of course. So, while you are still at frame zero, turn it on by pumping the Ambience up to 100, and make a key.
Move to the key at frame 00:00:01.00, pull the Ambience slider back out to 100 again so it will stay on for its full cycle, and make a key. (We don't need to make a key two frames from here, where the light turns off, because it's already made from when we turned the yellow light off.)
Skip to the key at 00:00:02.05, turn the Ambience back down to 6.7 to douse the light, and make a key. (Don't worry about the keys in between, because we will be getting rid of them.
Go to the last frame, at 00.00.02.07, and set the light back to 100 so that it will repeat seamlessly when we ask it to in the AML.
Finally, remove the extra keyframes, where the light doesn't do anything, or turns on when we don't want it to.
This light should have keys to be on at 00:00:00.00 and 00:00:01.00, off at 00:00:01.02 and 00:00:02.05, and one for on at 00:00:02.07. All other keys should be gone.
 Leave the Lab, and play that, and there you go! The quickest light in the west. (Glad I'm not trying to make it through that intersection!)
I'm sure you can look at this and figure the rest of it out. It all works this same way. You are all bright people, and I'm confident of your abilities. Naturally, you can also do all the things you do in the AML to materials there (change curves, scale things, add, remove, or copy keys; all that stuff.) If you do have questions, don't forget to post!
One more thing before we leave here. As you saw, if you copy and paste an animated material, you will also paste its keyframes. So you can move things around, keys and all, very easily. Presets don't keep their animation, however.
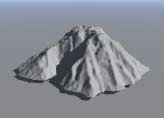
 Moving on to animating terrains. If you open the Terrain Editor, you will notice that once again the controls are all there, just where you expect them to be, and they behave just the way you would expect them to behave.
You can animate not only the geometry of a terrain - its picture on the Terrain Canvas - but the clipping planes and the gradient (if you apply it as a material.)
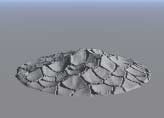
Let's take a closer look. Make sure Auto-Key is disabled. Create a terrain, and take it into the Editor. Make a keyframe at Frame Zero for the Geometry.
| Geometry Animated | ||
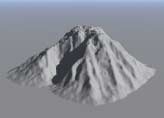 |
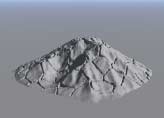 |
 |
| 00:00:00.00 | 00:00:01.00 | 00:00:02.00 |
Move along the timeline, and do something to it; anything at all. Make another keyframe, and play the preview to see one melting smoothly into the other.
Return to the Terrain Editor, and remove the key in the last frame, so the terrain will no longer change.
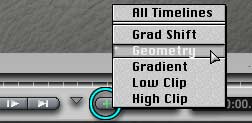
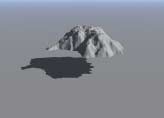
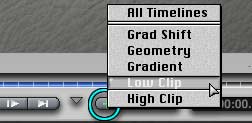 Back at Frame Zero, pull the clipping bracket from the bottom all the way to the top, until your whole terrain is gone; or at least as much as you can make vanish. (There is a limit.) Make a Low Clip key. Go to the last frame, and pull it back out. Make another Low Clip key.
| Clipping Plane Animated | ||
 |
 |
 |
| 00:00:00.02 | 00:00:01.00 | 00:00:01.13 |
Play the preview, and your terrain will drop out of nothing, changing shape as it goes.
The top clipping works the same way, of course, but uses High Clip. Delete the Low Clip keys and try it out if you want to.
Get rid of the any Clip frames (and the clip itself, of course.)
Go on to Page 5, and we'll take a look at the rest!