Note: I haven't used Bryce in years; so these tutorials are archived "as is." I can't accept questions, because I don't remember the answers.
This is page 3. If you haven't finished page 2, please do so before starting this page.
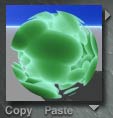
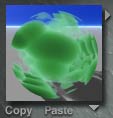
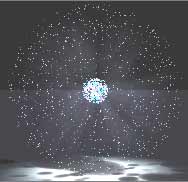
 We are going to make a ball of light to put between the pylons. A glowing sphere, with rays streaming out in all directions, and sparks of light floating in the air around it.
Begin by loading the Dark Scene sky preset that you saved from the beginning of the Light lesson last week, so you can work with the light more easily.
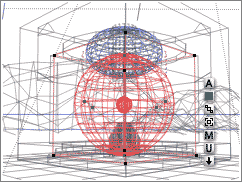
Create a radial light. Open the Attributes for it, name it Nimbus Light, and center it on the X and Z axis. Type in values for the wireframe to make it pretty big; about 60 B or so, so that it will fill the temple. Close the Attributes In the Light Lab, set the Intensity to around 60 something, enable Cast Shadows, enable Visible Object > Volume, and give it a gradient that fades to transparent at the end, because we are going to use Ranged Falloff. That way, we can make the light go to the edge of the wireframe, and no farther, so every bit of the light is visible. Say a Ranged Falloff Amount of 58. Go ahead, and set it up. You know how to do all of that.
Now, in order to make the steaming rays, we need something to cast shadows inside that light. Create a sphere, name it Nimbus Sphere, center it, and resize it to about 10 B on all three axis. Then take it into the Material Lab.
 Up until now, we have used almost entirely Surface Textures. This time, we are going to be exploring Volumetric Textures. They take longer to render (sometimes much longer) but sometimes the tradeoff is worth it.
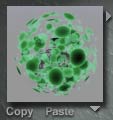
To start with, we need a component, so click in one of the dimples in Column A to get one. Choose the Rocks > toad rock texture from the presets under the triangle.
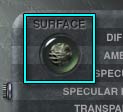
Now, in the upper left corner of the main palette there is a round button, with a textured sphere in it. Above it, it says, "Surface." That button toggles between Surface materials and Volume materials. Click on it.
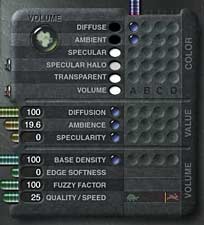 It now says "Volume" and shows a cloud. Notice that the choices on the palette have changed, as well. Now it looks like this.
Everything from Metallicity on down is gone, and there are four new Volume settings.
 |
 |
 |
| Base Density 100 | Base Density 80 | Base Density 50 |
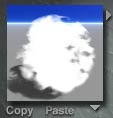
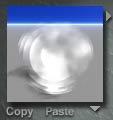
The first one, Base Density, controls how solid the material is. Because this is a volume, the texture exists in 3D space all through your object. When you move this slider, you don't just make the outside edge more or less transparent, you actually melt away the darker areas of the Alpha channel, until only the light ones are left. If you move it all the way to 0, even those are gone. Click in the dimple to use the A component in the Base Density channel, and try it out. Be sure to look at all sides of the preview.
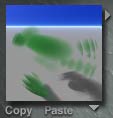
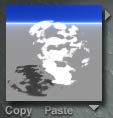
![]() When you do, you will notice that the spots stretch along one axis. That means that this material only uses the noise in 2 dimensions, and that's not what we want. There is an easy fix for it, though.
When you do, you will notice that the spots stretch along one axis. That means that this material only uses the noise in 2 dimensions, and that's not what we want. There is an easy fix for it, though.
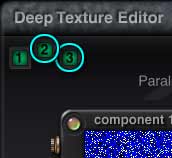
Go into the Deep Texture Editor (pink button.) At the bottom of the palette, there are three buttons that look like stones, titled Noise, Filter, and Phase. We want to call up the Noise palette, so click on Noise.
 A little palette materializes, with a green lit corner in the upper left, a slider, and four dimples. Each dimple corresponds to one of the components. So, if there is a blue ball in that first one, you are looking at the Noise for Component 1, and so on. The fourth ball is for the combination.
It's set for 1, which is what we want, so click on the green corner, to Edit the Noise.
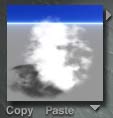
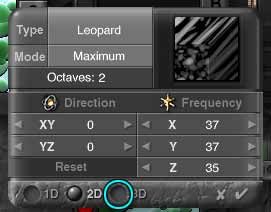 Another palette appears, with the Type of noise, Mode, Octaves, and so on. Ignore all of that, and look at the bottom. There are three little dimples labeled 1D, 2D, and 3D. Right now, the one that is filled is 2D, which we expected. Click in 3D, and watch the thumbnail change, as the noise is calculated for all three axis. Click the checkmark to close this palette, and the one to close the DTE. Look at the preview now. Dots, not streaks. Great!
 |
 |
 |
| Edge Softness 0 | Edge Softness 50 | Edge Softness 100 |
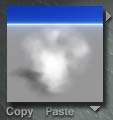
Alright. The next volume setting is Edge Softness. It determines how much fading there is at the edge of the material. The higher this number, the more the edges will fade out. In this kind of material it's not as noticeable, but when you start to play with clouds, this one can make all the difference between a cloud and vapor obviously bounded by a sphere. Go ahead and play with it for a moment.
 |
 |
 |
 |
| Fuzzy Factor 300 | Fuzzy Factor 150 | Fuzzy Factor 50 | Fuzzy Factor 0 |
Fuzzy factor controls the softness or sharpness of the material inside the volume. 100 is the default, so that's what is considered normal. (It's also what was used for the examples for Edge Softness.) Numbers over 100 make it softer, and numbers under 100 make it sharper. The sharper it is, the denser it appears, and the softer the more tenuous, so you will probably have to adjust the Base Density as you adjust this one to get the effect you want.
 |
 |
 |
| Quality 3 | Quality 50 | Quality 80 |
Finally, there is Quality/Speed. Remember that everything is a tradeoff? Well, that's really true of volume materials. The better the quality, the longer it takes to render them. The faster they render, the worse the quality. This slider lets you determine where you are willing to set the limit. The closer the yellow line gets to the hare, the faster and poorer the material. The closer to the tortoise, the slower but better. Give it a try.
The rest of the channels work just the way you have grown to expect them to, assuming that you are using a shading mode that pays any attention to them. (More about that in a moment.) Notice that you can blend volume textures, just the way you can surface ones.
 |
 |
 |
| Edge Softness 0 | Edge Softness 50 | Edge Softness 100 |
All of these things interact with each other. For instance, here is the Edge Softness run again, but this time with a Quality/Speed of only 25.
The end result, of course, is that volume materials are not only costly to have in terms of render time, but they frequently take much longer to set up, as well. I suggest that if you are using them, you always look at the Actual Object in the preview, and make sure that object occupies the exact space in your scene where you are going to be using it, as well. Otherwise, what you see in the preview may not be at all what you see in your scene, depending on where the negative spaces lie within Bryce Space. (Remember, all textures permeate the space.)
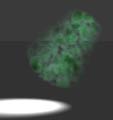
 Alright, now you know what the sliders do, let's use them. For this object, set the Base Density fairly high, so there will be lots of bits to block the light and make shadows. I used 81.3. We don't need soft edges, so I set that at 0. Fuzzy Factor I left at 100, with a Quality/Speed of 25. I also tweaked the size to 51% and moved it around a nudge here and there to get the shadow bits where I wanted them.
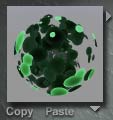
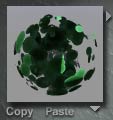
Let's loose the spotty green color, too. Click on the B column of the Diffuse and Ambient channels to generate a new component. Turn both Diffusion and Ambience up to 100%, because we want this to glow. Then load Rocks > yellow stroke. That looks really nice, but the colors, as amazing as they are, don't really look like a ball of lightning or something. You know how to change them, by going into the DTE and choosing new colors on the swatches there. Go ahead and do that now. Think ball lightning as you do.
 Let's look at the shading modes, before we leave the Lab. They are under that triangle next to the component palette, and they are a bit different for volumes.
First on the list is Flat Shading. Use that one when you don't want the light source to affect the material at all. When you are using it, the only things that matter to the color of the material are the Diffuse and Ambient colors. The rest of the channels are ignored. It's usually used for clouds, fogs, and other gaseous things with high ambience values. It's also what we've been using for all this work, since it's the fastest.
 The second choice is Basic Shading. That shades the outside of the object, but not the inside. Light and shadows won't reach there.
 Next is Full Shading. This one is for hard edged things, when you want the light and shadows inside the volume. It takes significantly longer, because of all those internal calculations, and is usually used for things like rocks or cages, where the volume is used instead of modeling a mesh.
 Light Sensitive is for making visible light beams. This one makes a material show only if there is a light shining through it, like a flashlight through fog, or a laser pointer through liquid soap. (Try that one in real life, if you have the laser pointer and the soap, to see what I mean.)
Those are the Shading Modes, and there can be only one. The rest of the choices here are modifiers, and you can have as many as you want.
 Just briefly, and without examples (you can make your own, if you need to see these. We aren't using them.) Uniform Density overrides the default volume action of putting more material in the middle and less at the edges, and evens the density out so it's the same all through.
Sky Integration allows the render to take into account things like fog and haze, so objects blend into the scene more easily. You want this enabled when you are making clouds and foggy bits.
The rest work the same way for Volume and Surface shading. We haven't covered them yet, so we'll do it here. Play with them later, though, not right now.
Additive makes bright ghosts, because the object isn't shaded exactly; instead its values are added to the background.
Distance Blur eliminates the moiré patterns in bumpy textures as they recede into the background by fading the bump before it becomes a problem.
Shadows we've used before; you know all about them.
Volume Blend-Altitude and Volume Blend-Distance blends the colors in the Diffuse and Volume channels based on - you guessed it - altitude or distance. You want them when you are making things like underwater scenes, to add that extra degree of realism. Use them with volumetric slabs and a Volume color that is darker than the Diffuse color to make the water get darker as it gets deeper or farther away.
Got it? Good. Back to our object. For this one, Flat shading will do just fine. We also want it to Cast shadows, but not to Receive them. So turn Receive Shadows and Self Shadows off (even though it couldn't possibly cast a shadow on itself, since it's a sphere, not having that enabled might shave a few seconds off the render time, and every second counts.)
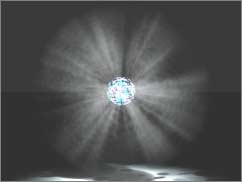
Leave the Material Lab, and render. If the rays of streaming light don't look the way you want them too, return to the lab and adjust the Base Density of the sphere. (Make it higher to get more shadows in the light, lower to get more light, of course.) Or just resize the material.
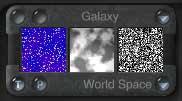 All we need now are the sparks. Create another centered sphere, named Nimbus Sparks, and make it a little larger than the Nimbus Light wireframe. Take it into the Material Lab. Toggle to Volume material, generate a component in the Base Density channel, and choose Clouds > Galaxy from the list. We need a bunch of little spots, and this looks about right.
But wait! When we get it into the channel, and turn down the Base Density, we don't have tiny specks at all; we have great blobs. What's going on? A glance at the Alpha thumbnail of the texture shows us. That's what is used to generate the material, remember, and that's not the little specks that are in the Color thumbnail at all. Time to go into the DTE again, and see if we can fix that. Click the pinkish dot, to enter the Texture Source Editor.
 There is the problem. There are two other components that are generating the Alpha Channel. The Alpha from the first component, where the specks are, is not enabled at all. We can fix that.
Click on the A to enable the Alpha in the first component. Now, in the upper left corner, there are three little pictures of the screens the components are on, labeled 1, 2, and 3. At the moment, all three are glowing green, which shows they are all enabled. Click on 2 and 3 to disable them. Their icons and their previews go dark. Leave the DTE, and you will see that the middle thumbnail of this texture now shows the specks we want. Much better.
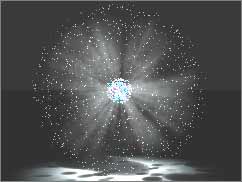 Put the colors you want for the sparks into the Diffuse and Ambience channels, set the Base Density to make the number of sparks you like, disable all the shadows in the Shading modes, and try a render. If you have too many sparks, reduce the Base Density, or resize the component. If you use a lower frequency, the sparks will be spread out more, remember. They will also get bigger, which may be a good thing. I wound up with a Base Density of 2, and a frequency of 9.2% on all three axis. (I also used the Jerry Garcia texture, with the colors lightened up considerably, so the sparks would have some color.) For this render, I disabled anti-aliasing on the Sparks, because I wanted to keep the tiny bright pixels. (Remember how to do that? Control/Shift or Ctrl/Shift and click on the checkmark in the Attributes box.)
Do plop renders of a bit of this sphere, instead of rendering the whole thing, to get an idea how dense your sparks are. Otherwise, you may spend the rest of the week just on this!
When you are happy with it, select all three parts (be careful not to snag the perspective camera when you do,) make sure they are aligned on all three axis, group them, and name the group.
 |
 |
 |
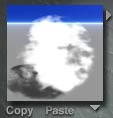
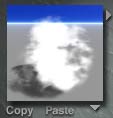
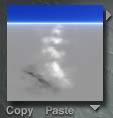
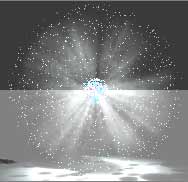
| Moonlight Interaction | Sunlight Interaction | Magenta Sun |
Now, before we leave this document, I have something important to show you about light effects in Bryce.
We have had the sunlight disabled for a reason. Go to the Sky palette now, and enable it. Click on the Sun/Moon toggle to toggle to the Moon, if it's not showing.
Now, take a look at the Nano-Preview. What happened to your lovely light effects? They interacted with the light from the moon. All volume light effects in Bryce are made using Light Sensitive volumes. The problem with that is that they are, well, light sensitive. If a dim light, such as the moon, shines on them they pick up the color and intensity of that light. It overrides the light intensity and color that you set in the light panel, and you get what you see there.
Toggle to the Sun. Counterintuitively, and not at all like Real Life, light effects in Bryce are much easier to see in bright sunlight than in moonlight. This, of course, is because the brilliance of the sun reinforces the light effects, making them brighter. Now try giving your sun an unusual color. See? The light effects pick it right up, even though the pool of light on the ground remains the bright white that it should.
Whenever you are using Light Effects in Bryce, you must have sunlight set to enhance them, or simply disable the Sun. (You can also increase the intensity of your light until you can see the effects anyway, but at that point it can shine through solid objects. (Yes. Try it out.) So it's probably not the solution you are looking for.)
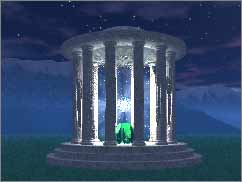
 Alright. Copy your Nimbus, save this document, and paste the Nimbus into the Temple picture. Move it upwards, constraining the motion to the Y axis, until it's somewhere between the top of the pylons and the roof.
Once it's pasted in here, you may find that it's getting hard to do anything, because the computer seems to be working all the time, and not letting you move around, or taking forever when you try to leave one of the various labs. This is common when you are working with Volume textures, or complex scenes. The culprit is the Nano-Preview, which is trying to update for every single change. If you find that you are having this problem, just disable Auto-Update in its menu. Then it will only redraw when you click on it, and you will have your processor back.
 Okay. In order to see the nimbus light rays, we are going to have to disable the sun light in the Sky Lab, as you know. Go ahead and do that.
You will notice that it doesn't seem to have as much of an effect as it should. The sky is still bright, there is plenty of light, and so on. That's Bryce. The sun isn't casting light and shadows, but everything else it does is still very much in evidence. If you want it to be night, and we do, you will have to set it all up exactly as if you hadn't disabled the sun.
Go ahead and do that. Remember that you can fake the dim blue glow of moonlight by making the Sky Dome that dim blue color. When it's all just the way you want, render. (Please don't take too much time here. You can always come back and tweak it later, if you want to, and we still have several things to cover.)
NOTE: For some people, the Nimbus doesn't seem to work properly, and I have no idea why not. If it's not working for you, trying using a Surface gel on your light, instead. It can look good, and you will have learned the things I was trying to teach you while setting the Nimbus up, even if it won't render properly.
You will notice that the mountains, which are now lit only by their Ambience value, look very flat. There is a way to fix that. I'll tell you all about it on Page 4.