Note: I haven't used Bryce in years; so these tutorials are archived "as is." I can't accept questions, because I don't remember the answers.
This is page 4. If you haven't finished page 3, please do so before starting this page.
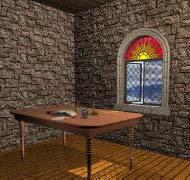 Okay. We've got a nice room, and we've fixed the extraordinarily fake view outside the window. But the open window is still catching the reflection of that view.
Fortunately, there are a couple of easy ways to fix it. If the reflection is distorted, like this one, you can just duplicate the Picture Object, and line it up with the open window, just exactly like you lined the other one up with the camera, so the window is catching that reflection. The colors will be right, and the illusion of a world outside will be restored. Try it.
Just hit Command/Ctrl-D to duplicate the Outdoors, then go to the Top orthogonal view. Select the Left Window Group and check the angle of rotation in its Attributes box. Select Outdoors 1, open the Attributes, and type that information in. Then, use the Reposition tool to place it just past the corner of the room, so the reflection will be caught in the window.
Render now, and the bad reflections will be gone.
 If the reflection is too clear, though, or isn't limited to a single plane, you can't use this method.
I'm going to tell you another one; and you can practice it later. (You have the skills now to do it.)
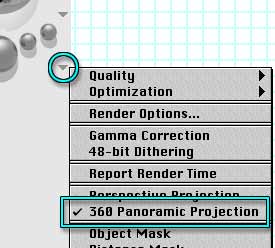
Set up the outdoors scene, with landscape all around. Then, under the Render Options flippy triangle, to the right of the Render Controls, choose 360° Panoramic Projection from the list. Save the Image with a name you will recognize.
 Return to your indoor scene, and make a sphere. In the Materials Lab, use the same options that you used for the 2D Picture Object, but with the 360° Panoramic Projection you just made as the map.
Make the sphere large enough to encompass your scene, put the middle of it at the same level as your camera, and you can have reflections everywhere!
I've included a map in this week's downloads if you want to try it after the lesson. I suggest that you use a sphere that is 116.48 Bryce units in diameter, placed at 36.08, 32.67, -66.61 and rotated 180° on the X axis, 43° on the Y, and 180° on the Z. This gave me the best view while still keeping the sun at more or less the correct angle.
It's also important in either case to have enough resolution on the Outdoor scene that it doesn't look too blurry, unless you want it to be out of focus. Also, if you want to really heighten the illusion of a photograph taken inside, you can wash out the outside picture by taking it into an image editor, like Photoshop, and changing the levels. That's what happens with film, so it will look more realistic to your viewers, who have been raised on photographs.
Okay. This is all well and good, but what if you want to actually see the light streaming through the window? You could do it by choosing Volumetric World in the SkyLab, but that would take for freaking ever to render.
 An easier method is to use a parallel light right outside the window. Let's try that one.
Disable the sun in the SkyLab, and Create a Square Parallel Light from the Create Palette. You want to use a Parallel light, because the sun's rays are so far away that they appear parallel on this planet.
Position it so that it is outside the window, and angled in. You can resize it so that it's the same proportions as the window (remember to use Resize by Object Space when you do.) Now take it into the Light Lab, give it an intensity of 15 or so, enable Visible Object > Volume, Infinite Light, and change the Falloff to None. Exit the Light Lab.
You will probably want to turn down the fill lights you have been using, so the effect will be more pronounced, and you may want to add another fill light to give the illusion of reflection from the light spill, depending on where the light spill falls. (Remember to keep an eye on the Nano-Preview while rotating your light to determine that. Also, if you have resized it, remember to Rotate in Object Space, or you will skew it; and we aren't covering skewed objects until the next lesson.)
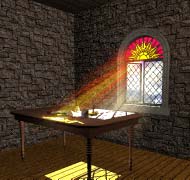 When you are finished, you should have something like this.
Try experimenting with Ranged Falloff lights for these streaming light effects. You can get some pretty nice results. You might also want to try putting a gradient on the light, particularly if you are using one with ranged falloff.
 Just one more thing this week.
If your window isn't going to be visible in the scene, you don't have to go to the trouble (not to mention the polygons) of modeling a whole room like this. Just use a gel on your light! It's simple.
Save this scene, if you like what you have here, and then Save As so we can make changes without overwriting it.
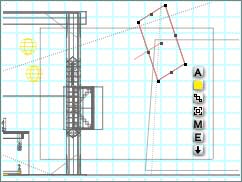
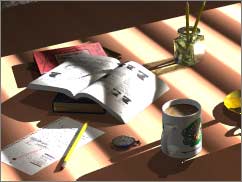
Now, select the whole window wall, the ceiling, the back wall, the right wall; everything except the "Wall, left" and delete 'em. (You will have to unlock some of them before you can delete them. So select everything, then go to Attributes and unlock it all at once.)
Now, use the FOV (Field of View) button under the camera crosses, or the magnifying tool, to zoom in on just the table and the objects on it. We are aiming for a tight closeup, with the back wall just visible in the background (if that.) Feel free to move the wall, if you need to, to cover any gaps.
Now, select the parallel light, which should still be in your scene, and take it into the Light Lab. Disable the visible light, to save on render time, and turn down the intensity a notch or so. Enable Use Gel, and click on Image. Load the Blinds.jpg into an empty slot, and hit the enter key twice to leave the Picture Editor and the Light Lab.
Now render. Look! Blinds! Really, really, BIG blinds! Let's fix that.
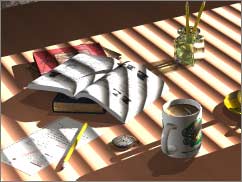 Make sure the light is still selected, and click on the M, or press Command/Ctrl M to take it into the Material Lab. You can see that Blinds.jpg is just being used as an image component. You already know how to resize components. That's easy!
So, click on the green Editor button, and change the size to use the pattern more often. Click and drag on the middle of the icon until all three axis read about 20% or so. Then hit Enter to leave the Material Lab. (I turned up the fill light a hair, too.)
And there it is. A picture of early morning sunlight streaming through the Venetian blinds onto the study table. Hmm. Maybe we should reset the watch!