Note: I haven't used Bryce in years; so these tutorials are archived "as is." I can't accept questions, because I don't remember the answers.
This is page 3. If you haven't finished page 2, please do so before starting this page.
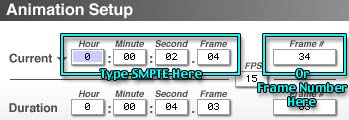 You can type any number you want into the Current line (using either SMPTE or the Frame # box,) and when you close the dialog, you will be at that frame. This is handy if you want to put a keyframe in a particular spot, and don't want to take the time to find it on a crowded timeline. Or you can type in a time, and it will put you at the appropriate frame.
 |
 |
| Change the View to Working Range High or Low | Type Frame Numbers to reset the Working Range. |
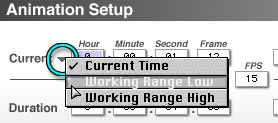
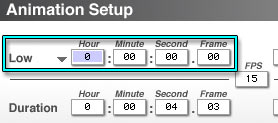
You can change the working range by using the flippy triangle at the beginning of that line (next to the word "Current") to view either the high or low frame, and type new numbers into the text boxes.
 |
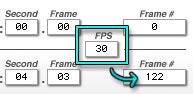 |
| 15 FPS, total duration 63 Frames | 30 FPS, total duration 122 Frames |
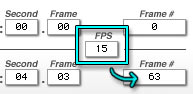
You can change the frame rate, also know as FPS or Frames per Second. Try this. Take a look at the Frame # Duration value to see how many total frames will be in your animation. Now, change the FPS. See how many frames it will take at different frame rates. Interesting, huh?
As a general rule of thumb, by the way, animations for video run at 30 FPS, and film runs at 24 FPS. (Hand drawn film animation was often "shot on twos." That is, each frame was shown twice, for an effective rate of 12 FPS.) Computer animation, of course, can use any rate you wish. The lowest that is generally acceptable is 8 FPS, with most computer animations running closer to 12 to 15 FPS. The slower rates may do better on the web, where people are using slow computers and browsers, because the low rate means that less information per second has to be transmitted, which causes fewer problems.
Set it back to 15 FPS when you are finished experimenting.
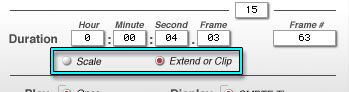 You can change the length of the animation by typing whatever length you want, in SMPTE or frame numbers, into the boxes in the Duration line, exactly the same way you did into the Current line.
You can also choose to Scale the animation when you change the duration, or to Extend or Clip it. If you were working with the defaults, you have probably made an animation that has around 60 frames, and lasts about 4 seconds.
 |
 |
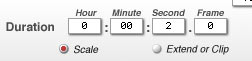
| Scale the Animation | Last Frame; the whole animation runs in half the time. |
Make sure that Scale is chosen and the fps is 15, and change the duration to 2 seconds. Close the dialog box, and play the animation.
You will notice that the blue line that shows the animation is half as long as it was. Also, depending on the speed of your computer, it should play about twice as quickly. In any case, it follows the whole animation in half the time.
 |
 |
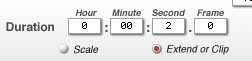
| Clip the Animation | Last Frame; the animation ends at the specified frame. |
Open the Animation Setup again, and reset it to four seconds. (You really need to do this step to restore the four second length.) Close it, to see if it really was faster. Now, reopen it, and set it to two seconds again, but this time choose Extend or Clip.
Now play it, and you will see that it goes to the two second mark, and then just stops, with the first cube somewhere near the top. It's been clipped.
This lets you add more time to the end of your animation, or simply make what you have animated last longer. (Or shorten the time or clip it.) Which you need will, of course, depends on the project you are involved in.
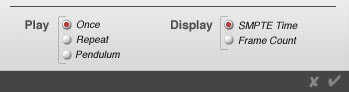 You can also choose the Play Mode and Display here, just as you can from the flippy triangle in the Animation Controls. There is no difference at all between them.
 Okay. Now you have been introduced to all the basic animation controls. But you have many more tools than that to change your animations in Bryce! (I did warn you this was complex, didn't I?)
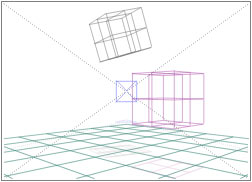
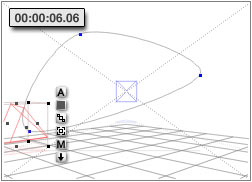
Lets take a look at the trajectory made by your first cube.
Delete the second cube, to reduce the clutter, and change your animation length back to 4 seconds, so you have the whole thing to play with again. (When you do, you will notice that the last keyframe is still there. Clipping the animation didn't delete it, it just made the animation stop before you got there.)
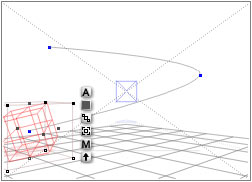
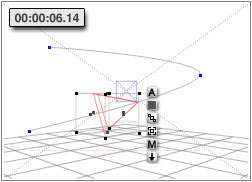
Select the cube, so that you can see its trajectory, and return to Frame Zero.
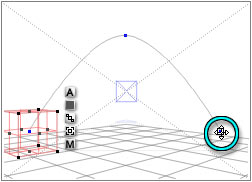
See the little blue squares that occur at each keyframe along that path? Place your cursor over the one on the end, at the last keyframe. You will notice that your cursor changes into a four pointed arrow. As always in Bryce, that means that you can move the thing under it. And indeed you can.
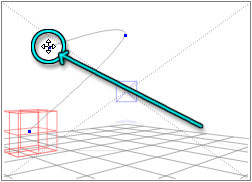 Click, and you will be able to drag that point, which represents the place where the motion of the cube will stop, anywhere you want.
As you drag, you can watch its position change in the Text Area. Most of the normal constraining keys will work to constrain the movement, too. Hold down the Z key to constrain all movement to the Z axis, and watch the shadow on the grid. The X key constrains movement to the X axis, of course, and the Y key to the Y axis. But don't use the Alt/Option key to try to constrain motion to Y. That doesn't work with trajectories. Instead, it twists them; and with trajectories, that's useless. (Nothing happens when they are twisted.)
Move the points around, and play the animation. Notice that the cube still glides along the trajectory in the same amount of time, no matter what you do to the trajectory itself.
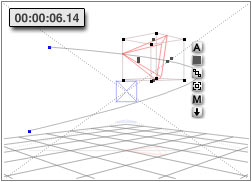
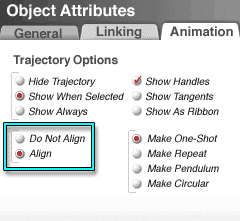 Open the Object Attributes of the cube by clicking on the A in the Icon column. Notice that there is a tab there called "Animation." Click on it to reach the Trajectory Options. The first set, Hide, Show when Selected, Show always, is pretty self explanatory.
Show handles lets you see or hide the little blue boxes. Show tangents lets you see the lines you may be used to if you use vector drawing programs. Show as ribbon lets you see the trajectory as if it was a roller coaster track.
The others take more explaining. Align or Do Not Align refer to the behavior of your object along the trajectory
 Choose Align, and close the dialog. You will notice that the cube changes orientation, so that the trajectory runs in a line through the center of the front and back. Play the animation, and it will try to maintain this orientation. (If your trajectory has too great a curve in it, it will do a sort of strange flip-flop when it gets there. That's a problem with Bryce. For now, just straighten out the curve a bit, so it doesn't.)
 Convert your cube to a Pyramid, using the Conversion palette at the top of the Edit window. You will notice that instead of aligning along the pyramid's Y axis and going point first along the trajectory, as you might expect, it's aligning through the side.
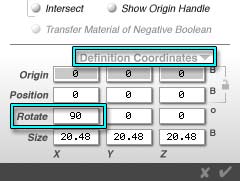 Fortunately, it's easy to fix. Just open the Object Attributes, and choose Definition Coordinates under the flippy triangle at the bottom of the General Tab. Change the Rotate to 90° on the X axis, and close the box.
 The Pyramid will now orient itself with its nose along the path.
You may find that you have to do this when you align something to a path. Often, the way the model was made is not the way you want it to move along. Good thing it's easy to change, huh? (By the way, you will notice that the orientation is now correct for the entire animation, no matter when you were at the point you changed the Definition Coordinates. Unlike normal rotation, those are a state, and cannot be animated.)
You will also find that you no longer have control over the rotation of the object. Bryce is handling it now. If you need to be able to change it, you won't be able to use Align. Instead, you will have to animate the heading yourself, (or be very clever with the trajectory.)
 |
 |
| 3/4 of the way through the animation; Make Repeat | 3/4 of the way through the animation; Make Pendulum |
Okay. We are going to take a look at the last four choices in the Trajectory Options dialog.
Use the Scale Timeline tool to make about twice as much of the timeline visible, and drag the Working Range out until the Time reads about 8 seconds or so. We need it to be about twice as long as it was. (Put your cursor on the Icon with the graduated bars, and drag to the right. Then grab the little dot at the end of the blue line which shows the working range, and drag it to the right as well, until the time reads 00:00:08.n.) Make sure the Play Mode is set to Once. (Change it under the flippy at the right end of the Animation Controls.)
Open the Object Attributes again, and look at the last section of Trajectory Options. The default is Make One-Shot. When you are using it, the motion goes from the first keyframe to the last, and then stops. It's the default, and it's what we have been using all this time.
Make Repeat goes from the first keyframe to the last, jumps to the first again and runs to the last, and keeps doing that for the duration of the animation. (Which is why we had to make the animation longer, to see it happening.)
Make Pendulum goes from the first keyframe to the last, runs backwards along the trajectory to the first, back to the last, and so on. Try them both out. (Feel free to make the duration even longer, if you need to, to see each in action.)
 |
 |
| Add Keyframe to make another Handle | Circular Trajectory |
All of these changed the behavior of the object on the trajectory, but didn't change the trajectory itself at all. The last one, Make Circular, does. It merges the first and last point of the trajectory. In order to use it, you really need to have at least four points so the circle will have at least three. (Otherwise, you will just have a line or a dot.) We'll add another point.
Set the Trajectory Options back to Make One-Shot. Move ahead in time, to around six seconds, move the pyramid, and create another keyframe. (Manually if you have Auto Key off, or just let the computer do it if you have it enabled.)
Now set the Options to Make Circular. You will notice the shape of the trajectory change. Play the animation, and you will see your cube slide merrily along the trajectory for as long as the animation runs.
If not, let's move on to Page 4.