Note: I haven't used Bryce in years; so these tutorials are archived "as is." I can't accept questions, because I don't remember the answers.
This is page 4. If you haven't finished page 3, please do so before starting this page.
![]() Lets move to the right side of the picture for a moment.
Lets move to the right side of the picture for a moment.
There is a narrow little Display Palette there, which looks like this.
 The bottom three controls are the pan and zoom tools you have already become familiar with. Click on the zoom tools to zoom in or out from your render (if that is still showing.) Click and drag on the pan tool to pan around if only part of your render is visible. (Zoom in to make that happen.) Click and drag on either Zoom tool to interactively zoom in and out from the center of your picture. You can also still get these tools from the keyboard, as you were doing before.
 Above those is a cube. Click on it.
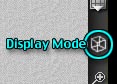
This is the Display Mode icon. It allows you to toggle between the render view, the wireframe view, and the combined view which lets you see your wireframe on top of the render, and is wonderfully valuable for placement and sizing.
Click on it several times to cycle through the modes, until you are used to it.
(You can also toggle between wireframe and render modes by hitting Escape/Esc.)
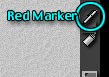 Moving to the top of the Display Palette, the first tool is a red marker. It allows you to make red notations anywhere on your screen, and is really only useful when taking screen shots. Go ahead and play with it. To stop using it, click on the tool icon again. Your marks will all vanish, but you will have the other tools back. (You can also get it and drop it by typing M on the keyboard.)
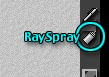 The next one down is the RaySpray tool. It's great for rendering a tiny, irregular area of your scene, just to see if that part looks right.
Go to wireframe mode by using the Display Mode icon. Click on the RaySpray icon. Now click and hold anywhere on the screen. A small section will be rendered, directly where the spray hits. Click and drag, exactly like you would with a spray can, to render an area.
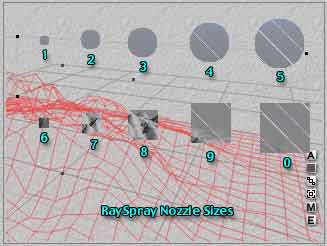 Type 1 on your keyboard, not your numeric key pad. This is the smallest circular spray available. Hold down the mouse for a moment, without moving it, to see how large that is. Repeat this, using the number keys from 2-5. Notice that each one gives you a slightly larger circular area that is rendered. Also notice that the larger the area, the less is rendered in the same amount of time.
Do this again, using the number keys from 6-0. These are the square nozzles.
Play with the nozzles for a while, until you are familiar with this tool. To stop painting, touch the escape key, or click on the RaySpray icon again. All the renders will vanish.
Rendering with this tool in wireframe mode gives you temporary renders. They don't affect your actual render in any way, and are not saved. So they are wonderful to check the interpenetration of two objects when you have saved a large render, before you change back to camera view and resume the render there. This is one way to save tons of render time.
Change to the Render view, using the Display Mode icon. (Make sure that you aren't in the combined view. Render view will show a solid cube with no lines, and the wireframe will not be visible.)
Use the RaySpray again. You will notice that it seems to work the same way.
Click on the icon again, or use the Escape key to drop the tool. Notice that this time, your render stays there. Change to one of the other view modes and back. Your render is still there.
Now click the Resume Render button. Notice that the areas you rendered with the RaySpray were not re-rendered. This can save a great deal of time, as well.
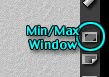 The next icon down is the Maximize/Minimize icon, which we have already used.
 Below that is the icon that allows you to set the background paper. Go to wireframe mode if you aren't already there, and click on this icon. A drop down menu will appear, giving you a number of choices for background papers and textures, or allowing you to use the Bryce color picker to choose your own background color.
These can be changed on the fly. Go ahead and play with it a bit, to see what kind of texture you like. I usually leave it set on Grid, because I find the grid lines helpful when setting up scenes. But this is really entirely a matter of personal taste. I'll be using grid for all the rest of the screen shots, though.
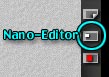 The next icon down is the Nano-Editor. This toggles between Nano-Editor on and Nano-Editor off. When the button is red, it's active. When it's white, it's inactive. Toggle it on.
Now, using the spacebar, get the pan tool and start to pan. Notice that, instead of panning the whole picture, a tiny little window opens with a small preview of the picture. When you release the mouse button, the whole picture updates. It works this way for all the camera controls. Go ahead and try it out.
This saves a lot of time when you are moving through a complex scene, where screen redraw time becomes a factor.
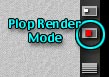 Below that is the icon to turn the Plop Render graphics on and off. When it's red, you will see the buttons and the drop shadow. When it's white, you won't, but the render itself will still work. This makes it easier to see the render of a small area in context.
Click on the icon to toggle the Plop Render off, and click the Render button. Your scene will start to render. Click anywhere on the screen to interrupt the render, and draw a marquee around any area.
Now, click the Resume Render button. As you can see, only the area you selected renders.
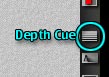 The next button down in the Display Palette sets the Depth Cue. Depth Cue is like aerial perspective for wireframe mode. It helps you get an idea how far away things are from your current position by making the more distant objects lighter in color. But this can also make them hard to see, so you can adjust it to your taste.
To do that, click on the icon, and drag your mouse up and down. If you are using the default Director's position, notice how the blue box that shows where the camera is fades in and out. (If you aren't, you might want to switch Director's view, and click the topmost blue Memory Dot, so you can see this.) Move the camera around, to get a different view of your mountain, and try it some more. Leave it where it seems most comfortable to you.
 Okay, to show you the rest of the icons in this palette, we are going to get rid of the mountain, and put some primitives in the picture instead.
If you were fond of your mountain, save the file, and open a new one. (Both commands are present under the File menu, as they are in most applications, or you can use the normal keyboard equivalents. Remember that you make the menu visible by moving your mouse to the top of the screen, and waiting for a moment.)
Otherwise, just delete the mountain.
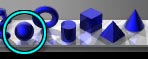
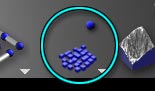
Go to the Create palette, and click on the sphere to make one in the center of the world. Put your cursor over it while it's still selected, hold down the mouse button, and drag it to one side.
 Now click on a different blue primitive shape. Move it aside, and click on another. Continue until you have several different primitives in your scene. Something like this.
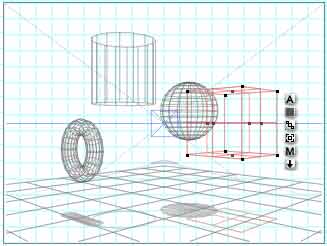
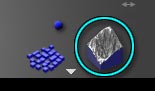
 Notice that each shape has a shadow under it. These shadows let you know where the shapes are in relation to each other, and how far they are from the ground. But if the scene becomes complex, they can be distracting, or slow your machine to a crawl. In that case, you can turn them off by clicking on the next icon in the Display Palette. This icon toggles the shadows on or off. Try it and see.
 Now, drag one of your primitives down until it is below the ground level. Notice that the part that is below ground is also invisible. This, once again, is a cue that lets you know when something is at or below the ground level. But, once again, you don't always want it. The next icon toggles it on and off. The little rectangle on the icon is hidden below the line when objects are hidden, and showing when they are showing. Play with it a bit and see. Notice that, if you have the shadows enabled, and hide objects below ground level disabled, you can see the shadows of things below cast up onto ground level. This lets you know where they are, even if there is no ground plane, or they are below it.
Go ahead and cut the ground plane (Command/Ctrl-X) and play with it for a little while. See, the shadows are still there. When you are finished, paste the ground plane back in using Command/Ctrl-V. (Or you can use the copy/paste commands from the Edit menu, like most other Applications.)
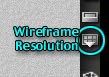 The last icon here is to set the grid size for the wireframe display. Click on the icon. You will get a drop down menu with several choices for Static, Motion, and Selected grids. The higher the number you choose, the tighter the wireframe, and the more it will resemble the rendered object. The lower the number, the faster the redraw. So, once again, it's a tradeoff.
Go ahead and experiment. Move your primitives around with the various grid sizes, and see which ones you like. You can always change it on the fly at any point, if the grid is making the screen draw too slowly, or if it's so loose that you can't position complex shapes easily.
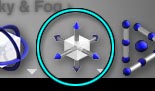
 Below the Display Palette, in the bottom right corner of your screen, is an icon that looks like a circle with a grid on it. This is the Swap Button, and it toggles the icons to the left of it between the Animation Controls and the Selection Palette.
The default opens to the Animation Controls; but since we aren't going to be doing any animation for a long while, go ahead and click on that button to change it to the Selection Palette. When you do, it should look like this. I'll be introducing you to that as we need it.

Now that you are familiar with the camera controls, and can get around the workspace and render things, let's return to the three palettes at the top.
You should be in the Create palette right now. We will be using it to create every thing on it before this course is finished, but for now I'm sure you have figured out how it works. <g> Just click an object, any object, to make one.
So we will move on to the Edit Palette. Click on the title (the word "Edit") to change palettes.
 Select whatever primitive you pushed underground, and pull it back out. (Don't forget that you can select things that are behind other things by holding down the Command/Ctrl key while clicking the mouse button. This gives you a menu of things under your cursor. Just drag down to the correct primitive name, and release.)
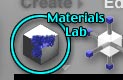
Now, look at that palette. The icon to the far right is the Material icon. If you click on it, you will open the Materials Lab. That is complex enough that we aren't going to go there until the next lesson. You can open it if you want to look at it; just click the X (Bryce for "Cancel") to close the box when you are through.
 For now, though, we are going to use preset materials.
Click on the flippy triangle next to the Edit menu title, at the top of the palette. (Make sure you click, don't drag. If you drag, the presets will open, but they will close the instant you release the mouse button. This makes selecting presets very fast once you are used to the program and know what you want. But for learning purposes, it's not as good.)
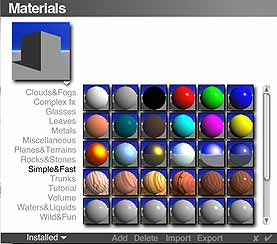 A dialog box will open, showing you all the presets currently stored in your program. It looks like this.
As you can see, there are a lot there. Click on any of the icons. The preview in the upper left hand corner will change, and the name of that preset and a short description will appear in the Text area.
You can scroll through the presets in any category, or click on the categories to view different ones. You can also add your own, and we'll be getting into that later.
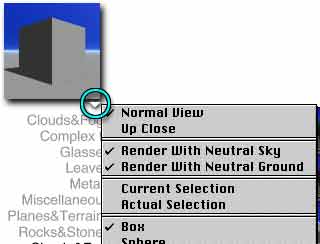 Now, look at the preview there in the corner. Notice that there is a flippy triangle under it. Click on it. A drop down menu will appear with a number of choices.
You can view any of the materials on any of the primitives listed at the bottom of this menu. You can view them on the actual selection, to see just how the grain etc. will fall on the object you are actually going to put them on.
You can view them with a neutral ground, or uncheck that choice to see the material also used as a ground plane. You can view them with a neutral sky, or uncheck that choice to see them with the sky you are actually using in your scene.
Finally, and this is the fun part, you can move the preview around, so you can see it from other sides and angles.
 Position your cursor over the preview, hold down the spacebar, and click and drag to pan right or left, up or down. Go ahead and try it now. (You will see a wireframe while you move it, and it will render when you release the mouse button.)
Click anywhere on the picture and drag to rotate all around it. Give it a whirl.
Hold down Control/Ctrl and drag to move on the Z axis, toward or away from the preview.
Hold down Option/Alt and click to return to the default position
Using these controls you can see just about any part of the object that you need to see, in order to be sure that you have exactly the material you need before you commit to any change.
Experiment here for a while, trying different materials, and different views.
When you are ready, choose materials for each primitive and render. Just be aware that transparency and reflection will add to your render time. Volume materials add a lot to your render time.
When you are finished, return to Wireframe mode.
 The next edit control is the Resize tool.
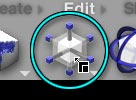
Select one of your primitives, and position the mouse over the middle of the Resize Tool. The cursor should change into a square with a smaller square in the corner and an arrow pointing out of it, and the cube in the middle of the tool should grow and shrink. Hold down the mouse button, and drag right and left. Notice that the size of the selected primitive object changes. As you drag right, it gets larger. As you drag left, it shrinks. But the proportions are unchanged.
Now, position the cursor over one of the rods pointing out of the resize tool. The cursor should change into a square with the letter for that axis in the center, and the cube should elongate along that axis. Click and drag. Notice that the object changes shape only along the axis chosen.
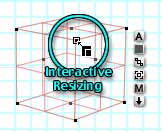 You can also change the shapes of things interactively by dragging the control handles of the object itself. Remember them? They are the little black squares at the corners, sides, and middle of the selection bounding box. Position the cursor over one, and it will turn into a square with the letter of that axis on it. Drag, and it will change shape, exactly the same way as it does when you drag the tool. Grab a corner handle, and the icon changes to show the proportional resize.
The real difference is that when you resize this way, the object enlarges or shrinks from the corner or side you are pulling on. In other words, the far side of the object doesn't move; only the one you grabbed. To resize from the middle interactively, hold down Option/Alt while you pull. Go on and try it both ways.
There is one more important thing you need to know about resizing objects.
Under the tool is a flippy triangle. Once again, that gives you a drop down menu with choices. We'll be getting into these later, but for now take a look at the one that says Unscale. You can use it to return your object to the size and proportions it had when you created it.
 The next tool is the Rotate Tool. It's used in much the same way. Position your cursor over one of the blue rings, and it will show you which axis the rotation will take place along. Click and drag to rotate. Go ahead, and play with that one, too.
 You can rotate your object interactively by holding down the Command/Ctrl key, and grabbing any of the Control Points. The ones in the center of the faces allow rotation only around that axis. The ones at the corners allow free rotation. Give it a whirl.
When you are finished, once again, you can click the flippy triangle under the tool and choose Unrotate, if you want to.
 The next tool is the Reposition Tool. You already know how to move things interactively by just dragging them. This tool lets you move things along a specific axis only. It works just like the others. You choose your axis, and drag. Try it out.
Reposition, under the flippy triangle, puts the object back at world center.
 The next tool is the Align Tool. It lets you align objects precisely in relation to each other.
To use it, you have to have more than one object selected. Do that now, either by holding down the shift key and clicking, or by drawing a marquee around all the objects you want to select.
Now, click on the blue dot in the center of the tool. All the objects are aligned on all the axis. They all come together in the center. Undo (Command/Ctrl-Z) to return to scattered objects.
Position your cursor over the blue band in the middle of the vertical cylinder on the left side of the tool. Look at the Text Area. It says, Align Y Center. If you click, it will align all the selected objects on the Y axis only, in the mathematical center of the group. Try it, and see. The top and bottom align the objects according to the top or bottom of their respective bounding boxes. Check it out.
Try the other axis, using the undo key to return to scattered objects each time. See how that works?
There is a flippy triangle here, too. The choices are pretty obvious, except for Snap to Ground and Snap to Land. Snap to ground snaps the selected object to the ground plane. Snap to Land drops the selected object onto the top of whatever is below it. Drag one of the objects above another and try it out. (You can use the shadows to tell when they are above each other, or you can align them with the Align Tool. Align X and Z center, and then use the Reposition Tool to pull one of them above the other in the Y axis. Or click the blue button to align on all axis at once, then unselect them by clicking an empty area, click one to select it, and use the Reposition Tool to drag it up along the Y axis only.)
 The next tool is the Randomize Tool. You will use it when you want to have a random pattern of objects. We will gloss over it here, really. It works by choosing a dispersion pattern from the drop down menu under the flippy triangle, and then clicking and dragging on the blue button at the top of the tool. Give it a try if you want. It's kind of fun.
You can also use it by dragging the group of cubes at the bottom of the tool until they reflect the kind of dispersal that you want, and then clicking and dragging the button; but I find that cumbersome.
 The final tool is the Terrain Editor. We will be getting deeply into that later, but right now just remember where it is. (I will tell you again when we get there, though.)
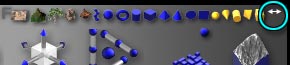 There is just one more thing on this palette that I'd like to show you. If you look at the top right corner of the Palette, you will notice a little double headed arrow. Select something, and click and hold on that arrow.
A palette will pop out to the left of it, which has bitsy little icons of all the things you can create. Slide your cursor along that palette, and notice that each icon turns white as your mouse moves over it. Stop on one that is different from the primitive you originally chose. Let go of the mouse button.
Your primitive changes into the one you just chose. This little arrow lets you change things into other things, which can be really neat if you realize that you just made a cube, and positioned it perfectly, but it should have been a sphere, or a light, or anything else. You can just change it, and not have to resize or reposition it.
Go ahead and play with it; but be aware that if you change your primitive into either of the two picture objects (the rightmost blue primitives in the list) it will become flat. And it will stay flat, until you stretch it back out by resizing it, either with the Resize Tool, or interactively.
When you are finished, move on to Page 5