Note: I haven't used Bryce in years; so these tutorials are archived "as is." I can't accept questions, because I don't remember the answers.
This is page 2. If you haven't finished page 1, please do so before starting this page.
 Okay, this is nice. But what if you need the wall to follow the contours of a terrain? Simple. Bryce can handle that by using blending.
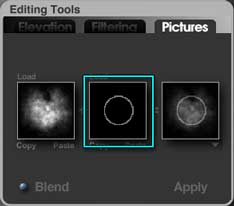
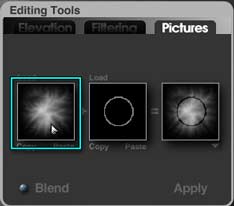
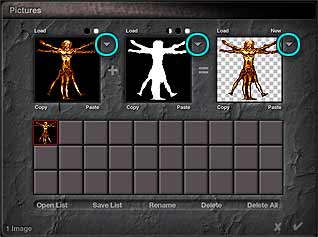
Right now, before you leave the Terrain Editor, go to the Pictures tab, and click on the middle thumbnail. Your ring wall will fill the blank white area, ready to blend. (If you already left the Terrain Editor, you will need to go back in and do this, of course.)
 Click the checkmark to leave the Terrain Editor. Name this terrain Ring, and drag it to one side, so you aren't building another terrain right on top of it.
Create a new terrain, and take it into the Editor. Drag right on the Eroded button, and then right on the Raise/Lower button and right on the Eroded button again to quickly get an interesting eroded terrain. Gaussian the edges if you feel so inclined.
Now, go to the Pictures tab, and click on the thumbnail on the far left to load the current terrain into that spot.
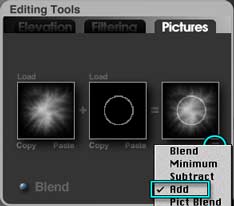 Go to the flippy triangle under the thumbnail on the far right, where the sum of the blend is shown. You will see a list of Blending Modes. The default is Blend. Choose Add. You will see the ring of the wall superimposed on the terrain.
Click Apply.
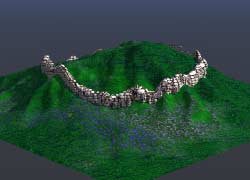
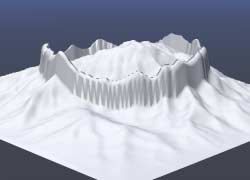 You will now have a terrain with a ring wall that follows the elevation contours of the terrain. Just as easily as that. (Look at the sides of the wall. That's why you don't want to use low resolution if you are making a "real" picture.)
Of course, you can use this method to make anything follow the contours of a base terrain. I'm sure that you can think of other uses for this one, too.
 But what if you want to make your mountain one material, and the wall another? Still no problem.
Click on the check mark to leave the Terrain Editor. Name this terrain Wall. Duplicate it, name the duplicate Hill, and take it into the Terrain Editor.
The Pictures tab will still be showing, unless you have quit between the last part of the lesson and this part. (If you have, you will need to reload the Ring terrain, and place the picture in the middle thumbnail again.)
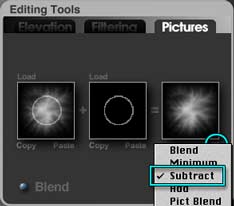
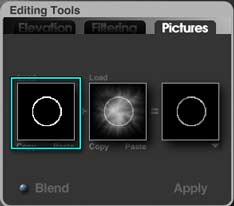
The terrain in the far left slot, however, will be the one you just loaded. Go to the Blending Modes triangle again, and choose Subtract.
 Notice that you can hardly see the ring in the final thumbnail. Don't touch the Blend button; just click on Apply. The ring is subtracted from the terrain, leaving the one you made in the last step, without the wall.
Click on the left thumbnail, to replace the terrain shown with the current one. Notice that the thumbnail on the right now shows a dark ring superimposed on the terrain. Click on Apply, and the wall will be replaced by a ditch.
Click the checkmark to exit the Terrain Editor.
 Now, select the terrain named Wall, and take it into the Terrain Editor. The Pictures tab is probably still up there. Click on Copy under the middle thumbnail, and then on Paste under the one on the left. That puts the ring in the thumbnail on the right. Now click on the middle thumbnail to load the current terrain. The hill with the ring wall appears there.
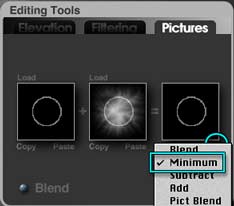
Go to the Blending Modes triangle, and choose Minimum, so that the lowest values for both pictures will be used. Click Apply, and the hill all but vanishes, leaving just the wall.
 Switch to the Elevation Tab, and drag left on the Raise/Lower button to make the wall as high as possible. It needs to really top out, so when you use the minimum values in the next step, they are at the top of the wall that follows the contours of the terrain, and not the top of the one that you made earlier. (If, for some reason, you needed to reload the Ring Wall, you could do this then, and eliminate a couple of steps here; but since we already have these in the blending slots, we're doing it this way.)
Go back to the Pictures Tab, and click in the thumbnail on the left to load the tall wall. Then just click Apply, and you will see a perfect version of the wall, with no hill around it, in your Preview.
Click the checkmark to exit the editor.
 Now, if you put appropriate materials on the two of them, you will see that you have a hill with a ring wall that fits it perfectly. That was easy! (I lowered the wall a bit on the Y axis, as I'm sure you can see, because it was so badly out of scale. It's still out of scale, but not as badly. <g>)
To recap this part; you can use the clipping planes to protect any portion of the terrain that you want to leave untouched, while you work on the rest to your heart's content. I'll let your imagination come up with ways to use that; I'm sure you can think of plenty.
You can also use the Blending modes on the pictures tab to do more than simple blending. You can superimpose any picture onto a terrain, and it will follow the contours of the terrain. You can also dig ditches of any shape, and use those tools to make two terrains have different materials, and still match up.
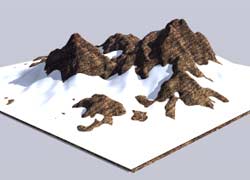 While we are on that topic, I'm going to show you a simple way to make rough, rocky terrain poke out of snow banks.
Save all of this if you want to keep it, and open a new document.
Create a terrain, and name it Rocks. Edit it if you feel so inclined. Duplicate it, and name the duplicate Snow. Take Snow into the terrain editor.
Go to the Elevation tab of the Editing Tools, and drag right on the Eroded button to add material. Move to the Raise/Lower button, and drag right to lower the snow. Add a touch of smoothing, just to make it - ummm - smoother. Click on the check mark to leave the Terrain Editor.
Give the Rocks a rocky material, and the Snow a material that looks like - you guessed it - snow. Render, and you will see rocks poking out of a snow bank that fits them perfectly. You might also want to raise the Snow slightly on the Y axis so that the base of the Rock terrain is covered.
This trick also works if you use the buttons on the Elevation tab of the Editing Tools in the Terrain Editor to Smooth the terrain, and then Lower it. Raise it on the Y axis when you leave the editor. That is the way I had to do it when I started using Bryce many years ago. (We didn't have the same Erode tool back then.) I prefer the look of the other, though, in most circumstances. Which one you prefer, of course, is up to you!
But isn't that amazingly simple?
 Here's another trick. On occasion, you will want to "mark" a certain elevation in the Terrain Editor, so that you can easily make sure that other things are higher (or lower) than that. You can do it very simply, by moving the gradient.
Save this, if you like it, open a new document, create a new terrain, and take it into the Terrain Editor.
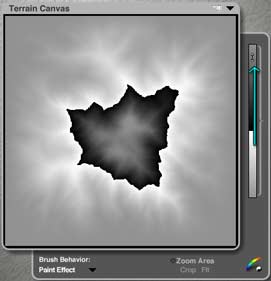
We are going to make a pool in the middle of this one, so run a little erosion on it so it doesn't look quite so raw. Now, place your cursor on the gradient bar. Notice that it turns into a double headed arrow. Drag up and down, and the break point of the gradient changes.
You can move it wherever you want, to highlight a certain elevation. As you move it, you will notice that the line where black and white meet changes elevation. Just stop moving when you get to the point you want to mark. Simple as anything. To return to the default placement, Option/Alt click on the Gradient Bar.
 Hold down the space bar to get the eyedropper and sample an elevation color to set the Elevation tool to that height. Choose one from below the line. Now, as you paint with it, it's easy to see when you break your elevation, which would cut through the bowl the water is going to be in.
Scoop out a nice area for your mountain pool. Break through the elevation in a spot where the land forms a gully, so we can have a waterfall. (You might want to add a touch more erosion after you do so.)
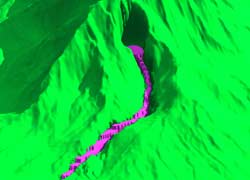
 When you are happy with it, leave the Terrain Editor. Name the terrain Mountain, and make it green for now, so you can see what is going on and it will render quickly. Save, and then duplicate it. Name the duplicate Water, and color it something bright (I favor magenta) so you can see it easily against the green.
Take it into the Terrain Editor, and you will notice that the gradient has reset itself. Set it again, if you want to, so that it's obvious where the waterline is. (I didn't, because it was harder to see the gully with it set.)
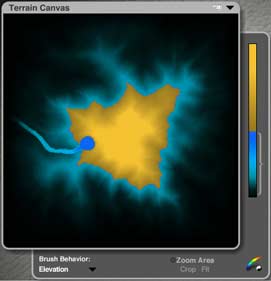
We need to isolate the pool and waterfall, and we are going to do that using the clipping plane mask trick that you just learned. So, use the clipping plane trick to lower the terrain below the waterline. (Pull down the top of the bracket to mask the higher elevations, and then drag right on the Raise/Lower button in the Elevation tab of the Editing Tools.) Don't take it down too far, because we need to see the gully.
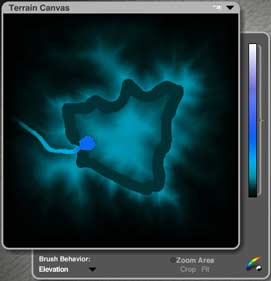
Now, use Unpaint Effect from the Brush Behavior choices to raise the level in that gully back to what it was. Paint with elevation to put the water level back, too. (As is often the case, this is much easier to see if you use one of the colored gradients. So I'm using it, even though it costs a bit more in terms of download time when you are loading this page. The yellow you see is not from the gradient, of course, but from the clipping plane.)
 Mask the bottom part of the terrain using the clipping path again, and lower the top part, using the Raise/Lower button on the Elevation page of the Editing Tools palette.
 Remove the clipping by pulling up on the bracket, and you should see a nicely isolated waterfall. Use the brush set to Elevation Behavior to paint a lower Elevation in any spots that were missed.
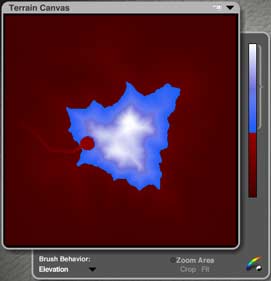
 Finally, Posterize the water a little, to make the surface of the pool flat, and to make the falls stair step. (You'll find the button to do that on the Elevation tab, third from the bottom of the green buttons. Drag it to control the amount of posterization. I changed the color of the gradient, so I could show you the effect more easily.)
Run the gradient back and forth to make sure that the water is flat, and to check your work. When you are happy with it, switch back to the Pictures Tab, and click in the middle thumbnail to place this terrain there. We are going to need it for reference in a moment.
Leave the Terrain Editor, and save. Don't worry if you can't see the waterfall at all at this point. We are going to fix that next.
 Select the Mountain terrain, and bring it into the Editor. Alright. Now I am going to teach you how to cheat like everything.
Note; The following was designed when monitors were CRTs covered with glass. If yours is a flat panel and not covered with glass, you probably shouldn't draw on it. Instead, cut the channel where you think it was, and make the water extra wide, a couple steps from here.
You will need to get a piece of regular household plastic wrap (Saran Wrap or any equivalent) and a dry erase pen, marker, or something else fairly soft that will leave a nice bold mark on the plastic wrap. Go get them now, and then come back. I'll wait for you.
Ready?
Alright. Go to the Pictures tab, if it's not already showing, and make sure the blending mode is set to Blend. Click Apply, and you will have a blended picture on your screen. The mountain will look all terraced; but you will be able to see exactly where the waterfall is.
Put the wrap right on the screen and smooth it down. It doesn't have to be perfect; but the wrinkles are hard to draw on. Now, take the marker, and trace the waterfall onto the plastic wrap. Leave it on your screen, exactly where it is.
Hit Command/Ctrl-Z to undo. You should have the mountain just exactly the way it was. If you have somehow used your one undo, just toggle to the Elevation tab, hold down the Control/Ctrl key, and click on New to return to the terrain you had when you entered the Editor.
Lower the terrain just a bit, undo, and use Paint Effect to lower just the channel for the waterfall. You will be able to see exactly where to lower the terrain, because of the line you traced. That's your waterfall, of course.
Do the same thing with erosion, if you want to, or use the Erosion Brush behavior. Basically, cut a channel however you would like to cut one. Just keep it fairly narrow. If you are not planning to make the waterfall transparent, you can ensure that it will be visible by setting the Brush Behavior to Elevation, choosing the lowest elevation, and simply tracing the channel that way. (Do add some slight gradation to either side, however, or your waterfall will be falling through a very steep channel, and will not look very realistic.)
 When you are ready, leave the editor and check it out. If you need to come back in and lower (or raise) the channel a bit, do so. Don't worry if you can see the edges of the waterfall; fixing that is the last step of the terrain editing.
 When you are satisfied with the channel, take the Water terrain back into the editor. (You can peel the Saran Wrap off now, or you can leave it in place if you think it will be helpful to see where the original channel was.)
Change the Brush Behavior to Maximum, and sample the elevation at the bottom step of the falls. Make sure the brush is fairly hard (we want steps here, not cushions) and has a good fast flow. Then, just widen each step, making sure that you start at the edge of the calculated step, and making them broad enough that there is no chance the edge of the water will show. Continue sampling and painting, until you have them all done. As you work, you will notice that you cannot interfere with the next step up; so make 'em as broad as you want. (If you poke through a ridge of the mountain, you can always come back and fix it.)
For variation, you might want to eliminate a step or two. That will keep your falls from being too regular.
 Leave the Terrain Editor, and check to see how it looks. Tweak the mountain and the water until they are both just what you want. (If you have a monitor with glass on the front, you can use the plastic wrap trick again, and trace a new outline, if you want to see where the waterfall steps are. In fact, you can use it all over the place. I've been using it for years and years, and it's saved me more time and trouble than I can possibly explain to you. <g>)
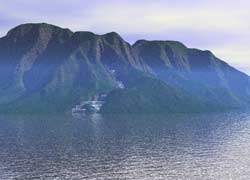
When you are satisfied with it, give the water a nice water material (something that breaks into foam on the slope will work best, like the one we made last week.) Give the mountain a mountain material as well, of course.
Finally, group the two terrains, and hit the * key a few times to make them land mass size. And there you go. This waterfall type will work best in distant scenes, by the way.
 I'm going to show you two more quick tricks in the Terrain Editor before we move on. So save this, if you want to, open a New document, create another terrain, and take it into the Terrain Editor.
Hold down the Command/Ctrl key, and click on the Picture button in the Elevation tab of the Editing Tools.
 You will find yourself in the Picture Library. From here, you can load any picture that you own, just the way you are used to doing, and use it as the grayscale picture for your terrain.
Don't forget, while you are here, that you can also use any Photoshop filters that you have on those pictures. Just click on the flippy triangle next to any of the thumbnails to call up the filters in your Plug-Ins folder. (Which, of course, is the advantage of doing this, instead of just loading a picture.)
You can get some very interesting terrains this way, by using things like Frax Flame from KPT 5 filters, if you have it, as a basis for a terrain. Then go ahead and play with the other Elevation Tools for more interesting effects.
 Save this, if you have something you like, and make another. Take it into the Terrain Editor as well, and once more click on the Picture button. But, this time, hold down Command-Option on a Mac, or Ctrl/Alt on a PC while you click.
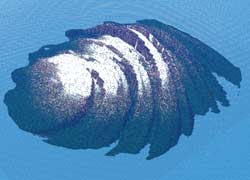
You will find yourself in the Deep Texture Editor. Now that you know how to use it, you can get just about any kind of terrain base that you want. A couple of things to watch out for; any colors that you use will be converted to grayscale. So, if you really want to see what you are getting, you may want to do that yourself first, by choosing shades of gray for your colors in the first place. Also, you may want to make sure your preview is set to Flat. (Then again, you may not.)
When you click the checkmark, whatever you see in the thumbnail for the combination will become the terrain (which is why you might, or might not, want a flat preview. You can get some pretty interesting effects using a spherical one, like the terrain above.) Now, once again, you can play with it to your heart's content.
Alright. I'll leave building an actual scene up to you. I'm confident of your abilities, and can't wait to see what you come up with.
Let's go to Page 3, and see some tricks with clouds.