Note: I haven't used Bryce in years; so these tutorials are archived "as is." I can't accept questions, because I don't remember the answers.
This is page 3. If you haven't finished page 2, please do so before starting this page.
 Open the Wagon file, and paste your Rounded Block in. It will appear exactly where it was in its own file. This is handy, too. When you are working on a very complex scene, say a room with many shelves full of books and things, you can position objects in a simpler scene (just one shelf) and then copy and paste them into the complex scene. This saves lots of time, since simply navigating in a complex scene can take a while.
Resize the block, until it looks right, and position it over the wagon. (Either go to the Top orthogonal view, or keep your eye on the wireframe shadows, to see when it's really over the wagon. Perspective views can be misleading, and a side view will only show you the X,Y or Z,Y axis. Since you need to position this in the X,Z plane, it saves time to look at both axis at once, which means the top view, or the shadows.)
Switch to a side Orthogonal view to place it on the bottom of the wagon bed. (We can't use the arrow to land it this time, since Bryce landing looks for the bounding box only. Both of these objects are Booleans, so the bounding box isn't where the bottom of the rendered object is at all.)
Zoom in closely, to make sure you have it. Remember, the dotted line is the bottom of the bed, and the cube, not the sphere, is the bottom of the block. You want the solid line of the Cube to match the dotted line of the Wagon Inside, as shown.
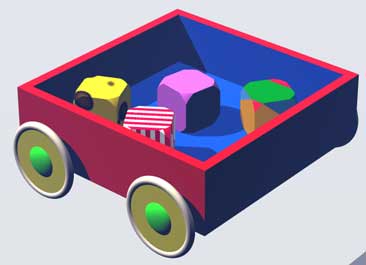
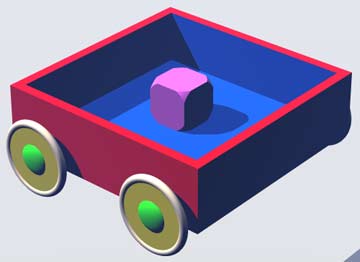 Do a test render, to make sure you've got it. It should look something like this. Watch the shadows, in particular, especially under the block. They will let you know if your block is floating.
 Now, it's no fun to play with just one block, so lets make a few more.
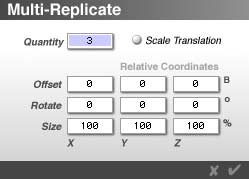
Select the block, if it's not already selected, and move your mouse to the top of the screen, so the menu bar will appear. Go to Edit > Multi-Replicate. This will bring up a dialog box that looks like this. It allows you to make a lot of copies of any selected object at one time, instead of copy/pasting to make each one, as we have been doing. It will also allow you to automatically reposition and resize them as they are made. We'll be doing some of that in the last lesson. But for now, just set the dialog box as I have it here. We'll make three copies, and keep them all the same size, and in the same spot, as the original.
Make sure that you check the numbers in all the boxes; if you have moved or resized anything, Bryce will assume that you want those alterations applied to the multi-replicated objects, and place the numbers in there for you. If you don't want that, you have to return them to zero and 100%. So be careful, or Bryce will "get'cha" on this one.
Click the check box, and it's done. The three new blocks should be selected.
 Go to the Edit palette, and choose the Randomize tool. We are going to spread the blocks out randomly in the wagon.
Make sure that 2D Disperse is checked from the flippy triangle under the tool. (We don't want them to rotate right now, because they would do so on all three axis.) Then, move your cursor to the blue dot at the top of this tool, and slowly drag in any direction. As you do so, keep your eye on the wireframe shadows and the Nano-Preview. You want the blocks to stay in the wagon, and not to interpenetrate. (Don't worry if they interpenetrate a bit, though; you can always fix it later.) Remember, it's the cubes inside the group you are watching, not the spheres.
 When you have spread them out so they look good, select each one and give it a slight tweak along the Y axis with the Rotation Tool, just to make them look more random. (Correct any interpenetrations, or any that have wandered out of the wagon now, too.) You can also give each one a different material.
You should wind up with something like this. (I used Wild&Fun presets on these.)
Okay, it looks good. But every baby needs a rattle, right? Let's make one.
Save, and open a new scene.
 Create a sphere, a cylinder, and a torus. These will form the parts of a simple rattle.
Pull the sphere upwards, using the Reposition Tool on the Edit palette. (Place your cursor on the top arrow, so that it changes to a square with a Y in it, click and drag to move the sphere along the Y axis.)
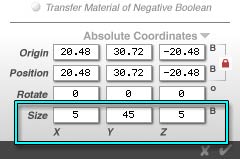
Select the cylinder, and open the Objects Attributes box. This time, we are going to resize the cylinder numerically.
Look at the bottom row of attributes, Size. You will notice that they are all the same. Well, we need to change that. We need to make a long handle for the rattle. The size on two of the axis will still need to be the same, but the third will need to be quite a bit longer. Do you know which ones are which?
If you said, "X and Z the same, and Y longer," you are correct. Let's type in new values now. We'll use 5 for the X and Z, and 45 for the Y. When you are finished, the bottom of your attributes box should look like this.
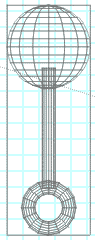 That was easy, wasn't it? Now try this. Select the torus, hold down the Y on the keyboard, and click and drag until it's at the bottom of the cylinder.
Holding down the key that corresponds to the letter of any of the three axis constrains movement to that axis only. (Option/Alt also constrains movement to the Y axis, and is handier because it's right there near the other two.) We could have used that to keep the wheels on the wagon even; but I wanted to show you the alignment tricks.
Change to the Front view, and make sure that you are allowing objects to show below the ground plane, if you need the room. (The icon 9th from the top in the Display Palette on the far right, if you've forgotten. The one that looks like a rectangle, with another rectangle sitting on a line in the middle of it.)
The proportions look a bit off, don't they? Let's enlarge the sphere to make them look better. Use the Resize Tool (on the Edit palette) to resize proportionally from the center, until it looks like a good rattle to you.
Make sure you have named all the parts, select, and group them. (Don't forget to name the group.) The handle should be protruding into both the sphere and the torus, like this.
 Alright, rattles should be sort of transparent, right? Click on the M to go to the Materials Lab, and assign a material to the whole group.
We are going to make this one from scratch.
First, choose the diffuse color. Make it anything you like. I've chosen light green.
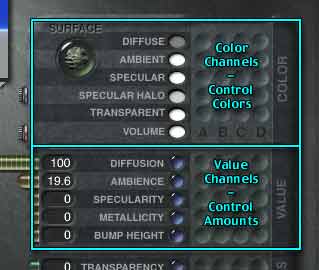
The top six choices in the palette here are color choices, as you may have guessed from the color swatches shown. But what you see depends entirely on the values chosen in the next two sections. So we are going there first, so when you get back to color you can see how your choices effect the material.
The next group of five channels control values. As you can see, these aren't colors, they are amounts.
| Effect of Diffusion on 100% Transparency (0% Ambience in all cases) |
||
 |
 |
 |
| 100% Diffusion | 50% Diffusion | 0% Diffusion |
The first one, Diffusion, is the amount of direct light your object will accept. This may sound strange, but the more transparent something is, the less direct light affects it. So, if you want something to be transparent, you will need to decrease the value in this slider. I just want semi-transparency for the rattle, so I'll set this one to 65%. You can either set it by clicking and dragging on the slider to the left of the row, or by clicking on the number, and typing the value you want directly into the text box.
| Interaction of Diffusion and Ambience (Diffuse color is purple; Ambient color is Cyan) |
|||
| 0% Diffusion | 50% Diffusion | 100% Diffusion | |
| 0% Ambience |  |
 |
 |
| 50% Ambience |  |
 |
 |
| 100% Ambience |  |
 |
 |
Ambience is the amount of indirect light the object catches. This one is tricky, because if it's set too high, the object will appear to glow. When you want that, it's great. But if you don't, it's not. (As a general rule of thumb, the total of Diffusion and Ambience should be around 90% to 110% for non-glowing objects. Use the high end of the range if you want the illusion of a lot of reflected light, say an apple on a white plate. Use the low end if you want the illusion of little reflected light, say a book in a dark room.) I want transparency, though, so I'll be setting it lower. I'm going with 15% for Ambience.
| Specularity | ||
 |
 |
 |
| 0% Specularity | 50% Specularity | 100% Specularity |
Specularity is the amount of highlight. The higher this number, the shinier the object. The lower the number, the more matte. This interacts with the Specular Color and Specular Halo Color channels to give you the highlights for your object. I want the rattle to be very shiny, so I'm setting this to 100%.
| Metallicity (Shown with 50% Reflection) |
||
 |
 |
 |
| 0% Metallicity | 50% Metallicity | 100% Metallicity |
Metallicity affects the colors of the reflections. The higher this value, the more they take on the color of the Diffuse Color channel. This is what metal does, which is why the value is called Metallicity. If the value of the Reflections slider in the Optics channels is zero, this setting has no effect. I'm leaving it at zero.
| Bump Height | ||
 |
 |
 |
| 10% Bump | 30% Bump | 90% Bump |
Finally, Bump Height affects the height of whatever you are using as a bump map. We aren't using one here, (that's for later) so we are going to ignore this channel.
| Transparency (Diffusion decreased as Transparency increased; sum = 100) |
||
 |
 |
 |
| 20% Transparent | 50% Transparent | 100% Transparent |
The last three channels are Optics channels, and determine the optical properties of your material.
The first one is Transparency. This determines how transparent your material is. I want the rattle to be translucent, not completely transparent, so I'm setting this to 45%.
| Reflections | |||
 |
 |
 |
 |
| 10% Reflection | 50% Reflection | 100% Reflection | 100% Reflection with 0% Diffusion |
Reflections determine how strongly reflective the material is. This is very important for some things, like metals or polished wood. But for transparent objects this is handled to a large extent by the amount of refraction set in the last Optics channel. So I'm leaving it at zero, until I see the preview.
| Refraction (All examples shown with 100% Transparency, 0% Diffusion) |
||
 |
 |
 |
| Refraction 110 | Refraction 133.3 | Refraction 150 |
Finally, Refraction. This is the amount that light is bent as it enters and leaves the material. You can see the refraction of water when you look at a straw in a glass. Ever notice how the straw seems to bend at the interface? Refractions are real world measurements, which can be looked up in tables. Bryce takes the real word measurement, and multiplies it by 100 to get the Brycian equivalent refraction value. For instance, the refraction value of water is 1.333. To make water in Bryce, you would type 133.3 into the Refraction channel. (If you do, you will see that it shows up as water.)
Air has a refraction value of 1, and glass is somewhere between 1.5 to 1.9, depending on the composition. I don't want that much refraction in this plastic, so I'll set it at about 1.3, which translates to 130.
Now, looking at the preview, I find that's not really enough reflections, so I'm going to bring that up a bit, to 11 or 12, after all.
Alright. We'll be setting the colors on Page 4.