Note: I haven't used Bryce in years; so these tutorials are archived "as is." I can't accept questions, because I don't remember the answers.
This is page 2. If you haven't finished page 1, please do so before starting this page.
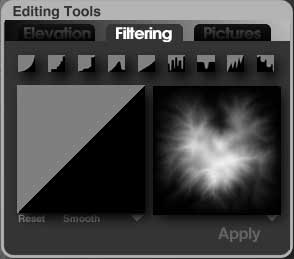 Okay? The second tab is Filtering. It allows you to change the cross sections of your elevations. You can click one of the thumbnails across the top, or you can draw your own outline by dragging the mouse in the window with the diagonal outline. Reset goes back to the regular 45° angle that is the default. Smooth smooths out the jagged bits in your drawing. Click Apply to apply the filter, or click the flippy triangle under the right corner of the drawing window to apply in different directions.
Try it out. This is how you can make Mesas, canyons, and other interesting things.
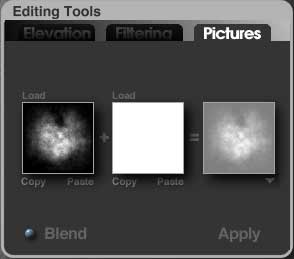 The third tab is Pictures. It allows you to control the pictures you import to modify, or replace, your terrain. We'll be getting to that at the end of the lesson, when we do symmetrical lattices.
 Alright. Now for the painting. This is not as much pure fun as editing with the elevation tools, but it gives you a lot more control.
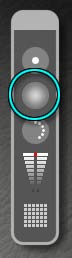
Look in the bottom left corner of the Terrain Canvas. There is a title there that says Brush Behavior. The default is Elevation, so we will start there.
Look at the Paintbrush palette. The circle on the top is the size of the brush you are using. Dragging to the right makes the brush larger, and dragging to the left makes it smaller. Make sure that Visible Brush is enabled in the triangle at the top right corner of the Terrain Canvas, and drag that control.
You will see a circle in the middle of the canvas grow smaller and larger. That is the actual size of the brush. As you can tell, you can paint tiny details, or you can cover most of the canvas in a single swath, depending on the size you make your brush.
Try drawing with a couple of the sizes. Keep an eye on the Preview as you do, to see what it looks like on the actual terrain. (Remember how to return to the terrain you started with? Control/Ctrl - Click on New in the Edit palette. Do that when you have experimented enough with any one size.)
 The next circle shows the softness of the brush; how much it blends as you paint. Drag right to make the edges softer, left to make them harder. Experiment a bit with a fairly small brush and various softness/hardness settings, to see how it behaves.
Return the canvas to its original state when you are finished trying it out.
 The next circle is the flow of the brush. The more little dots you can see, the more effect the brush has. Few dots (slow flow) applies the effect only gradually, and you will have to go over the same area several times to have the same effect as a high flow brush. But if you want a subtle effect, slow flow is the way to go.
Click and drag right to increase the flow, left to decrease it. Try it. (Hint; the softer the brush, the more effect flow has on it.)
 The slider below that is what actually controls the elevation when you are painting with elevation, like we are doing now. The higher you move the little red dot, the higher the elevation. The lower you place it, the lower.
You can use high elevation to make walls, and low to cut channels. Or you can just retouch the mountain, and give it a double peak, before you use the elevation tools to manipulate it.
You can pick a specific elevation, from any area on your canvas, by holding down the spacebar. The cursor will turn into an eyedropper, which samples the color of the pixels below it, and translates them into elevation, for as long as you hold the spacebar down. Try it, watching the little red dot move up and down as you run the dropper over the picture. Matching elevation becomes important when you want to add things like roads, walls, or waterfalls or to your terrains.
 Elevation is only one of the ways you can use the brush. (The controls work exactly the same for all of them, of course.)
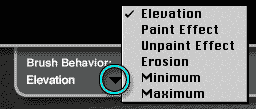
There are six different Brush Behaviors under the flippy triangle in the bottom left corner of the Terrain Canvas Tools palette. (If you don't see it, click on the icon in the top right corner of the Terrain Canvas to open the tools, as explained on Page 1.)
You can paint with any effect caused by the Elevation Tools. Change the Brush Behavior to Paint Effect. Click the Elevation tab, if you aren't already there, and use one of the editing tools to do something to your terrain (what doesn't really matter) Now immediately Undo.
Take the brush, and paint over an area. The effect appears where you paint! Neat, huh? So if you want spikes, for instance, in just one area of the terrain, you can add them, undo, and paint them in just where you want them. (Spikes, by the way, make great conifers on distant mountains.)
Unpaint Effect works in just the opposite fashion, for those times when you want the effect most places, but not everywhere. Change to the Unpaint Effect Brush Behavior.
To check it out, add an effect, any effect, with the editing tools. Paint with the brush on your canvas, and the effect vanishes just where you paint. Once again, you can get wonderful, realistic, and subtle variations with this.
Erosion, the next Brush Behavior, allows you to paint those wonderful little erosion rivulets just where you want them. For instance, you can use the lowest Elevation brush to paint a river in the middle of your terrain. Then use the Erosion brush to erode just the banks of that river.
The last two Brush Behaviors are Minimum and Maximum.
Minimum will darken (lower) any elevations that are above the current level, but it won't touch things that are below that level. So, you could lower the top of a mountain without touching the erosion that had cut grooves into it. (Normal Elevation behavior would raise the grooves at the same time it lowered the mountain. This is nice if you want a road, but if you just want to lower this bit, it's not so good.)
Maximum lightens (raises) any areas below the level you have set in the Elevation portion of the Paintbrush palette, but leaves the levels above that untouched.
So, play with your terrain for a while, until you have something that you really like. When you do, click the check mark to exit the editor and commit to your changes. I'll see you out there! (But don't take too long, we still have quite a way to go in this lesson. You can come back here later.)
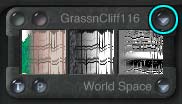
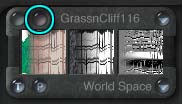 Okay. Now that you have the terrain just the way you want it, it's time to learn some more about the Material Editor. So click on the M next to your terrain to enter it. (If your terrain has become unselected, you can always use the Selection palette at the bottom of the screen to select it again. Don't forget to name it, too, so you can recognize it easily.)
Choose a preset terrain material. I want to show you something.
As you can see, this material uses at least one of the Procedural Texture Components that we mentioned briefly last lesson. You can see it there in the palette on the right, and you can see the dimples filled in for the channels that are using it. (Probably Diffuse and Ambient Color, and Bump Height.)
At this point, you know how to increase or decrease the bump height to modify your material a bit. I'm about to show you how to change the colors.
Now, this will involve a trip to the Deep Texture Editor, much of which is Advanced Material. But some of it is easy to use, so we'll be doing more and more of that during this course.
Remember how you clicked on the pinkish button to access the Picture Editor? Well, you click on the same one to get to the Texture Editor. Do it now. (It's the one on the right in the left hand corner of that little Component Palette to the right.)
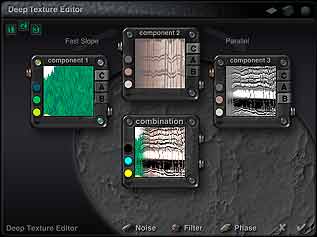 This is the Deep Texture Editor, where all the procedural textures in Bryce get their start.
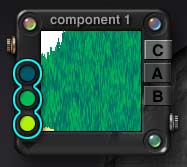 Notice the color swatches on those component palettes? You can change them, just the way you change colors in the regular Material Editor. Try it now.
 Depending on how the texture is set up, the colors can blend in different ways, so you will have to look at the palette in the center bottom, labeled Combination, to see what you are really getting. (Don't forget that it has color swatches, too.)
Sometimes changing the colors won't have any effect, because sometimes they aren't actually being used. Sometimes the color will do something strange, depending on how it's blended. But you can still play around, and get closer to what you envisioned, even if you can't seem to get the exact color you wanted.
Don't forget, you can hold down Option/Alt and get the advanced color picker here, too.
Alright. When you are ready, click the checkmark to exit and keep your changes. If you just want to cancel out, click the X.
 Now, I'm going to show you how to save the material you just made as a preset for yourself.
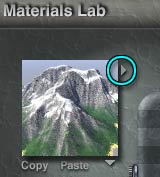
Click the Triangle next to the Preview in the Material Lab to open the Presets.
 Set up the preview so it looks really good, because this is going to be the thumbnail for this preset. (I highly recommend unchecking "Render with Neutral Ground" when saving terrain presets, so you can see what they will do on a flat ground plane.)
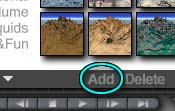
At the bottom of the window there are a number of choices. Click on Add.
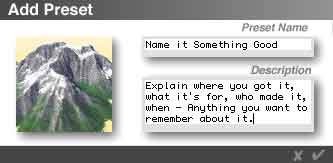 A dialog shows up that has the name this preset had before, and a text area for the description of it. Name it whatever you want, and add a description, if you are so inclined, by typing directly into these text boxes. It's a good idea to add your initials, at least, so that you know which ones you have tweaked, and which ones you got other places, in case someone asks. You may also add which one you tweaked to arrive here.
 Click the checkbox, and your preset appears at the end of the list, with the title and description just like all the others. It's saved as of now. If the program crashes, you won't loose it.
Close the preset box.
 I want to show you just one other thing, while we are here.
See the flippy triangle at the top right corner of the Component palette? (When you run your mouse over it, the text above it will say, "Texture Library.") If you click on it, it will give you a list of all the various built in textures. Which is nice, if you happen to know what the names mean.
Now, hold down the Shift key, and click on it again. This time, you get thumbnails. You can click on any of them to add that texture component to your material. (You can also add the texture you just modified to these presets, just the way you added it to the Material Presets, so you can use it again at any time.)
So, you can set up a texture with colors, like you did for the last lesson, and then use the bump from one of these. Or you can just use one by itself, and set your own values for specularity, etc.
You can play with it to your heart's content. But do it later; for now, exit the Material Editor.
 Alright. You now have a beautiful terrain. It's time to put a tree on it. But not just any tree. We are going to explore the Tree Lab, so that you can make the trees look (more or less) the way you want them to. Save your terrain, and open a new document.
Trees are the second thing on the Create bar, in the Procedurals section. The others are Terrains, which we just did, Symmetrical Lattice, and Rocks.
Click on the little tree icon to create a tree. An outline will appear on your screen, already selected.
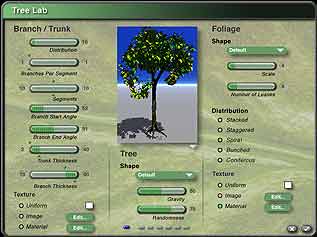 Click the E on the Icon Column to enter the tree lab. It looks like this. (Well, more or less. Once again, I've used the Rendered Preview, just to show you.)
You will notice a preview in the middle of the lab. This one works just like the others. You can use the flippy triangle below the preview to choose Wireframe or Rendered view, Normal or Close Up, and whether to use a neutral sky, or the one currently being used in your document. Render with Neutral Ground will, once again, give you a flat gray ground plane which renders quickly. If you uncheck that option, you will get a grassy plane. (It won't be the one used in your scene, however, so in my opinion you may as well save the render time.)
The same controls work to navigate in the preview, as well. Click anywhere in the preview and drag your mouse to view it as if the tree were the center of a virtual trackball. Hold down Control/Ctrl, click and drag to zoom in and out. Hold down the spacebar, click and drag to pan right and left, up and down. Hold down Option/Alt and click to return to the default view.
The one difference is that, in Rendered Preview, the preview may not render until you click somewhere on it. This is because these previews take time, and there is no point in using the memory required to render until you need it.
 Bryce trees have four parts; the Shape, the Branches, the Trunk, and the Foliage.
The Shape is the overall silhouette of the tree, as seen in the distance. All tree species have characteristic shapes. For instance, an elm has a distinct umbrella shape, fir and spruce trees are shaped like cones, and everyone can recognize a palm tree.
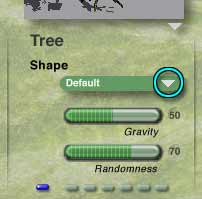
Bryce has an extensive list of preset shapes. You get them by clicking the triangle on the green bar at the top of the Shape section, under the preview. It probably says Default right now. But look at all the shapes you can have.
Now, because each shape requires the computer to generate a new tree, it will take a few moments to see the change even in Wireframe Preview. Also, because there is more to a tree than just its shape, they may not look like you expect them to. Branch distribution and foliage have a lot to do with how a tree looks, too.
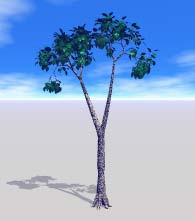
| Effect of Gravity on Tree Shape - Note even leaves are effected | |
 |
 |
| Gravity 87 | Gravity 7 |
Below the Shape menu are two sliders that also affect the general shape of your tree. The first one is gravity. When this is set to a high number, all the branches will droop, and all the leaves will point to the ground. The lower it is, the less this effect influences the shape of a tree. At a low gravity, branches are more upright, and leaves may point in any direction. (There is no antigravity; no setting to make the branches and leaves all strain skyward.) Try it out.
Below that is the randomness setting. This keeps your trees from looking identical, even if you have several in the scene with exactly the same settings. You can set this number by pulling the slider, or by typing a number directly into the field.
In the bottom middle are memory dots. They work exactly the same way the memory dots throughout Bryce work. Save a new group of settings by clicking in an empty (gray) one. Use saved settings by clicking in a blue one. Clear a set so you can save a different set by Option/Alt clicking on a blue one. Be careful, though. There is no undo if you clear something you wanted to save.
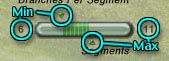 To the left are the settings for the trunk and branches. Several of the sliders here work a bit differently. They're called Min/Max sliders, and they allow you to set minimum and maximum values. Bryce will then pick a random value between those two when generating a tree.
Min/Max sliders have tiny green arrows above and below the slider. The arrow on the top sets the minimum value for the attribute. The arrow below sets the maximum value. To use them, click and drag the arrow itself. (Dragging on the scale in these sliders won't do anything.) You can also type the minimum value into the text field on the left, and the maximum into the field on the right.
The greater the spread between these numbers, the more random your tree will be. It will resemble a tree with what is known as an "untidy growth habit." The smaller the spread, the more regular the shape of your tree.
If you don't want the computer to pick a random number, you can set both Minimum and Maximum to the same number, and the computer will simply use that one.
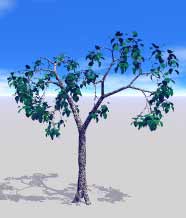
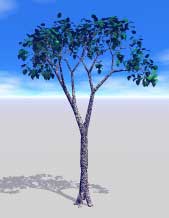
| Effect of Distribution on Tree Shape - Note even leaves are affected | |
 |
 |
| Distribution 6 | Distribution 86 |
The first slider in this section is Distribution. It controls the way in which the branches are distributed on the tree. The lower the number, the lower on each branch new branching begins, and the more evenly the branches are spaced. The higher the number, the higher on each limb they begin. High numbers can form clusters of branches at the ends of limbs.
Well, this page is full. Moving on to Page 3