Note: I haven't used Bryce in years; so these tutorials are archived "as is." I can't accept questions, because I don't remember the answers.
This is page 2. If you haven't finished page 1, please do so before starting this page.
 |
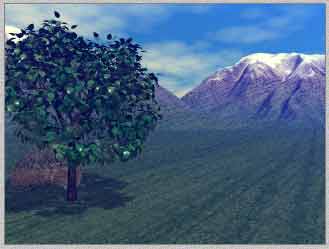 |
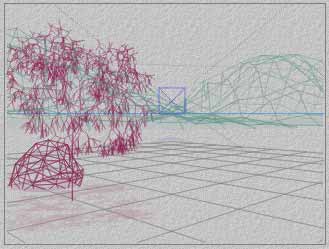
| This is a Wireframe; it's what you work with. | This is a Render; it's the final output. |
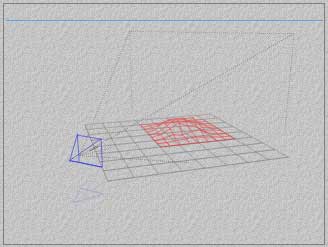
When you are building a scene in Bryce, you will normally be looking at the wireframe, just as you see it here, and on your screen. Right now, it has a grid on the bottom. This is the ground plane, and we will be talking more about it soon.
In order to see the picture, you will have to render it, or translate the wireframe into an image. We'll be talking about that soon, too.
 You will be using one of several preset views, or one of two cameras, to look at your scene.
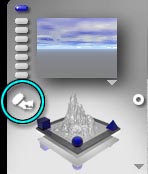
At the moment, unless you have changed something, you are looking through the virtual lens of the Director's Camera. You can tell, because there is a little icon of a Director's Chair in the upper left corner of your screen.
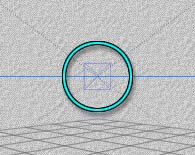 If you look at the workspace, you will notice a blue square in the center of the scene. That is the Camera. In Director's View the default is exactly opposite the Camera, and you are looking right into the camera lens. The Director's view camera is always invisible.
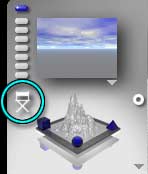
 Click on the Director's Chair. You will notice that the icon changes into a Camera, showing that you are now in Camera View. Also, the blue box vanishes, since you are looking through it, and the sky in the little picture above that icon changes.
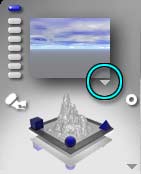 That picture is a tiny rendering called the Nano-Preview. Right now, it's pretty empty. But as we start changing things, keep an eye on it. It will show you the rendered scene, as opposed to the wireframe you see in the working window.
You can decide whether to update it as soon as you make a change in your picture (recommended,) how much to show, and which view to use.
To see those choices, click the little flippy triangle directly under the right corner of the Nano-Preview. A menu will drop down, allowing you to choose from a variety of items.
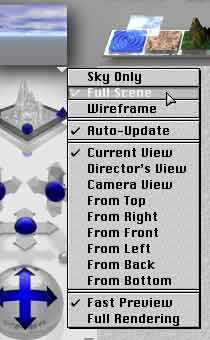 To view changes in the scene as you make them, make sure the checkmark next to Auto-Update is showing. If it's not there, click on the word Auto-Update now to show it. (When it's not checked, the Nano-Preview will only update when you click on the little picture itself.)
Also, for now, make sure that Full Scene is checked. That will show the whole rendering, instead of just the sky or the wireframe. Current View should also be checked. That will show a rendering of whatever is in your working window.
Click on the camera icon again, to change back to the Director's View.
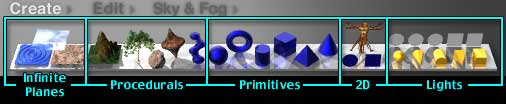
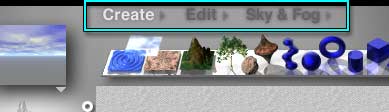 To the right of the Nano-Preview are three palette choices; Create, Edit, and Sky & Fog. Each of these calls up a separate palette when you click on the word. These palettes are composed of icons, and will appear directly below the words. You can tell which palette you have, because the word is white. Go ahead and click on them now to see them.

This is the Create palette.

This is the Edit palette.

This is the Sky and Fog palette.
We will start with the Create palette, so if you are not showing that one, please click on it now.
This palette shows icons representing the various things that you can make within the program itself. They include infinite planes of water, clouds or land (on the far left.) Terrains, trees, or rocks (next three to the right.) Symmetrical Lattices (the one that looks like a top.) Metaballs (the blue zigzag thing.) Primitive shapes (the blue ones.) Picture objects (the circle and square, and the picture of Leonardo's Man, who is called Leo, by the way.) And, finally, different kinds of lights (the yellow things.)
We will start from the left, because it seems logical to me.
 Click on the far left object, the one that looks like a blue square with concentric rings in it. That is the Water Infinite Plane, and represents blue water with ripples. Immediately, a new shape appears in your workspace, and the Nano-Preview shows an ocean beneath the sky.
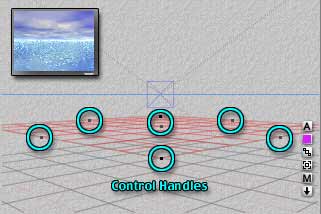 You will also notice that the object in the workspace is a red grid, with black boxes at each corner, in the center of each side, and in the middle of the object. That means that it's the currently selected object. The black boxes are Control Handles, and we will be talking about them in detail later.
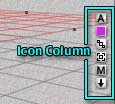 Also notice a column of tiny square icons and things somewhere on your screen, that looks like this. These are controls for the attributes of the object, and we will cover them in detail later. Whenever any objects are selected, this line will appear in the workspace, even if the selected object is not visible in the workspace itself. They are usually to one side of the object; but the program chooses which side, so watch for them.
The object you have just created is an infinite plane, which means that, although you can see the sides in the wireframe, the render shows the surface going on forever. Bryce put it at this height, and assigned a water material to it from the presets stored in the program, because you chose a water plane. The exact preset that it chooses is random, but you can change it at any time. I'll be showing you how later.
 Click on the patchy white square, which represents an infinite cloud plane, to see the height Bryce assigns to clouds, and one of the preset cloud materials. Remember to watch the Nano-Preview to see what the rendering will look like.
Notice that now the cloud plane is the selected object, and the water plane is a magenta grid with no control points, showing it is no longer selected.
Click on any empty area of the workspace, and you will see that the cloud plane is unselected. Whenever you want to unselect things, you can click on any empty area of the workspace to unselect everything.
 Click on either plane to select it. Now, hold down the shift key, and click on the other one. As you can see, they are both selected; and both wireframes are red. They share a set of Control Points, and an Icon Column. There is a reason for that, and we will explore it later.
If you clicked in the middle of the water plane, and some of the default ground plane was under your cursor, it will be selected as well. Anytime you hold down the shift key and click, everything under the cursor changes selection status. In other words, anything that was not selected will become selected, and anything that was selected will be unselected. Try it out, and see.
You can also select everything in the scene by typing Command/Ctrl-A. Unselect everything by typing Shift-Command-A on a Mac, or Shift-Ctrl-A on a PC.
Now, select just the water and cloud planes, and tap the Delete key to delete them.
 Click on the brown square to make an Infinite Ground Plane. Notice that it, too, is assigned a random terrain material from the presets stored in Bryce. Check it out in the Nano-Preview.
You can play with these three planes for a few minutes, see some of the presets, and see the positions that Bryce assigns to them. Once you have created them, of course, you can put them anywhere you want them. I'll be showing you how to do that soon.
If, at any time during this process, you want to step backwards through what you have done, you can undo the last 16 operations by clicking Command/Control-Z to Undo. To Redo, click Shift-Command/Ctrl-Z.
When you are finished experimenting, delete everything but the default ground plane.
 Now, go back to the Water Plane, and click and hold the mouse button. Notice that you are now given a choice between Surface and Volume. Bryce can assign materials in two different ways, applying them to the surface of an object, or making an actual volume with that texture assigned all the way through it. The latter is wonderful for making realistic clouds and rocks with actual texture and holes in them; but the cost is a high rendering time.
Go ahead, and choose the Infinite Water Plane Volume, to see what the wireframe looks like. Notice that now it has a third dimension, height, added. The height shown, unlike the width and depth, is real. That is, it renders with an actual top and bottom and they are where the wireframe shows them. It's not infinite in this third direction.
You can create Volume Cloud Planes and Volume Ground Planes, in just the same way. Click and hold to choose, or just Option/Alt-click if you know you want the volume.
 Delete this, and click on the little mountain to make a terrain. Bryce will automatically generate a terrain based on random fractal information. Each one will be different from any of the others. Look at the Nano-Preview. Notice that this little mountain has the default gray Bryce material, and is floating above the ground.
![]() Remember the little column of controls that show up when something is selected? We are about to use one of them. Make sure the terrain is selected, and find those icons. At the bottom of the column is a little arrow pointing down. Click on it. Your terrain will land smack on the ground. (It will probably be slightly off the bottom of the picture, too.)
Remember the little column of controls that show up when something is selected? We are about to use one of them. Make sure the terrain is selected, and find those icons. At the bottom of the column is a little arrow pointing down. Click on it. Your terrain will land smack on the ground. (It will probably be slightly off the bottom of the picture, too.)
 Good. Now that we have something to look at with the camera, we are going to explore camera movement.
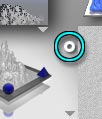
Look to the right of the Nano-Preview. See that little white circle? Click it.
 You are now in Flyaround View. Pretty neat, huh? Move your mouse, and you will see that the position you are viewing from changes, too.
Hit the spacebar to freeze the motion. Move the mouse now to have complete control over where you are going.
Hit the spacebar again to start the motion once more. Hold down the Shift key to slow it down.
Hold down Command/Ctrl and move the mouse up to zoom in, or down to zoom out. The slower you move the mouse, the larger zoom you have available
Click anywhere to return to the previous camera position.
Click on the Flyaround Icon again. This time, type Return/Enter. The flyaround will stop, and the last position will become the new camera position. If you were using the Director's View, it will be the new Director's View, and you will still be able to see the blue sideways pyramid that represents the Camera. If you were using the Camera, it will be the new Camera View.
You might want to experiment with this for a couple of minutes. End with a view that is different than the one you started with.
When you are finished, it's time to move on to Page 3