Note: I haven't used Bryce in years; so these tutorials are archived "as is." I can't accept questions, because I don't remember the answers.
This is page 2. If you haven't finished page 1, please do so before starting this page.
 Alright. Now we are going to take a look at the next section, which will allow you to use a gel on your light. This is exactly the same idea as using a gel in the theater. It allows you to add colors or shapes to your light, therefore letting you have pretty impressive effects fairly cheaply.
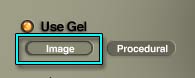
To enable it, just click on the button next to Use Gel. You now have your choice of either using an image as a gel map, or a procedural texture. First, click on Image. The familiar Picture Editor opens. Load the SeamlessCaustics.jpg image that was provided with this lesson, and exit the editor.
 |
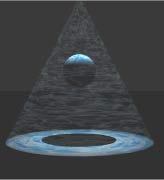 |
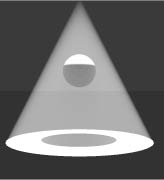
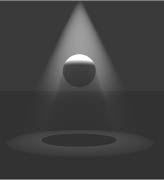
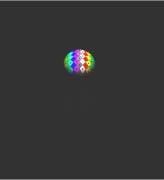
| Volume Visible Light with Gel | Surface Visible Light with Gel |
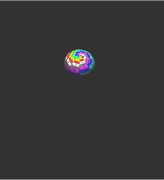
If you don't already have Visible Object enabled, do so now. Use an infinite volume light, and white uniform color. Notice that the colors of the gel are added to the light, and that you can see them in the visible light as well. Change to a surface light. Notice the difference, and the similarities. (By the way, you can use this particular gel on a light to create underwater scenes. I don't have time to show you that now; it's for the next course. But you can experiment on your own if you want to.)
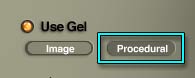 The other button, Procedural, will take you into the Material Editor. Try it now. You know all about how to use that. Try some of the materials made for lights in the Volume section of the Presets. You can increase the transparency by turning down the Base Density. You already know how to change the size by using the greenish edit button on the Component Palette, and increasing the frequency to make the texture finer, or decreasing it to make the cloud clumps larger. Have a great time, but don't get seduced by the Fun Side of the Bryce. There is still a lot I want to show you.
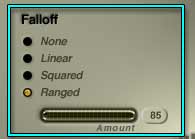 Alright. The final part of the Light Lab is Falloff. As you know, the light from a real world lamp doesn't go on forever. It fades as it gets farther from the source. How long it takes to do that is its Falloff rate. In Bryce, you can control that.
 If you set the Falloff to None, obviously, there won't be any falloff. You will have a laser; except that it might still spread out (we'll be getting to that soon.) Try it out by clicking the button, and see what it does to your preview.
 Linear Falloff is the default. It makes the light fade at a constant rate, with a fairly large range. However, you cannot directly control that range. This is usually used for things like street lamps and searchlights in outdoor scenes. It's what we've been using all along, (unless you changed it at some point.)
 Squared Falloff uses a geometric progression to cause the light to fall off very quickly. It's usually used for things like candles and light bulbs indoors, where you want some of the scene to be in shadow. Take a look at it.
 |
 |
 |
| Ranged Falloff 10 | Ranged Falloff 50 | Ranged Falloff 85 |
Ranged Falloff just makes the light stop at the end of the range specified. It's great when you want a light to go just so far, and no farther; but it's not very realistic looking. To test it, type numbers into the text box, starting with 10, and increasing by increments of 10. See what I mean?
 If you need to use a ranged light, I suggest that you put a gradient on it. That way, you can have the best of both worlds. A light that fades after a distance that you can specify. In this example, the range for the light was 85 (the same as the figure at the far right above) but this time, I applied an opacity gradient that took it from 100% to 10% opacity. See the difference?
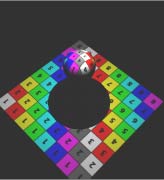
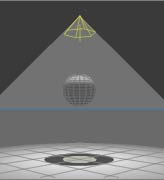
So, now that you know your way around the Light Lab, we are going to take a look at the kinds of lights that are available. Turn off Visible Light, enable Use Gel and click on the Image button. This time, load the one called ImageMapTester.jpg. It will allow us to clearly see the distortion caused by the various lights.
Make sure that the Intensity is bright enough to easily see the spot of light on the ground, and that you are using Uniform color, Linear Falloff, and have Cast Shadows enabled.
Click on the check mark to exit the Light Lab and keep these settings.
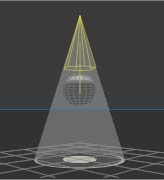
 Now, using the Director's view, move so that you are a bit above the light, and far enough away to see the pool it leaves on the ground easily. Go ahead and render.
See how the grid is distorted, so that it all pulls in towards the center? That is going to happen to every gel that you apply to a spotlight, so be aware of it.
 Now, make sure that your light is selected, and go to the Edit Palette. See the little double headed arrow above the palette? That's the Convert button. It allows you to change anything that you made from the Create Palette into any other thing that you can create there.
Right now, we are going to change the Spotlight to a Radial light. Just click on the arrow, and drag out to the little round yellow ball. Let go, and there you are. Slick, huh? (Make sure your sphere isn't selected, or it will change that to a light. Anything created to any other created thing, remember?)
 Now render. Notice how, with exactly the same settings, the light illuminates much more. And there is no sharply defined edge. It just fades away. This is the Bryce equivalent of a light bulb without a shade or a base. It's just a ball of light. But the polar distortion is still there.
 Now, try the next one on the list, the Round Parallel Light. First, notice that the edge of the light doesn't go beyond the sphere. This is because it doesn't spread out at all. The spotlight makes a light beam that is shaped like a cone. This one is really more like the laser we spoke of earlier. The beams of light are all parallel, and there is no Half Angle (spread of the light.)
But, once again, notice the polar distortion of the grid. It's all drawn up in the center.
 Alright. Change it to a Square Spotlight. Notice that it now spreads again, just like the round spotlight. But there is no distortion of the gel image. If you need to use a gel without distortion, put it on a square light. If you need to have a round edge on the light, incorporate that into the gel.
 Finally, switch to a Square Parallel light. No spread, and no distortion. This is the kind of light you would use to imitate sunlight, which is so far away that the beams appear parallel, while keeping a gel intact.
 |
 |
 |
| Default Half Angle | Half Angle Changed by Decreasing Length on Y axis | Half Angle Changed by Increasing Length on Y axis |
There are just a couple more basic things to show you, and then we can start actually using the lights!
Switch back to one of the spotlights, it doesn't matter which, and enter the Light Lab. Remove this gel, and switch to a Visible light. Use Surface for now, because it renders so much more quickly. Close the Lab.
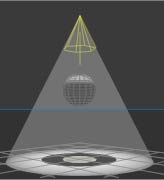
We are going to change the Half Angle of the light; the amount it spreads out from the source. That is controlled by the ratio of the height of the light to it's width. In other words, the shorter it is on the Y axis compared to its size on the X and Z axis, the more it will spread. Think of the shape of the light as its lampshade. A short, wide lampshade will give a much larger pool of light than a long, narrow one. It's just like that.
Visually, the angle formed by the sides of the wireframe is exactly the angle formed by the light beams. Mentally extend those lines, and you will be able to see just where the light is going.
Without changing the angle of the camera, grab the Y control handle of your light, and squish it up along the Y axis. Keep an eye on the Nano-Preview, and make several stops, so you can see the effect. The shorter you make it, the greater the half angle of the light.
Now pull it the other way. Notice that the longer it is, the smaller the circle of light on the ground. The narrower the light, the smaller the half angle.
 Okay, now you can control every aspect of every light in your scene. (Well, you will be able to with this knowledge and a bit more practice.) But how do you aim these puppies? Simple.
There are two ways. One is to aim them manually. If you look at them from the side, either in an Orthogonal view, or with one of the perspective cameras, you will notice that there is a red line sticking out of the end. (There isn't one for Radial Lights, but then, you don't have to aim them.)
That is the actual direction of the light. Keep your eye on it, and use the same tools you have been using all along to rotate it, resize it, align it, and perform all the other transformations on it that you've been doing with everything else.
![]() The second method is more elegant, and will allow you to keep your light on a specific target, even if you move the target. It's called Tracking, and it's very simple to set up.
The second method is more elegant, and will allow you to keep your light on a specific target, even if you move the target. It's called Tracking, and it's very simple to set up.
Select the light, if it's not already selected. Now, in the Icon Column, the one in the middle is the Tracking icon. It shows a square, centered between some registration marks. (Keep your eye on the Text Display area, to make sure you have your mouse over the right one.) Click it, and begin to drag.
 A line will appear, going from the center of the light to your mouse. Pull that line to the sphere, and the sphere will turn blue, to show that it's the tracking target. Release the mouse button.
Now select the sphere, and move it around. The light will follow. The sphere cannot escape it! You can also select the light, and move it, and it will continue to aim itself at the sphere as you go. You can even change the light to any other object, using the Convert Selection tool, and it will continue to track.
To stop tracking, just click on the icon again. It will turn the tracking off.
Isn't that easy? (You can use the same trick to make the camera point at things, by the way.)
Alright. Now to have some real fun.
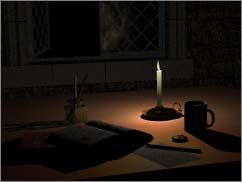
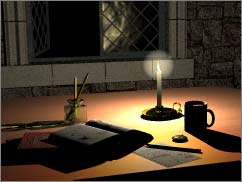
 Save this scene, and open the scene called Study.br5, which was in this lesson's downloads. This is an interior scene, which we are going to use to explore a few things about lights, and a few techniques.
Press the render button, or hit Command/Ctrl - R to make a quick render.
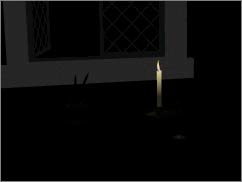
As you can see, it's pretty dark right now. In fact, all the light that you see comes from the Ambience value of the objects. Notice that the window frame is obviously there, in a ghostly kind of way, even though it's not illuminated by anything. (So is the candle, but that's intentional.)
If you want to do a night scene, it's important to turn the ambience way down or off on all the objects in the scene, or they will glow like this.
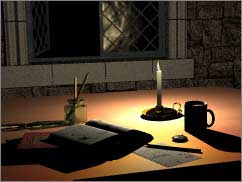
Let's start by getting rid of that glow, shall we? Hit the Esc/Esc key to toggle to Wireframe mode. Select the window frame, take it into the material lab, and set the Ambience value to zero. Now render it. That's better. Nothing glowing except the candle.
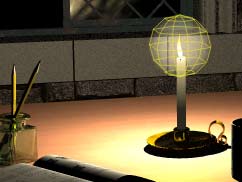
 Now, in order to make the candle actually shed light, we are going to put a radial light inside the flame. But we don't want the flame to move, because the scene is already set up. So we will lock it first.
Select the Candle Flame, get the Attributes, and check "Locked," just the way you have before. Then go to the Create palette, create a radial light, and name it Candle Light. (You create it by clicking the round yellow ball, remember?)
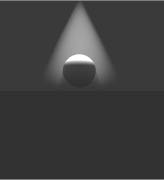
If it shows up outside your scene, drag it inside the room, and place it above the table. Take a look at the Nano-Preview. Wow, that's bright!
 Go to the Resize tool on the Edit palette, or grab it by one of the corner control handles, and shrink it down until it looks like it's the right size to make a nice halo around the candle flame. Keep an eye on the Nano-Preview while you do this. See any difference? There isn't any.
Unlike the other lights, radial lights are not at all affected by the size of their wireframes. This is because they are all really single point source lights. The size and shape of the wireframe makes them easy to grab, and influences the Visible light, if that's enabled, but that's all.
We are going to have to change that wattage in the Light Lab. So click on the E in the Icon Column to enter it now.
 Make sure that the preview is showing Render in Scene. The intensity should be the default of 25. Edge Softness is dimmed, because Radial Lights don't use it. The shadows look good. So why is the thing so bright?
The answer is Falloff. Remember, I said that Linear Falloff was pretty long? That's what you are seeing. Click the button to change to Squared falloff. Big difference.
 It's still a bit white for candle light, though. Use the Color to make it a bit warmer. (You know how. Just click on the color swatch.) Don't overdo it; this isn't a bug light. Make it about the color that you want to see on the white pages. Also notice that you can control the brightness of the light here, too. If you choose a darker color, the illumination of the whole scene becomes darker.
When it looks about right for candle light, exit the editor.
 Now to place it inside the candle flame. Select them both, and use the align tool to align them on all three axis (blue button in the middle.) Since the flame is locked, only the light will move. (Of course, since it's locked, you can't select it directly. You can either use the Named Meshes under the flippy triangle in the Selection palette, or you can use the Shift key with Control/Ctrl to select them both.)
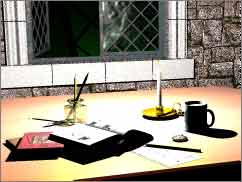
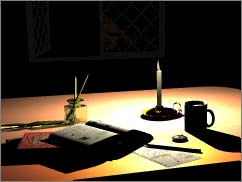
Did it look to you like it just got dimmer? That's because the candle flame object is blocking the light. In order to make something that looks like a candle flame or a lit bulb, (anything glowing, and casting more than a little light,) the object you are putting the light inside must have a high Ambience value, and either a Transparency value of 100%, or a shading mode that doesn't cast shadows. It doesn't matter which one. In this case, because we want to keep the color of the candle flame, and transparency washes out color, we'll leave it with the transparency map it has, and eliminate the shadow casting.
 Unselect the light, so just the candle flame is selected. (You can hold your cursor over both of them, and hold down Shift/Control on a Mac or Shift/Ctrl on a PC, to get a menu of the objects under the mouse. Then just release the button when you are over Radial Light to unselect it. The flame will remain selected.) Go into the Material Lab, to the Shading Mode triangle next to the Component Palettes, and disable all three shadows. (Cast Shadow, Receive Shadow, and Self Shadow.) Exit the lab, and you will have light on the table again. Go ahead and do a quick render. (Don't forget that you can turn off anti-aliasing in the Document Setup to save time.)
Notice the quality of the light, and the darkness and direction of the shadows. This is what you get with one radial light and no fill light. If you want to experiment later, try rendering with soft shadows, or putting a gradient on the light.
 Now, lets say that we want more of the things on the table to be illuminated, but we want the wall to be in total shadow. How can we do that?
The answer, of course, is Ranged light. Remember how it ended abruptly with the spotlight? Well, it's something like that with Radial lights, too. It has soft edges, but within them the light is closer to its total value for longer. Outside of the limits you set, there is no light. Let's take a look.
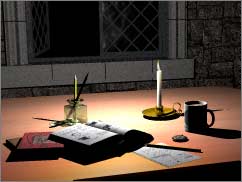
Take the light into the Light lab by clicking on the E, and change the Falloff to Ranged, making the Range about 10, because this is a pretty small scene. (It's probably easier to just type it in.) Set the preview for Render in Scene, and watch it, as you change the Amount of ranged light to 15, 20, and 25. See how it works? Don't forget, that number is actual Bryce units.
You can render this, if you want to. Try it with the range set to around 20 B.
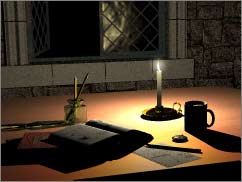 When you are finished, return to the Light Lab, and set the Falloff back to Squared. Now, set the Render Options to Visible Object > Surface, and exit the Lab.
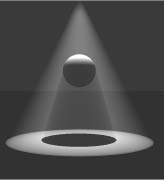
Render the picture. Notice that the edges of the light globe around the flame are soft? Surface visible object gives you soft edges with a radial light, unlike the hard edges you get with a spotlight.
 Make sure the light is still selected, go back into the Light Lab, and change that to Visible Object > Volume. Use the RaySpray to render just the light from the Render Mode screen. (You can find the controls for both of these on the Display Palette to the right of the workspace.) Notice that the edges of the light are now much harder, and that you can see the shadow from the candle extending into the light.
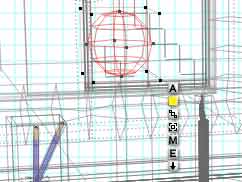
 Toggle the Display Mode to combined Render and Wireframe. Notice that the edges of the wireframe for the light define the edges of the Visible Object sphere. You have control over the size and shape of the Visible Object.
Make the Wireframe larger, using any method you like, and re-render that portion of the picture. This time, use the Plop Render, so you catch some of the table and the objects on it, as well. As you can see, neither the brightness nor the range of the light have changed. The only thing the wireframe of a Radial Light controls is the size of the Visible Object. You can play with this for a few moments, if you want to. Try changing the proportions of the Wireframe, or its angle, as well. (Just be sure to keep the center point within the candle flame, and don't let it get into the Candle Wax, or it will get very dark in your picture.)
 |
 |
| Shading Mode; Blend Transparency | Shading Mode; Fuzzy |
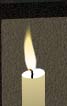
When you are finished, there is just one more thing I want to show you about using candles in Bryce pictures. Notice how hard and sharp the edges of the flame are? Well, they don't have to be that way. Select the Candle Flame itself, and take it into the Materials Lab. Go to the Shading Mode flippy triangle, next to the Component Palettes, and choose fuzzy, from the top portion of the list, as the Blending Mode. Then click in the dimple right next to the word Transparency in the Optics portion at the bottom of the Palette to switch back to straight value, so that the map from the texture won't be used to determine the transparency of the flame.
Now, render just the candle flame again. See the difference? You can control how blurry it looks by changing the transparency in the Material Lab. The higher it is, the more the edges blend.
In this shading mode, Bryce determines the blending of objects based on their thickness. Usually, that means the edges are fuzzy. But if an object is thinner in the middle, that will blend too. (If you can't really see any difference, zoom in on the flame, and try again. Then click the first Camera Dot to return to the position the camera was in. Or just use the Director's View, and the RaySpray to render in the wireframe.)
For more on Lights, please go to Page 3