Note: I haven't used Bryce in years; so these tutorials are archived "as is." I can't accept questions, because I don't remember the answers.
This is page 4. If you haven't finished page 3, please do so before starting this page.
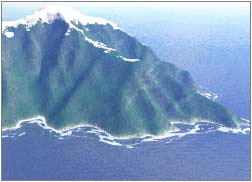
 To easily put surf around an island, all you have to do is create your island, and edit it until you are happy with it. Make sure that you have used a clipping plane to keep the edge from being square. Then duplicate it, and take the duplicate into the Terrain Editor.
 |
 |
 |
| Move the Gradient Point, Slide Clip up a tiny bit, Lower Terrain |
Clip Top, covering a bit of edge to mask it Lower Terrain |
Remove Clipping Outline of Island remains |
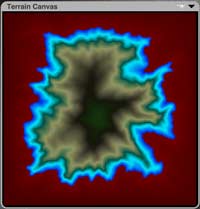
Change to a Color preview, so you can more easily see the height, and drag the color bar until the break point is at the clipping plane, as we did earlier this lesson.
Drag the clipping plane up over the break point, to protect it, as we did before, and drag the Raise/Lower button on the Elevation tab of the Editing Tools to the right to lower the rest of the terrain below the clipping plane. You should have a single height ribbon that does not change. It will be the outline of your island.
 |
 |
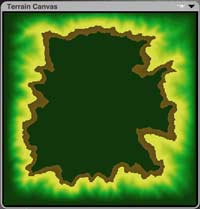
| Move the break point, so you can see the surf line. |
Hit the Enter key to leave the Terrain Editor, and change the material of the outline around the island to one that is like surf. (You can use the Foam I have provided, or you can create your own material.) Adjust it on the Y axis if necessary.
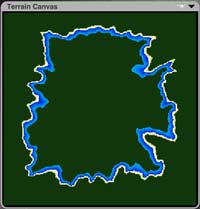
Finally, take it back into the Terrain Editor, and set the break point for just below the top of the surf line. Get a medium flow, hard brush; as small as it will go. Set the Brush Behavior to Elevation, and paint the lines of surf onto the terrain. When you have it, run just a touch of smoothing on it. Then take it out and render. Tweak if needed, as always. And post your picture when you are happy with it!
Alright. So much for the surface of the water. Time to dive right in!
![]() Making underwater scenes is slightly different. In most cases, I'm afraid it won't work to simply create a water plane, and place your action under it. What we need is to recreate the visual effect of being under the water.
Making underwater scenes is slightly different. In most cases, I'm afraid it won't work to simply create a water plane, and place your action under it. What we need is to recreate the visual effect of being under the water.
When you are under the water, the first thing you may notice is that your visibility goes way down. Water, even clear water, is really full of suspended particles; and those cut visibility to feet, not miles.
The easiest way to recreate that in Bryce is with fog. And the easiest way to get nice dense fog is to be below ground level. So, that is where we are going to start.
Create a new scene, and make sure that you will be able to see things below the ground plane in the wireframe view by checking the Underground On/Off toggle in the Display Palette.
 Go to the Right view, and drag your camera under the ground level. Then go to camera view, and drag the ground plane down, too, if you want the sea bed to be visible in your scene.
Create a sphere, so you can see what your visibility is, and drag it down as well.
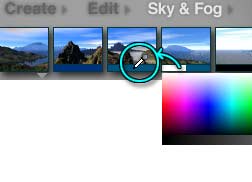 On the Sky & Fog Pallet, choose a bluish color for your fog (or whatever color you want the ocean to be.) Don't worry about actually setting any fog right now. Its behavior is a little quirky here underground, and I find that it's easier to set it in the Sky Lab. We'll be going there in a few moments.
Move to the Haze Color swatch, and drag the eyedropper over to pick up the fog color. Grabbing the color will eliminate the bright line on the horizon from the default white haze.
Repeat to use the Fog color for the Cumulus Cloud Color.
Set a deeper blue color for the Ambient color.
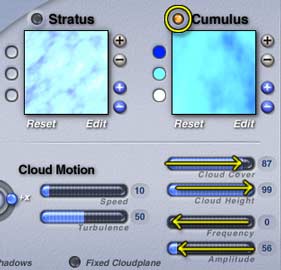 Go into the sky lab, to the Cloud Cover tab, and make sure that the Cumulus clouds are enabled, and the Stratus are disabled.
Pull the Cloud Height slider all the way to the right. We want it to be so high that we can't see any clouds above the fog. Pull the Cloud Cover to the right too, just to be safe. We want everything that we can see to be that same color, so we're going to give it as thick a cloud bank as possible, too. So set the Frequency to zero, and the Amplitude pretty low.
 |
 |
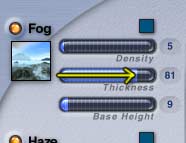
Go to the Atmosphere tab, make sure the preview is set to "Render in Scene," and adjust the fog until you are seeing just as much of the sphere as you want to see.
Notice that if you drag the thickness slider to the left, the fog gets thicker, and if you drag to the right, it gets thinner. That's because we are underground. It always works backwards like that here.
 The real visual cue that says, "This is underwater, not on some weird very foggy blue place," is caustics. Caustics are the bright light patterns that are caused by the waves focusing (and unfocusing) the light as it passes through them.
We are going to fake the caustics by using an enormous parallel light with a light gel.
So, when you are happy with the visibility, disable the Sunlight. Then close the Sky Lab.
Create a Square Parallel light, and make it very large. You want it to cover the entire visible area of your picture. For now, leave it pointing straight down.
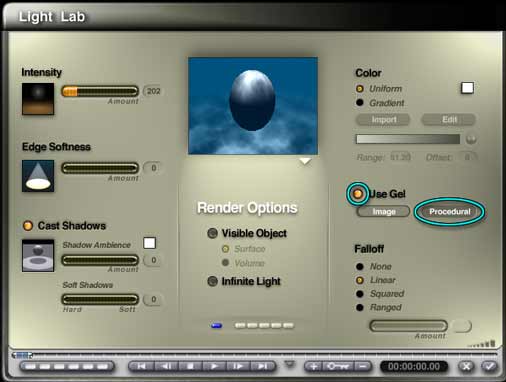
Take it into the Light Lab by clicking the E in its Icon Column. Give it a pretty high Intensity, Linear falloff, no edge softness, and leave Cast Shadows enabled.
Click to enable Use Gel, and then click the Procedural button. We are going to be using an image; but this way we are in the Material Lab and can adjust it more easily.
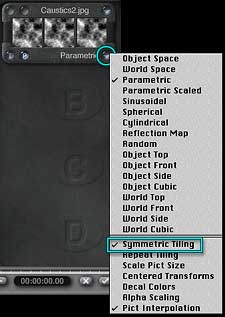 Set it up as you normally would to use an image, and load the Caustics2.jpg image that was in this week's download. Click on the greenish Editor button, and change the frequency to around 20 to 25. Finally, go to the Texture Mapping Mode flippy, and choose Symmetric Tiling from the bottom of the menu. That will keep the multiple tiles called for by the frequency from showing their seams.
(Ordinarily, you might be afraid that the constant repetition of the pattern as it reflects across the axes would itself be visible and distracting; but in this case it won't be noticeable at all unless you have a large area of flat ground.)
 Tap the enter key a couple of times to leave the Materials Lab and the Light Lab, and do a test render.
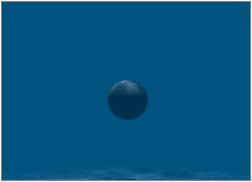
You should have a featureless sphere floating in a very, very empty ocean.
That is the basic procedure. A word about the caustics; I made this one by copying a Pocked terrain picture, pasting it into Photoshop, and changing the levels. (The Pocked terrain is generally fairly low contrast.) That's the easiest way to make them, I think. Of course, you can also make them by using textures in the DTE, or by using a number of Plug Ins in either your favorite graphics program or Bryce itself, as I explained earlier.
 If you don't have another graphics program, you can change the levels of a terrain without leaving Bryce; right there in the terrain editor.
Let me show you how. Save this, open a new document, create a terrain, and take it into the Terrain Editor.
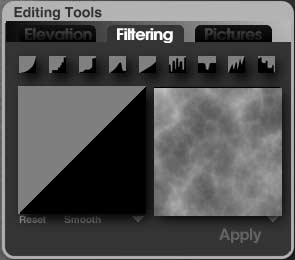
Shop for your terrain until you have one that looks good, then regenerate it at a fairly high resolution, as we've done before. When you have it, go to the Filtering tab of the Editing Tools.
You will see two previews; the curve that represents your levels of gray on the left, and a preview of the terrain on the right.
The lightest grays to white are represented by the top right corner of the curve, the darkest down to black by the lower left. We need all the grays from about the middle range on down to be black; so all we have to do is redraw the linear curve so that, instead of starting in the lower left corner, it starts from about the middle of the bottom.
 |
 |
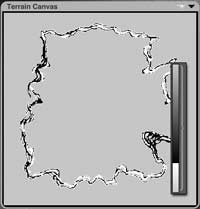
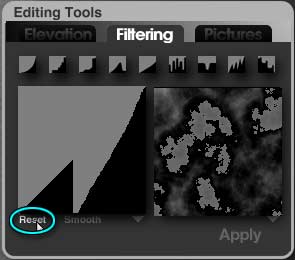
| Incorrect Point on Bottom; Gray still appears in thumbnail. | Correct Point on Bottom; Thumbnail shows even tones. |
Click on the curve, and you will get a pencil tool that you can draw with. Start at the top right corner, and draw a straight line to a point along the bottom edge. Exactly where on the bottom depends on the values in your picture.
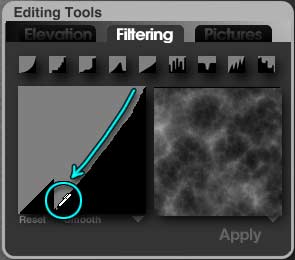
As you draw the line, you will notice that the light gray tones are getting darker; and those darker tones are surrounding the light gray that has yet to be adjusted. If you choose a point that is too far to the right, you will hit the bottom while those areas are still gray in the middle. Although you can keep drawing, and the remaining values will all go to black, you will lose some information if you do that. Instead, just tap Reset under that thumbnail, and try again.
If you choose a point that is too far to the left, the gray will vanish before you get to the bottom. Once again, you will lose some of the possible tonal range if you accept that. You want a line that hits the bottom just as the last of the inner gray turns black. This is where it really helps to have a steady hand, (which I admit that I no longer have.) But do the best you can; it's not absolutely critical. (A graphics tablet is a great help here, by the way.)
You will notice that the preview now shows a full value range, from very black to very white. If you have Photoshop Compatible Plug-Ins, and you want to use them now, they are all accessible from the flippy under the right hand preview.
When you are satisfied with it, click Apply, and the preview will transfer to the Terrain Canvas.
Hit Command/Ctrl-C to copy the terrain picture onto the clipboard.
Now all you have to do is open the Gel again, and paste this picture into the appropriate slot. Voilà! A brand new caustic pattern, all ready to use.
(Of course, now that you've seen how easily you can use the Filtering tab, I'm sure that you can think of lots of ways to use it on terrains, too!)
 The rest of the scene will have to be filled in as well, naturally. I suggest that you use SymLats for coral outcroppings, and low resolution SymLats for schools of small fish. You can make them appear more random by using Multi-replicate twice with a small offset, and then using the Disperse tool on the Edit Palette.
Let me show you what I mean. Load the Minnow.obp that was in this week's download. It's a high resolution SymLat now, just in case you wanted to use it for a close up or something. It doesn't need to be that high for this, though, so take it into the Terrain Editor, and change the grid to 128.
Resize it, so the scale will be right for a small fish in your scene. When you have it, make sure it's selected, and go to Edit > MultiReplicate. Make 5 copies, offset 2 B on the Z axis. (Make sure that the rest of the distance and rotation fields are set to zero, and the resize fields are all set to 100%. They will probably all need setting, since you just resized your fish, and they are kindly holding all those settings in case you want them again.)
 Hold down the Shift key to select all six fish, and make 5 copies again; but this time offset 5 B on the Y axis. That will give you a nice, neat grid of fishies. Which, of course, won't do. We need a school, not a regiment.
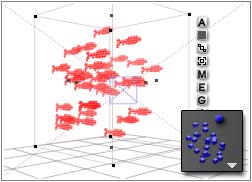 So, hold down the shift key and select every one of them. Then simply go to the Disperse tool, and choose 3D Disperse from the flippy menu. Move in small increments, and disperse the school!
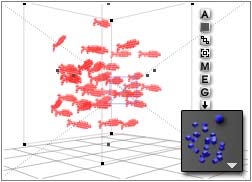 Finally, disperse a tiny, tiny bit using 3D Disperse Rotate, so they aren't all facing in exactly the same direction. When you are happy with the pattern, group them so you can move the whole school around easily. Tweak it by moving any fish that is interpenetrating another, or has a position that you find unpleasant.
I'll leave the rest of this up to you; I'm sure you can populate your scene.
 |
 |
If you want the surface of the water to be visible at the top of your picture, just add a water plane or a water terrain, whichever you prefer, at Bryce ground level. Give it a water texture, but make it pretty close to 100% transparent.
 |
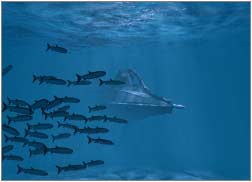 |
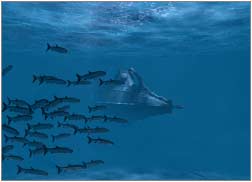
| Parallel Light (Nautilus model by Chris Bradley) |
Spotlight (Intensity increased slightly to compensate for edge softness.) |
If you want light rays going down into the water, I've found that a spotlight gives better results. You may want to make it smaller than the Parallel light, as well, depending on the effect you want to achieve. You will need to set it to Volume visible light, of course, just as you always do if you want light rays.
The advantage of using a parallel light is that the caustic map doesn't get pinched in the middle. The disadvantage is that the light rays don't diverge. With a spotlight, you do get a pinched caustic map, so you will want to be careful with that. But you also get diverging light rays. As always, it's a trade off.
Join me on Page 5 to finish this week's lesson!