Note: I haven't used Bryce in years; so these tutorials are archived "as is." I can't accept questions, because I don't remember the answers.
This is page 3. If you haven't finished page 2, please do so before starting this page.
 Alright. Now we need a pebbly bottom for the stream bed. This time, we are going to make it from scratch. I'm tired of second guessing what other people have done with textures. Making an entirely new one isn't that difficult, when we have all those Appendix sheets from last week to refer to, which will make the job much easier.
Select the ground plane, and take it into the Material Lab. Generate a random texture, like always, by clicking on the Diffuse and Ambient hollows in the A column, and use it to open the DTE by clicking on the pink button in the top left corner of the Texture Component palette.
Once in there, hit Command/Ctrl N to begin a new texture. All the palettes will go dark, the colors will all revert to black, with a Color Mode of None, and all the noise and filters will be nothing, with every number in them set to zero. We will have a completely blank slate to work with.
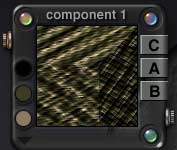
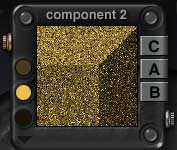
Now, we want to have rippled ground, with pebbles on it and a grainy texture below the pebbles. That means three bump maps (one for the ripples, one for the pebbles, and one for the grain) which means that we will be using all three components. Click on the 3 in the Components Used.
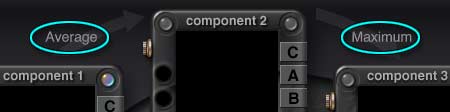
Let's think about this for a moment before we decide which one to put where. Remember, when you are Blending components, their order can make all the difference in the world.
We want the bump for the stones to stick up above either of the other bumps. Light bumps are what stick up, so we want the light of the stones to be used instead of the dark areas from either of the other ones. A quick check of the Blending Modes appendix shows that this means we are talking about Maximum, Add, or Blend Max. (We could also go the other direction, and reverse the Bump in the Material Lab; but at this point that would be adding extra complexity. So we'll stick to making it white.)
We don't want Add, because that works on the colors, too, and we want the surface of the river bed to be fairly dark. So that means Maximum or Blend Max. We don't want blending, though; we want the stones to be clearly defined. So that means Maximum.
However, the sand should be following the contours of the river bottom. Which means that the bump maps from those two components need to be pretty much averaged out, so they both dip where the muddy bottom dips, and rise where it rises. Oddly enough, a quick check of the Appendix shows that the Blending Mode that does that is, indeed, called Average.
Now, the stones need to be on top of that. So, let's put the mud and sand in the first two, and average them, with the stones in the third set to Maximum blend. Click on the first Blending arrow, and change the Mode to Average. Click on the second, and change it to Maximum.
 |
 |
 |
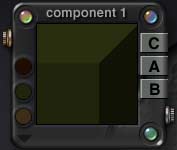
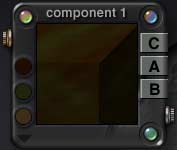
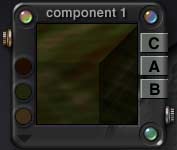
Let's do the colors next, so we can see where we are when we put the noise in. For the mud at the bottom, we want dark muddy colors. Go to the Color Palette of Component 1, choose three, and set the Color Mode to Linear Interpol3 to take advantage of the full tonal range of the alpha.
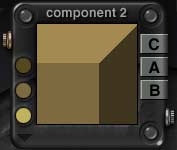
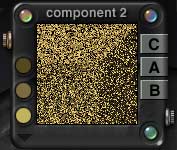
For the sandy stuff on the river bottom, we want three colors of wet sand. Go to Component 2, pick 'em out, and set the Color Mode to Linear Interpol3.
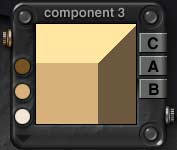
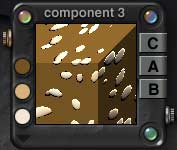
For the stones, we want light stone colors, so set those in Component 3. Remember to put the lightest color on the bottom, where it will be mapped to the white areas of the alpha channel, and the darkest one on the top. (Hint; if you start with the top swatch first, you can use the eyedropper to pick up the color, and then hold down Option/Alt to open the accurate color picker to HLS, and easily get a different saturation or lightness of the same hue, if you want it.) Once again, set the Color Mode to Linear Interpol3.
Enable Color, Alpha, and Bump on all three palettes by clicking on the CAB buttons. As soon as you do, you should see the middle color from each swatch covering its palette.
Alright! We are ready to put some noise in here, and we will even be able to see it when we do.
Open the Noise Dialog by clicking on the top left corner button of Component 1, or the Noise button at the bottom of the DTE. The corner will be gray, since no noise is being used anywhere; but we know where it is anyway. Click on it.
The Noise Editor opens. Drag it out of the way, so we can see the palettes.
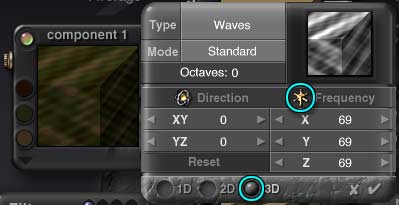
Now, for the first noise, we want the ripples that water makes on the soft mud and silt of a river bottom. Check Appendix Page 1 for Noise. Humm. Looks like Waves is the closest, which makes a lot of sense when you think about it. Pick it from the Type menu.
It still won't look like anything, because the Frequency is set to Zero. So, put your cursor on the gold Frequency button, and drag to the right. Bring the frequency up to 60 or 70. You will notice that you have lines, not ripples. That's not right! So set the Number of Dimensions button at the bottom to 3D. Ah! That's better. It's way too regular, though.
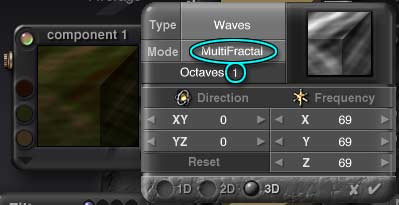
Let's introduce a little variation. Change the Octaves setting to one, and the Mode to MultiFractal. (I ran through them quickly, and like that one best.) Still a bit too regular for my taste, though. This is supposed to be the kind of mud made by a million little ripples and eddies.
Let's hit the Auto Phase mode for a moment, and see if that's better. Remember, that one adds phase without actually working with the Phase Editor, so it's cheaper in terms of rendering time. And you don't need any additional octaves to use it. Try it out by changing the Mode.
No, I don't think so. We'll probably want to add phase ourselves. But right now, since this Editor is open, let's finish assigning Noise first, and see where we are then.
Change back to MultiFractal mode.
![]() With the Noise Editor still open, click the second hollow in the Noise Dialog to Edit the Noise of Component 2. Notice when you do that the corner buttons light up on Component 2, and the Noise Type is back to Nothing.
With the Noise Editor still open, click the second hollow in the Noise Dialog to Edit the Noise of Component 2. Notice when you do that the corner buttons light up on Component 2, and the Noise Type is back to Nothing.
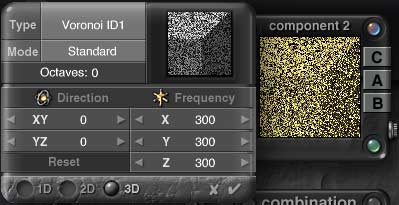
This is where we want the sandy grains. Let's check the Appendix for grainy looking noise. The best, really is Voronoi ID1, but it has no bump to speak of. That's really alright, though, since we don't actually need one; we are going to be following the bump of the mud. Choose it, set the Noise to 3D, and drag the Frequency out to around 300 or so. Looks good.
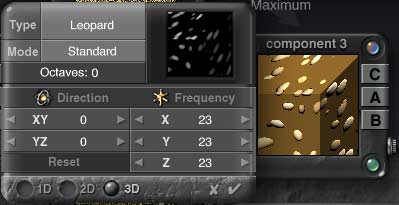
Click in the third hollow of the Noise Dialog to move to the third component. Once again, the corners of Component 3 light up, and the noise is back to Nothing.
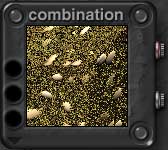
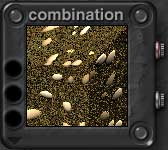
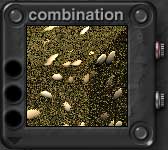
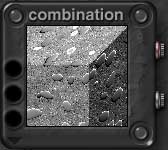
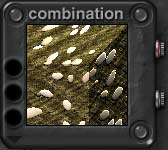
We need a texture with a lot of separate little stones for this one. So, check out the Noise appendix. Ah. The one we are after is called Leopard. Choose it. Change this one to 3D, too, just so we can see what we are getting on the preview windows, and drag the Frequency to around 20 or 30. Looking at the Combination, we might need to adjust the height of the Alpha for the river bed. We'll take care of that with filters, too.
Click the checkmark to close the Noise Editor, and apply the changes to Component 3.
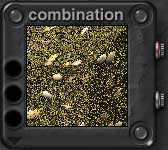 Alright! Looking at the Combination, we need those stones to be higher, and the river bottom mud could use a little phase. Let's change the height first. We need to drag the muddy bottom down, since we don't want the stones to be flat on the top, and clipping the top of Component 3 would do that.
 |
 |
 |
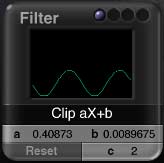
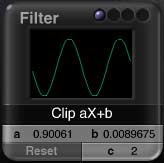
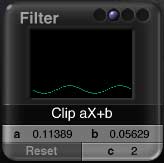
Open the Filter dialog by clicking the top left corner of the Component 1 palette, or clicking the Filter button at the bottom of the DTE. Click in the first hollow of the Dialog Component Indicator to make sure you are working with Component 1.
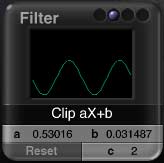
Right now, there is no filter, and all the numbers are set to zero. Click the Reset button in the lower left corner to get some numbers in there to start with. Now, all we really want to do is make the Alpha darker. Which means we need the curve to be closer to the bottom of its window.
Let's start with Clip, and change it only if we need to. Choose Clip aX+b from the list by clicking where it says None, and dragging to the correct choice from the menu. Drag it down by placing your cursor on the graph itself, and dragging towards the bottom of the Graph Window. As you do so, notice the river mud sinking below the sand and stones. It's getting clipped, though, and we don't really want that, either. (Or you can just drag the a numbers if you want to constrain the dragging.)
So, drag left on the graph, to make a curve that is low to the bottom of the window, but isn't getting clipped too much. (Alternatively, you can drag the b numbers.)
 |
 |
 |
Let's do the same with the sand. Click in the second hollow to filter Component 2, hit reset, and choose the Clip filter, exactly like you did before. Once more, drag down and to the left until you have a low wave that isn't being clipped.
Humm. That doesn't really leave much variation in the bottom mud at all, does it? Maybe we should raise the stones instead of lowering the bottom after all. Leave the graph here where it is; if it all works out right that will leave sand that has settled in the hollows with mud poking above it, which should be perfect.
 |
 |
 |
Click in the first Component Indicator hollow, to filter the mud again, and pull the graph back out and up so it is only a little lower than the full graph window, and not clipped at all.
 |
 |
 |
Now, let's see if we can do something about those stones by filtering Component 3. Click in the third Component Indicator hollow so we can work on it. Hit Reset, as we did before, and choose Clip from the menu once again. Pull up on the graph, to lighten the alpha. Nope, the stones are flat on the top where the graph is getting clipped, as we suspected, and the flat base of the stone texture is also beginning to show. That won't do at all.
Remember me saying something about a filter that made bell curves and points, though? That would do it, wouldn't it? Check the Appendix, and you will find that the one we want is called X Power. (X pwr a)+b. That one lets you favor the light (or dark, if you flip it) portion of the texture, and allows you to still keep the dark down in the dark without bouncing anything and making rings we don't want.
So choose it, and drag until you have stones that poke out from the mud. They will be a bit flatter than they were, but not really flat; and river stones are often flattened, so that's alright.
Okay. That's looking pretty good. Let's go out to the Material Lab and see what we have. Click the checkmark or hit the Enter key to leave the DTE and keep your changes.
 Click in the A column of the Bump to use the bump we have just carefully made, and slide the slider up to around 100%, to use a lot of it.
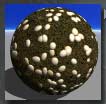
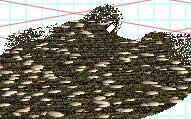
Looking at the default sphere preview, we have a Big Ball o' Mud with Stones In, which is just what we want. Let's go out into the Real Bryce World, and do a test render. Hit enter again, and we'll check it out.
 Renders, especially renders of infinite planes with interesting textures, take time. We don't really need to see that much to see if we have what we are after, so don't run a whole render. Just grab the spray can, and RaySpray a section that we can look at to see where we are.
Humm. The bump from the grain seems to be interfering with the wavy mud texture. Let's hop into the DTE and see if we can fix that. Go back into the Material Lab. Yes, the Alpha looks about perfect, but the bump has too much grain where the sand is. Click the pinkish button to enter the DTE, and we'll see what we can do.
 |
 |
Before we do anything else, save this as a Texture Preset by clicking on the copper button of the Combination palette. That way, if we like the tweak less than we liked this, we can always come back to it.
We want to see what is happening with the bump, so turn off the Alpha and Color for all three components for a moment, so we can see what it looks like.
Go to the Filter Dialog, make sure it's set for Component 2, and flatten the graph out some more. Pull it down to the bottom, and keep an eye on the Combination palette.
 When it looks about right, enable the color and alpha on all 3 components again. Click the check mark to leave the DTE, and again to leave the Material Lab.
RaySpray a bit, to see what we have.
That looks better, but it's still pretty hard to see the waves, and from what I can see, they look too big. Let's change the colors, and increase the frequency of Component 1.
 |
 |
 |
Go back into the DTE, and make the lightest mud color lighter, and increase the frequency of the Component 1 noise to around 250 or so.
While we are in here, change the colors on Component 2 around. The lightest color corresponded to the lightest Alpha, and we aren't going to be seeing much of that. Putting the lightest color in the middle swatch means that we will see it; but it won't be overpowering. Try moving them around, just so you can see the effect of having different colors in different places. (I'm increasing the saturation on the sand color, too.)
 That's much better. But it could use more irregularity in the ripples, as I suspected. That means phase, of course.
Come to Page 4, and we'll finish this up!