Note: I haven't used Bryce in years; so these tutorials are archived "as is." I can't accept questions, because I don't remember the answers.
This is page 4. If you haven't finished page 3, please do so before starting this page.
 We are going to start with a soap bubble, because it's easy and just plain fun.
Open a new document, and create a sphere. Take it into the Material Lab, and click in the A hollow of the Diffuse and Ambient color channels to load a default texture.
Open the DTE by clicking the pink button second from the left in the top corner of the Material Component palette.
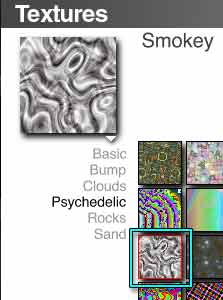
Once you are in there, hold down the Shift key and click on the title of the Combination palette. Choose the Smokey texture from the Psychedelic page.
 Open the Noise palette by clicking the top left glassy of the Component palette, or by clicking the Noise button at the bottom of the DTE.
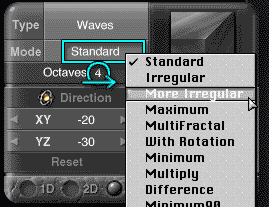
You will notice that this texture is using Waves, 0 Octaves, Standard mode. Change it to 4 Octaves by dragging right on the number. Change it to More Irregular Mode by clicking on the Mode button, where it says Standard, dragging down to More Irregular and releasing.
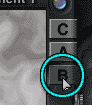 Click on the B in the CAB buttons to disable the bump. We aren't going to need it.
Now, put your cursor right in the middle of the preview, and drag it into both of the other Component windows. As you do so, notice the little green Components Used Indicators light up.
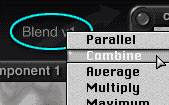 Change the Blending Mode to Combine between both sets of palettes by clicking on the arrows, and choosing Combine from the drop down menu.
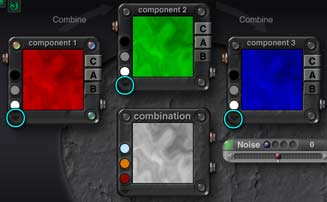 Go to the Color Mode flippy triangle under the Color Palette for each one, and choose Red or Hue from the drop down menu for the first one. Choose Green or Light for the second. And choose Blue or Saturation from the third. When you are finished, your screen should look something like this.
What we have done is divide the RGB color channels, so each component is driving only one of them. As you notice, the result is a neutral gray. This is true no matter what color is in the top swatch for the component when you copy it like this, because equal amounts of Red Green and Blue always result in shades of gray.
But we aren't going to leave it like that. We are going to make interference patterns!
 Slide the Noise Dialog slider to change the frequency of the first component.
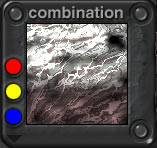
As you do so, notice that colors are starting to show up in the Combination palette.
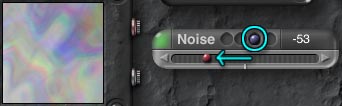 Move the ball to the third hollow, so that you are changing the frequency of the third component, and slide the dialog slider the other way.
Notice that more colors are showing up. Continue to drag and tweak until you are happy with the colors. Remember, we are aiming for a soap bubble here, so try to get colors that remind you of bubbles! (Be careful; you only have one undo. If things get too out of whack, though, you can always drag the texture in the middle box, which we haven't touched, into the other two, reassign the colors, and start over.)
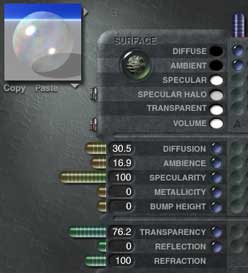 When you are happy with it, hit the Enter key to leave the DTE, and return to the Material Lab. Set the Diffusion Value to 30.5, the Ambience Value to 16.9, Specularity to 100, and Transparency to 76.2.
That's really nice, but the colors are rather soft, aren't they? Wonder why? It's because there was very little contrast in the shades of gray to begin with, so the colors are also muted. Well, we know how to increase the contrast. It's the very first filter we played with, and the one that is used most often. It's Clip or Smooth Clip, for contrast adjustments.
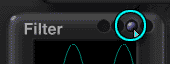
Go back into the DTE, and open the Filter dialog by either clicking the glassy in the top right corner of the first texture component palette, or clicking the Filter button at the bottom of the DTE.
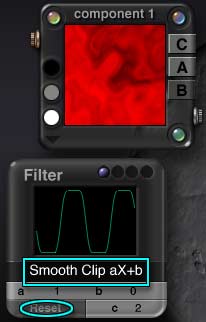 We are going to use Smooth Clip, because it has clipping even at the Reset values. So, click the Reset button, put your cursor on the Equation, and drag down to Smooth Clip. You will notice that the contrast increases in the component thumbnail.
 Now, just click in the second hollow of the Component Indicator at the top of the Filter Palette. You are now working on the second component. You never have to close a dialog or editor to work on a different component. All you have to do is click in the hollow corresponding to the component you want to work on.
Give it the very same filter; Smooth Clip.
Repeat for the third component, and then go back to the Material Lab.
You will notice that the colors in your bubble are much brighter. So much so, in fact, that you may want to tweak the Diffusion value and make the bubble more transparent. Feel free to tweak it in any fashion you choose. Scale the texture, or move it, or change anything you want to change. Use the texture's alpha in the Transparent channel to make an old bubble that is about to break. Change the refraction, so you have an iridescent crystal ball instead of a bubble. Save it as a preset if you love it. Have fun with it!
 For this one, I used the texture in the Ambience channel as well, and then used Alpha Scaling from the bottom of the Texture Mapping Mode menu under the flippy at the bottom right corner of the Material Component palette, so I could filter the Ambience value through the bubble's alpha, instead of simply having the alpha control it.
 Let's do another. We're going to modify an existing material this time. That's a lot easier than making one from scratch, and you will probably be doing more of that than anything else, for a good long time.
Lets postulate that you are making a river scene, and you want some rocks sticking up out of the water. But you want the bottoms of the rocks to be darker and more reflective than the tops, so they look wet.
Save the bubble, if you haven't already, and open a new document. Create a rock, and bring it into the Material Lab. We want to start with a nice rock texture on it already. Choose Veiny Stone from the Preset Materials. (Fourth row, fourth column in Rocks&Stones, unless you have changed it.) Looks good.
 Time for the DTE again. Click the familiar pink button to enter it.
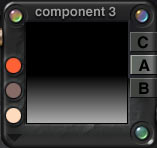
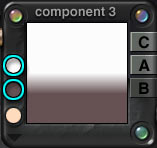
First thing you will notice is that the rock has two components. This is good, because it means that we can put the component to make it dark into component 3.
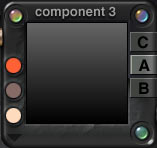
Now, let's activate component 3. Click on the Component 3 palette to generate a random texture. Let's think about this for a moment.
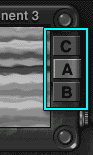
We know we want to have reflections on the bottom of the rock, which means an alpha channel. Make sure that the A is enabled. For now, it would be easier to set up the alpha without the distraction of anything else, so disable the C and B.
 We just want this to be a band of darkness and reflection, we don't want to add any additional noise. So, first thing, let's turn the noise off. Open the Noise dialog, if it's not already open, by clicking in the upper left hand corner of the component 3 palette, or clicking the Noise button at the bottom of the DTE.
When the Noise Dialog comes up, make sure the blue ball is in the third hollow, since we are editing the third component, and click the green corner.
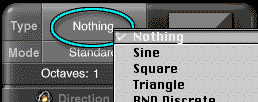 Change the Noise Type in the Noise Editor to Nothing by using the popup menu under Type. Close the Noise Editor.
The green light goes out, because we aren't using any noise, and the thumbnail shows gray. Perfect.
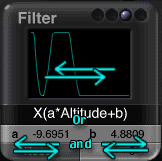
 Now, we want the reflection to be at the bottom of the rock, which means, of course, that it want it to be altitude dependent. We'll use the filter with Altitude in the name, and nothing else. A quick look at the filters available shows that the correct one would be X(a*Altitude+b). The other one mentions slope, as well, and we don't want that. So choose this one.
 Looking at the preview, that's the right idea, but the wrong direction. We need the bottom to be lighter, so it will be reflective. (White in the Alpha channel causes reflections, black causes the lack of them.) So the first thing to do is flip the alpha. Remember how to do that?
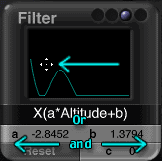 If you want to do it visually, just put your cursor in the middle of the filter preview, and drag to the left until the bottom of the texture component preview is white.
If you would rather use numbers, we need the a to be negative, and the b to be positive. So, place your cursor on the a numbers, and drag to the left, until they are negative. Place it on the b numbers, and drag to the right until they are positive.
 There we go. White on the bottom, black on the top.
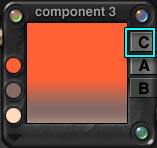 Let's add some color, so we can see what it looks like in the Combination Palette. Click the C to add a color component. The colors from the random texture generated by Bryce are probably not what we want at all, but we can change them.
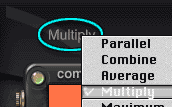 Let's choose the Blending Mode next, so we can see the actual result when we pick the color.
What we want from the color, really, is something to darken all the color components of the rock. If we were in Photoshop, we'd be looking for Multiply. Check them out, by clicking on the arrow. Great! There is one called Multiply! Let's use it. (That's what we want for the alpha, too, so it's perfect.)
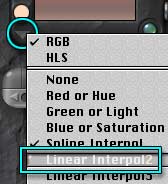 We only want two colors. A dark one that darken the rock, and white that will be ignored in a multiply blend. So, let's change the color mode to the one that uses 2 colors. A quick check of the list shows that would be Linear Interpol2. So choose it.
| Keep your eye on the Combination while picking the colors! | |
 |
 |
Now all that remains is to set the colors. The one in the middle is clearly being used on the bottom. So that will have to be our dark shade. The other one that is being used is obviously the one in the top swatch. Set the top color swatch to white, so we can see where we are in the Combination preview. The swatch on the bottom must be the one that's not used. Remember that for future reference.
Set the middle swatch to a dark color, mostly gray, that will look like wet rock. I'll leave that part up to you. (You might just want to slide the eyedropper over to the Texture Component 1 palette, and grab the color that's already used in the rock for a very natural look.)
 Slide the dark up or down by dragging up or down in the Curve preview, or increasing or decreasing the b numbers. Increase or decrease the sharpness of the change by using the a numbers, or dragging right or left. Just tweak it, until you have what looks right to you.
All set. That was easy, wasn't it?
 Click the checkmark to leave the DTE, and see what the rock looks like.
Click the A hollow in the Reflection channel of the Optics section to use the alpha for reflection. Go to the Mapping Mode (where it says World Space) and choose Alpha Scaling so that you can change the amount of reflection using the reflection slider. Set it to whatever seems appropriate to you.
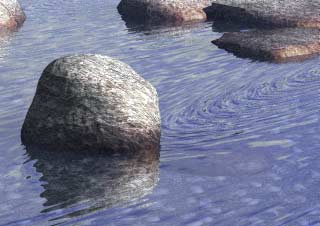 Finally, put the rock (or several rocks that use this same texture) into the stream, and render.
Well, that is quite a lot for a single session, so we'll stop here so you can digest some of this.
Next lesson, we'll finish up the DTE by working some more on our stream. We'll do some trees with mossy bark for the bank, dapple the water with raindrops (or is it tiny fish biting?) make a bed for the river with grainy mud and small stones (as seen here,) and more!