Note: I haven't used Bryce in years; so these tutorials are archived "as is." I can't accept questions, because I don't remember the answers.
This is page 3. If you haven't finished page 2, please do so before starting this page.
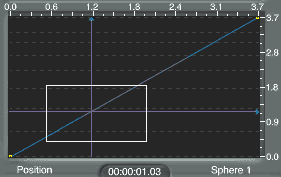
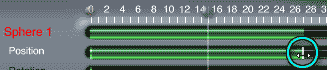 Go back to the Position timeline, and place your cursor over the last key event. It's the pale line at the end of the timeline. When you click on it, it will be selected, and will turn white.
Your cursor will turn into a double headed arrow, which of course means that you can drag the event around.
Here in the AML, the keys and the frames are two separate things. Since the events have come loose from time, they can be adjusted. This helps a lot in fine tuning your animations. If the position was perfect, but the timing was off, you can fix it easily.
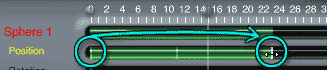
Drag the key, and you will see the change in the Preview window. Drag it to the left, and leave it there.
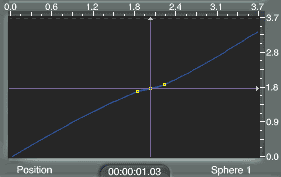
 Now, click on the first key event to select it, hold down Command/Ctrl, and drag to the right. You will notice that you are dragging an event, but there is also one left behind. You have made a copy of the event. This is wonderful when you want repeating motion, or color, or anything that can be animated. Just set it once, and then put duplicates wherever you want them in time.
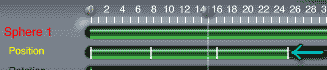
Drag the copy past the last event. Play the preview, and you will notice that your sphere slides to the end of its trajectory, and then goes back to the beginning, at whatever time you drop the duplicate of the initial position.
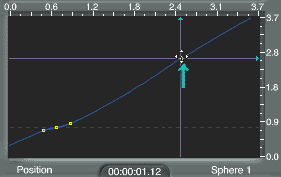
 Duplicate the key for the ending position, and drag it to the right of the previous duplicate. Now your sphere runs back and forth on the line twice.
If you dragged it past the End of Working Range marker, you will notice that your animation preview won't play beyond that point. If you have moved the marker, you can move it back to extend the working range.
But if not, you cannot extend the animation from inside the AML.
You can, however, scale the key events.
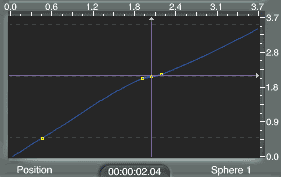
Hold down shift, and click on all of the event keys for the Position timeline, or simply draw a marquee around them all to select them. (Hint; draw the marquee from right to left, so you don't accidentally collapse your timelines.)
Hold down the Option/Alt key, place your cursor on the marker for the last event you want to scale, and drag to scale the events. Dragging right, of course, makes them take more time. Dragging left reduces the time. Scale them until they all fit inside the working range again.
Notice as you do that they maintain the same relative distance between them. Which, naturally, is what scaling is all about.
Be careful, though, because if you drag left past zero, things get weird. Try it if you want to, to see what happens. After all, you do have one undo in here. But you only have one, so be cautious.
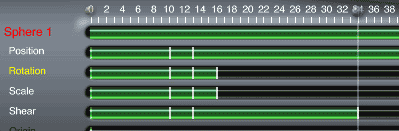 |
| Results of scaling across timelines; animation ended at frame 34. Second, third, and fourth events scaled for all four timelines; dragging in Rotation. Shot shows result after the mouse button was released. |
You can also get oddnesses when you select events in different timelines, and scale them all at once. If you do want to try it, make sure that you click on either the top or bottom one to move them; not one in the middle someplace. Otherwise, I can almost guarantee that it won't work. Also, when it does work, the marks won't line up until you release the mouse button. So don't pay any attention to how they are distributing themselves while you drag; just watch the total time. If it is going to work, they will straighten themselves out.
If they don't, it's time to use that undo.
If you want to run the experiment yourself, leave the AML and add rotation to the sphere at the first and second keyframes. Reenter the AML, and you will have no problem selecting the keys for rotation, scale, and shear together and duplicating them. No problem dragging them in tandem to mirror the four keys of the Position timeline.
But, if you select all the keys and try to scale them, you will see for yourself what I'm talking about. Try it by grabbing a timeline in the middle, to see just how odd it can get. Then undo and try it with the top timeline, to see if you can get it to work.
Key events can be eliminated as easily as they can be duplicated. Just select the ones you don't want, and tap the delete/Backspace key. No more event.
Okay! That's about it for Sequencer tricks. I'm sure that you can figure out when you want to come back in here to tweak the event/time relationships.
In the meantime, go to the flippy triangle, and select "Collapse all Timelines." All the timelines collapse, so that only the names are showing again.
 Alright. Click the arrow to leave the AML. And this is where, if you didn't notice it before, you will notice that we are stuck with the changes we made. There is one (1) undo in here. And there is no cancel. So wise animators get into the habit of saving their work before they enter the AML, like we did.
 We are about to make a Bouncing Ball. (Well, we couldn't buck tradition forever, now could we?)
Let's begin. Turn off Auto-Key, if it's enabled, and open a new document.
Create a sphere. Switch to Camera view. Place the sphere in the upper left hand corner, so just a bit of it is showing in the view.
 Create a keyframe by clicking on the Add Key button, and choosing Position, Rotation, Scale, and Shear. (We are going to be rotating our ball and scaling our ball to give it squash and stretch, and shear always goes with scale. Since we know that, we're setting all the initial keyframes now, to save a bit of work later.)
 The first thing to do is to set the motion the way we want it. So, we are going to add all the positions now.
Put the scrubber on 00.00.00.10, and bring the ball down at a pretty steep angle so that it just touches the ground plane. Add a keyframe for Position.
Move to 00.00.01.04. Bring the ball back up, almost to the top of the frame, and add a keyframe for Position.
Move to 00.00.01.12, and bring it back down to the ground. Add the keyframe for Position.
Move to 00.00.02.04, and take it up about half as high as it was the last time. Add the keyframe for Position.
Move to 00.00.02.10, and back down to the floor. Add the keyframe for Position.
Move to 00.00.03.00, and up just a little bit. Add the keyframe for Position.
00.00.03.04, and back down to the floor. Add the keyframe for Position.
00.00.03.10, and push it almost off the screen to the right. Add the final keyframe for Position.
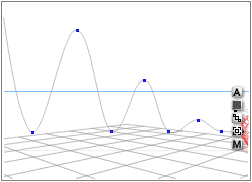
Your screen should now look something like this. If your spacing is off, you know how to edit it. (Just drag the Control Handles around.) Don't forget, though, that unless you have restrained the motion, you may also need to readjust the point where the ball just touches the ground. To do that, of course, use the Play controls to move to the correct keyframe, hit the Land arrow for the ball, and make a Position keyframe. It will overwrite the old one.
Play that using the play buttons, and you will see a round ufo or a balloon or something, that skims the floor and floats back up a few times. There is no bounce.
 We will add the bounce by changing the trajectory, and then fine tuning it in the Advanced Motion Lab.
Move to the bottom of the first bounce, hold down the C key, and drag to the left to break the continuity of the trajectory.
Move to the bottom of the second bounce, and use the T to increase the tension, instead. Now play this. See the difference? The two trajectories look almost the same; but the first one definitely bounces, while the second comes down much more gently. Now you have seen that, you can figure out when to use which one in your own animations.
Change the Tension back to zero on the second bounce, and use the C to break the continuity there, and at the bottom of the final bounce.
Move to the top points, and decrease the tension there if it looks like it needs it, by holding down T and dragging to the left, just like you did last week. Make sure the top points are evenly spaced between the bounces, and that the distance traveled gets shorter with each successive bounce, so that it looks like the trajectory of a bouncing ball (which, of course, is exactly what it is.)
 Now, on into the Lab. Save your work, then click the icon to enter the AML.
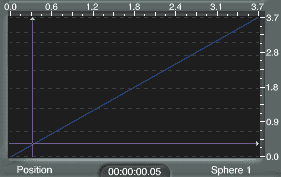
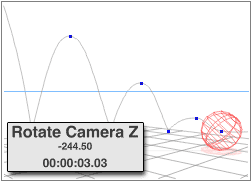
You will notice that we are already using Camera view. This is because we are. Click on the name of the Sphere to open it, and you will see once again that the Position is animated. But this time there are a lot more white lines, because we have more keyframes.
Click on the first keyframe in the Position channel, and you will see the word "Position" turn yellow, while the blue line appears in the Time Mapping Editor again. If you look carefully, you will notice that there are a bunch of horizontal dashed lines that were not there before. Each of those is a key event. They weren't there before, because there were only two key events; one at the beginning and one at the end of the animation. (How visible these lines are depends on the gamma of your screen. If you cannot see them, try increasing the gamma until you can.)
If you move the scrubber, you will see that each time the current time line attached to the scrubber crosses a key event (white mark) on the green bar, the current time line in the Time Mapping Editor crosses one of those lines.
 Now, we want the ball to slow when it gets to the top of a curve, hang there for just an instant, and then start down again, like a real ball. We also want it to accelerate as travels down the curve. (It's already doing that to some extent, because of the shape of the trajectory; but we want to exaggerate the motion.)
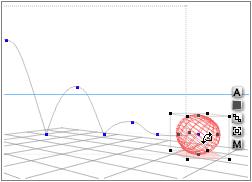
Let's start by zooming in. Scrub to about the top of the first bounce, so you can see which key event line is the correct one. Place your cursor near the time line, and drag to make a marquee. Enclose a comfortable area, and let go. The area you enclosed will zoom to fill the Time Mapping Editor.
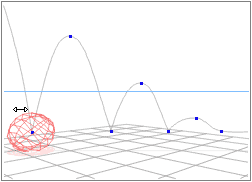
 We want the motion to hang for a moment here. That means a gentler curve. Place your cursor on the blue line, and click to make three yellow squares. One a little bit before the keyframe, one on the keyframe, and one a bit afterwards. They can be dragged around, remember, so don't fret too much about the placement right now.
Pull the one before the keyframe out to the left and up, so that the curve flattens out. Push the one after the keyframe down, so the curve is almost flat just at the peak of the bounce. Play it, to see how it looks, and adjust it if you need to.
 Hold down the spacebar so you can pan, and move to the next keyframe, which corresponds to the bottom of the second bounce. Move the scrubber so that the purple horizontal line is there, too. You will notice that the event is no longer exactly at the keyframe. It's been moved by the changing curve. Make a yellow square, and move it so that the purple lines cross the keyframe line at the correct spot. (The line will move as you drag the yellow square.)
 Go on to the fourth keyframe, the peak of the second bounce. Repeat the process here, but put the first and third editing points closer to the second one, since the ball wouldn't hang quite as long on this bounce.
Make sure the event and the curve match again at the fifth keyframe, the bottom of that bounce.
Move to the sixth keyframe, and gentle it out just a bit. After all, the ball is almost finished bouncing by this time.
Finally, make sure the last keyframe and the second one happen at the moment in time that they are supposed to, and correct them if they don't. (We are doing the second one now, because it didn't need it until we worked on the third one. Nothing says that you have to build your animation in the order in which it will be played; in fact, it's frequently better not to.)
Run it a few times, to make sure it looks right. Tweak it if you think it needs it. When you've got it, leave the lab.
 Okay, great! The ball is bouncing. Now we are going to add some roll.
Move to the last keyframe by hitting the right square bracket (]). Then, back up one keyframe by hitting Shift/Comma (<). We are going to put the roll for most of the bouncing here, and then add a roll across the floor.
So, switch to Camera Space on the Edit Palette, and move your cursor over the ball until you see it change into the letter Z. We are going to rotate on the Z axis. Hold down Command/Ctrl to get the rotate tool, and rotate almost, but not quite, all the way around. Bryce doesn't pay any attention to how the ball has moved, just what the final rotation is. So if you go too far, it will think you have hardly moved it at all. 360° of rotation is exactly the same as no rotation, in Bryce.
(If you find that you can't get the rotation handle, because you are picking up the Trajectory Control Handle instead, just go to the Animation tab of the Object Attributes, and hide the trajectory. You can show it again when we are finished with the rotation.)
Make a key frame for Rotation.
 Move to the final frame to add the last part of the rotation.
In order to see the ball while you are doing this, go to the second flippy triangle on the Camera Control palette, and choose Director to Camera. Then, switch to Director's view, and pan until the ball is easily visible.
Rotate it the same way you did before, moving it farther to the right, enough that it will appear to be rolling when you play it. Make another keyframe for Rotation.
Play this. If the ball is not rolling enough, and appears to be sliding instead, just add more rotation, and make another keyframe. It will overwrite the old one. Tweak it as much as you need to make it look good. When you are satisfied, switch back to Camera view.
 So, the ball is now bouncing and rolling. The only thing left to add is what animators call "Squash and Stretch." Squash and stretch will make your ball look like it's really made of rubber, as it squashes when it hits the floor, and stretches at the top of the bounce.
Bryce doesn't do stretch well on rolling objects, so we are going to skip it for this animation, and just do squash.
We want the squash to happen just as the ball hits the floor, and last for only a frame or two beyond that before it regains its normal shape. In order to do that, we are going to put "normal shape" keyframes one frame before, and two frames after, the bottom of each bounce.
So, move to the second keyframe by hitting the left bracket ([) to return to the beginning of the animation, and then Shift Period (>) to go to the next keyframe. Use the comma key to back up a single frame, and create a key for Scale, and one for Shear. (Remember, changing one always changes the other; so unless you want the shear from the resize to persist all through your animation, you need keys for both.)
Tap the period key three times to step through the bottom of the bounce, and two frames past it, to frame 00.00.00.12. Once again, make key frames for Scale and Shear.
Move to the bottom of the next bounce, two keyframes over, back up one frame, and repeat the process. Make another set two frames after the bottom of the bounce, at frame 00.00.01.14.
Go to the third bounce, and do it all again, with one key a single frame before and another two frames after the bounce point.
We won't make frames around the bottom of the fourth bounce, just before the roll, because by then the ball has lost so much energy that the squash would be negligible; so we are ignoring it.
 Okay. The setup is done. Time for the Squash.
Move back to the bottom of the first bounce, at 00.00.00.10.
Think about squashing something for a moment. When you compress a rubber ball by putting pressure on the top of it, the sides expand so the volume remains constant. In order to do that with our animated ball, we need to expand it equally on the X and Z axis as we compress it on the Y axis.
The easiest way to do that, of course, is to enlarge it symmetrically, and then shrink it on the Y. So, grab a corner, hold down Option/Alt so it scales from the center, and enlarge it, Then move to the Y axis, keep Option/Alt down, and shrink it just enough that it is barely touching the ground. Then make the keys for Scale and Shear.
Repeat the process for the bottoms of the other two bounces, squashing it less each time as it runs out of steam and the bounce dies down. Preview this, and tweak anything you aren't happy with. (If you want to completely strip the scale and shear off your ball, I've found that the easiest way is to go to one of the "normal state" keys, find the dimensions, and fix it in the Object Attributes. Then try the scale again.)
There is one other thing you need to be aware of. Occasionally, for no adequately explored reason, Bryce will add extra keys. Sometimes they are for things you are actually animating, like rotation or scale. Sometimes they are for things like the Origin. They are often pretty obvious when you run your animation, but sometimes they aren't. So, it pays to get into the habit of visiting the AML, and removing any extra keys that you find there.
Do this now.
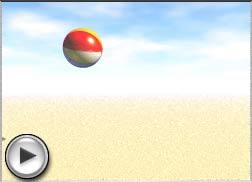 Finally, put a material on your ball, and render that puppy!
You can click on the image to the left, and see how mine looks.
 There, we have done the Bouncing Ball, and tradition has been served.
We are going to do a really simple pendulum next, so I can show you a few other things.
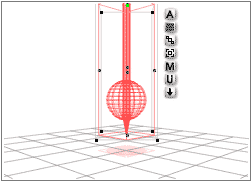
Open a new document, and make the pendulum using a ball, a cone, and a cylinder. It should look something like this. Group it, and put the Origin Point at the top of the cylinder. Name it Pendulum.
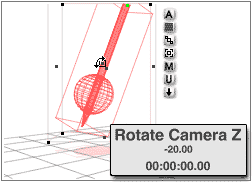 Make sure that the scrubber is at frame zero, and that you are using Camera Space. Use the Rotation tool in the Edit palette to rotate on the Z axis until the readout in the Text Area says about -20°. Add a keyframe for rotation.
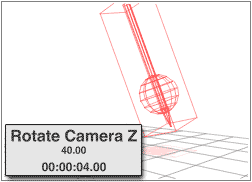 Move the scrubber to around four seconds, and rotate the other direction until it says about 40°. Add a keyframe for rotation.
Play it, and you should have a pendulum that swings very slowly from the left to the right.
Enter the Advanced Motion Lab.
 Open the Pendulum so you can see the channels. This time, of course, there is only one, and that is rotation. Click on the name, and it turns yellow, and the blue line appears in the Time Mapping Editor.
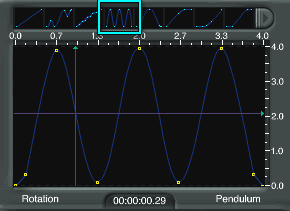
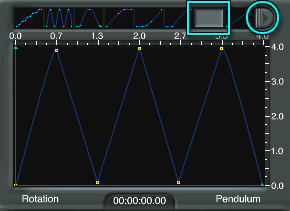
Click on the Time Mapping Preset that looks like a sine wave. Play the animation now, and you will see the pendulum swing back and forth several times, as the purple lines follow the up and down motion of the curve.
![]() Try out the other presets, to see what they do. If you click on the tab on the end, you can cycle through the thumbnails, by the way. That's the Presets Scroll Button.
Try out the other presets, to see what they do. If you click on the tab on the end, you can cycle through the thumbnails, by the way. That's the Presets Scroll Button.
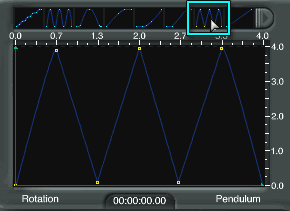
 When you have looked at all of them, come back to the one that oscillates. Now, hold down the shift key, and click on all the points, to make the curves into straight lines. Notice that each one affects the curve after the point you click on.
Play it now, and you will see that the motion is more mechanical, and less smooth and organic. There is still some ease in and ease out, because of the two points at the very beginning and very end of the curve.
Hold down Control/Ctrl and click on those, and they will be deleted. Now the motion is a continuous straight back and forth. You can almost hear the "click" at either end.
Perhaps this would be useful for something, some day. Let's save it as a preset Time Mapping Curve.
Click the Scroll Button at the end of the Presets until you see the blank spot.
 Click in that blank spot. Your curve is saved. Notice that it has yellow points, while all the others have cyan. That lets you know it's one you saved. Yours will all have yellow points; the ones that ship with Bryce will all have cyan points.
Click the Scroll Button again, and you will find that the spot just under the tab has become a new blank spot. There will always be exactly one.
What if you change your mind, and don't want that preset anymore? Just hold down Option/Alt, and click on it. It is deleted forever, just like that. But be very careful. If you click on the Scroll Button while holding down Option/Alt all of the presets you have made are instantly and permanently destroyed. No warning, no nothing. Just gone.
 The only insurance you have against that is to save the file they are in to a separate spot on your hard drive (or on a CD Rom.) That way, if you accidentally delete them (or if something happens and you need to reinstall Bryce) you can get them back.
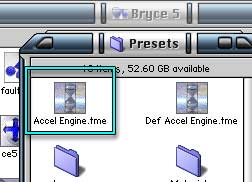
They are stored in a file called "Accel Engine.tme" in the Presets folder in your Bryce 5 folder. ("Def Accel Engine.tme" holds the default time curves.) You can copy this file to any safe place to back up your curves.
To quickly recap the Time Curves; the steeper the line, the faster the motion, the flatter, the slower. Perfectly flat lines stop motion for the time they cover. Lines that slope up cause things to move forwards in time. Lines that slope down cause things to move backwards in time. You can tell which attribute you are playing with, because its name will turn yellow in the Object Hierarchies, and its name will also appear on either side of the SMPTE display at the bottom of the Editor.
Alright. That about takes care of the AML. Don't forget, if you have any questions, or if you have discovered anything that you think the rest of the class might want to know about, post it on the board!
So. You've been doing quite a bit of animating so far. You may be wondering what to do if you really, really mess up your work; to the point that it becomes hopeless and you want to start over. There are a couple of ways to do it.
The first, and easiest, is to simply revert and work with a saved document.
If you don't have a saved document, though, you can remove all the keyframes, and start over again.
To remove all the keyframes from an object, just select it, hold down the shift key, and click on the Remove Key button (the minus sign to the right of the Key.) All the keyframes, trajectories, etc. associated with that object will vanish. Remember, though, you can't undo it, so be careful.
What if you want to remove every single keyframe from every single object in the entire scene, so that absolutely nothing is animated? That's simple too, but once more, it cannot be undone. Holding down Command-Option-Shift on a Mac, or Ctrl-Alt-Shift on a PC, and then clicking the Remove Keyframe button will remove every single keyframe, from everything, everywhere. A warning will appear saying, "What're you up to??" and then one saying, "Done!" But it's already too late if you see the first one. There is no place to go but forwards, no matter what you do. So save often!
When you do either of these things, the Working Range will still show in blue, even if you no longer have any animated objects at all. To remove it, just grab the end and slide it back to the beginning. If there is no animation, there won't be any dark blue Animation Length, either.
Still with me? Good. We'll be animating other things, such as materials and skies, as we look at them in this course.
For now, though, let's move on to more advanced animation concepts, instead of just advanced tools. On to Page 4!