Note: I haven't used Bryce in years; so these tutorials are archived "as is." I can't accept questions, because I don't remember the answers.
This time, we are going to be looking at Bryce Light.
Lighting is one of the most important things in any scene. A beautifully composed scene, with lovely terrains, striking materials, and perfect models will still look dull and boring without good lighting.
Lighting adds snap, depth, and life to your scenes.
So, lets take a look at how lights are created, manipulated, and used in Bryce.
You are already familiar with sunlight. But that is only one of the many lights that are available. We are going to look at the rest. I've broken the downloads for this lesson into two files, Lesson5-1.sit and Lesson5-2.sit if you are on a Mac, or Lesson5-1.zip and Lesson5-2.zip if you are using a PC, because they are both pretty big. (3.4MB and 7.3MB respectively for the sit files, or 3.6MB and 6.9MB for the zip.) If you are on a dial up, you might want to build your own files, instead. (On the other hand, once you see the models included in them, you might decide to go for it after all.)
Begin by starting Bryce, and opening a new document, if you haven't already done so.
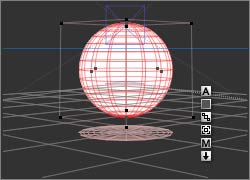 Create a sphere, and place it a little way above the default ground plane. Both of them should be using the default gray material at this point. Now, go into the SkyLab, and disable the sunlight. We won't be using it just now. (It's at the bottom of the Sun controls on the right hand side of the palette, in case you've forgotten.)
Also turn off the atmosphere, from the Sky & Fog palette. (The triangle under the Sky Modes thumbnail on the far left has the command.) Give your scene a dark gray sky color. (Place your mouse on the color swatch under Sky Modes, and slide the eyedropper to pick up the dark color from the ground plane in the Nano-Preview, to get one that matches.)
Alright. You should now have a pretty dim scene. In fact, it should just be dark gray all over. This kind of setup is perfect for exploring lights, and we are going to be using it again next week. So open the Sky presets (Triangle next to the title of the Sky & Fog palette,) and Add this as a preset, just the way you have done with other palettes before. Call it Dark Scene, or something like that.
The first thing we are going to look at is Ambient Light glow. So, select your sphere, and go to the Material Lab. Turn the Ambience value up to 100. Exit the lab, and take a look at the Nano-Preview now. Your sphere is glowing white, like a light bulb. That's what high Ambience values do. You can make it glow different colors by using a color in the Ambient Color channel, or by changing the color of the Ambient light in the scene using the Sky & Fog palette. (It's under the Shadow thumbnail, second from the left.)
 |
 |
| Ambient Color in Material | Ambient Color in Sky & Fog Palette |
Try it out both ways for just a second. Notice that the color of the Ambient Light in the Sky and Fog palette tints the whole scene, including the ground plane. That's because there is an Ambience value of 19.6 on the ground plane, too. Anything with any Ambience value at all will be colored by the Ambient light in the scene.
Set the Ambient Color back to white in both places. I want to show you something else.
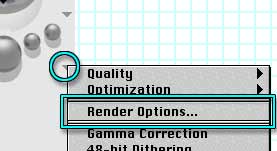 We are going to just peek into the rendering methods here. (We'll be covering all of this in more detail next lesson.) Go to the bottom flippy triangle on the Control Palette, next to the Render buttons. There is a choice there called "Render Options." Choose it.
 A dialog box will open that is full of options for rendering. Right now, the only one we are going to look at is True Ambience under Premium Effects. To enable it, go to the Quality Mode section at the top left, and click on Premium (Effect AntiAliasing.) Now, this will increase render time quite a bit, but it's sometimes worth it.
When you click on it, the section below it will become enabled (no longer dim.) Leave the other choices alone, but click on True Ambience. Then click the checkmark to close the box and accept the changes.
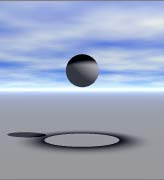
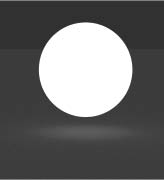 You won't be able to see this one in the Nano-Preview; you will have to render. Please do so now. (Remember, you can speed things up a lot by using the Plop Render.) You should get something like this. This is a new feature in Bryce 5, and it's wonderful, because the glow is exactly the shape of the object that is casting the light.
It also works even if the Ambience value isn't as high. So we don't have to fake Ambience as much as we used to. It's not really radiosity yet, but it's getting closer.
Try changing the shape of the sphere, and rendering again, to see what I mean. But don't take too long playing with this. You can do that later; for now there is still a lot of ground to cover.
Return the sphere to its original shape by going to the Edit palette, clicking on the flippy triangle under the Resize tool, and choosing Unscale. Reset the Render Options to Regular. Change the Material of the sphere back to an Ambience value of 19.6, and pull it a little farther away from the ground plane.
You should be back to solid gray.
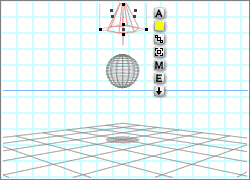 Now, go to the Create palette, and create a Spotlight. (It's the second yellow shape from the left; the one that looks like a cone.) It will appear in the scene, facing straight down. Pull it up until it's a little way above the sphere, and make sure that the two of them are aligned on the X and Z axis by selecting them both and using the Align tool in the Edit palette.
 If you render now, you will have a sphere, lit from directly above, and casting a shadow directly below. Something like this. Dramatic in its own way, but hardly worth exhibiting.
It's time to visit the Light Lab. Make sure that the light is selected, and click on the E at the bottom of the Icon Column to edit your light.
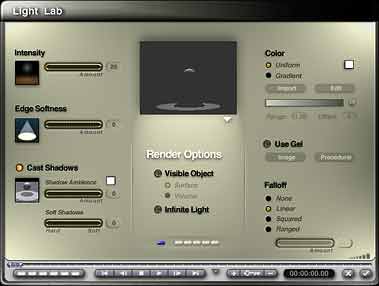 The Light Lab opens. It looks like this. In the top center is a preview, which works much like the others in Bryce. Dragging the mouse on the picture allows you to view the scene from any angle, holding Control/Ctrl and dragging up and down lets you zoom in and out, the Spacebar lets you pan, and Option/Alt returns to the default. Choose Render in Scene, if you haven't already done so. You should be able to see both of your objects easily. If you can't, maneuver until you can.
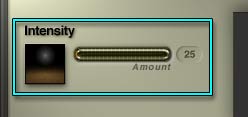 The control at the top left allows you to change the intensity of your light. You can either drag the slider, or type the number you want into the text box by clicking on it. Try it out, and see how it affects the scene.
 Notice that you can have negative numbers. (The slider turns blue when you are using anti-light.)
This is used to add shadows to an area that's too well lit. But be careful, because it adds bright anti-shadows where a positive light would add dark shadows. (We'll be talking more about that in a moment.) Pretty strange looking, huh? (That's edge softness on the pretty intense antilight, by the way; making one picture serve for two.)
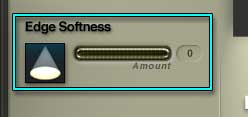 The next control down allows you to soften the edges of the light. Try it out. You can choose between 0, which gives you a hard edged spot, and 100, which softens the edges quite a bit.
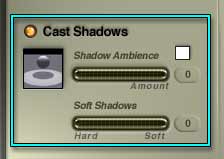 Next is a control that enables Cast Shadows. Turn it off, and there isn't a shadow to be seen under your sphere. (That's how to fix the anti-shadows under negative lights. Just turn 'em off.)
 There are two additional controls that allow you to do things with shadows besides simply enable or disable them. The first one is Shadow Ambience. This doesn't decrease the darkness of the shadows. Instead, it adds whatever percentage you specify of whatever color is in the color swatch next to the control to your shadows. Be careful using this one, because if the color is too light, or the percentage is too high, you can actually wind up with a very fake-looking patch of unexplained light color where you would expect a shadow.
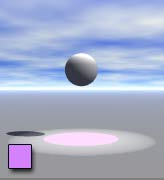
In the example here, the Shadow Ambience color was a light purple, as shown in the swatch in the lower left corner of the picture, and the percentage of Shadow Ambience was 57%. Now, this might be what you want. But it's not what I expected when I saw these controls, so I just thought you should be warned.
You can also make the shadows Soft or Hard for each light. It does add to rendering time, but it's really nice to have. Move the slider to the left for hard shadows, move it to the right to soften the edges of the shadows cast by this light. (Remember, though, that soft shadows add to render time.)
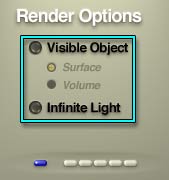 Moving on to the center panel, we have the Render Options.
 |
 |
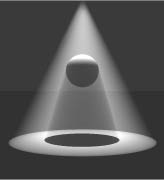 |
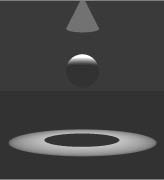
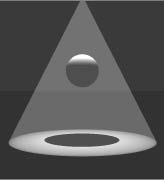
| Visible Object Light | Infinite Visible Object Light; Surface | Infinite Visible Object Light; Volume |
The first choice is Visible Object. If you click it, you will be able to see your light. But it's not very realistic looking. In fact, it's a shape made of light, that's all. Click it anyway, though. See what I mean?
Now, directly below that, click Infinite Light. That's better, isn't it? Make sure that Surface is still checked under Visible Object, and try out the sliders on the left now.
Notice that while they all still work the same way on the light and shadow that are seen on the sphere and the ground, none of them have any effect on the cone of light.
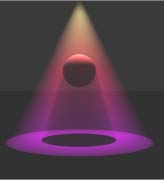
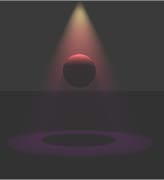
Now, change to Visible Object > Volume. Notice the shadow cast by the sphere now extends to a shadow in the light cone itself. Neat, huh? That's how you can get the really realistic light effects where light comes streaming in a window, and things like that. But I'm getting ahead of myself.
Try the sliders on the left now. This time, notice that they affect both the light and the cone. Remember that. Also, notice how much longer it takes to render the preview. Remember that, too. Whenever you use volumetric materials in Bryce, it increases the rendering time. It's frequently worth it, but it's the price you pay.
At the bottom of this panel is a bank of memory dots. They work exactly like all the others throughout Bryce, and you already know all about them. After all, you've been using them for over a month now, right?
 Leave Visible Object > Volume enabled, and take a look at the controls on the right hand side.
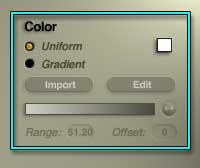
The first is Color, and there are two ways you can apply it. Uniform is pretty straightforward; you choose a color from the swatch, which works exactly like all the other color swatches in Bryce, and your light becomes that color.
Gradient is a little more complex. It actually applies a gradient, which you control, to the light; so that the color near the source is different from the color farther away from it. It's hard to see with the white to black gradient that is the default, so let's change that.
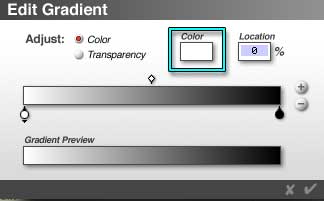 Click on Gradient, then on the Edit button, to open the Gradient Editor. It looks like this. Click on the color swatch, which once again works just like all the others in Bryce, and choose a nice yellow for the beginning of the gradient. (If you don't see a color swatch, make sure that Adjust: Color is enabled at the top of the dialog.)
 Now, click on the Black circle at the end. Notice that the little arrow is under it, now, and the color swatch is black. That shows that you are now editing that Color Node. Make it bright purple.
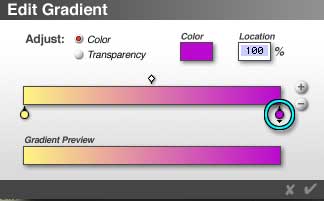
The color between them is sort of strange, isn't it? Lets change that.
 Click on the plus button at the right end of the Gradient, to add another color. Another circle appears, in the middle of the gradient. Make that one bright red.
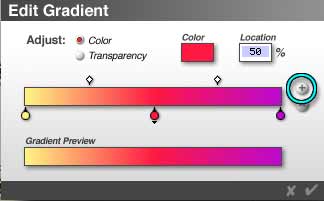
You can add as many colors to the gradient as you like. If you want to delete one, you can either select it, so the black arrow appears below it, and click the minus button, or you can simply Option/Alt click on it.
If you want to change the position of a Color Node, just click on it, and drag it wherever you want, or input the position numerically in the Location text field in the top right corner. You can drag color nodes right over each other, to rearrange the colors in your gradient. Give it a whirl.
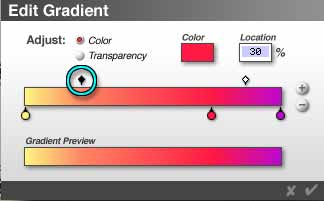 You can also change the midpoint of the transition from one color to another. Click on one of the white diamonds above the gradient. It will turn black, to show it's selected. Now, either drag on it to move the transition point, or type the number you want into the Location text field. Try it out.
 When you are ready, click the checkmark to close the dialog, and see the preview of your gradient. You should have something like this.
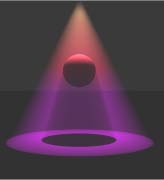
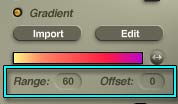 If you look below the Gradient Preview, you will see two text fields labeled Range and Offset. Those control how the gradient fits on the light.
 |
 |
| Range = 20 | Range = 85 |
The Range controls where the gradient ends. The higher the range number, the farther the distance from the first color of the gradient to the last. Anything outside the range simply uses the last color of the gradient. Try typing a few numbers in to see. (Just click on the text, and you will get a text box that you can type numbers into.)
This number is a real value in Bryce Units, by the way; so you can use the size of things in your scene to determine this number.
 |
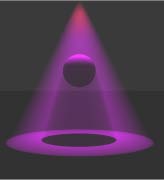 |
| Offset = 20 | Offset = 70 |
The Offset controls where in the gradient the light starts. At zero, which is the default, it begins with the first color of the gradient. The higher you set this number, the farther into the gradient the light color is at the beginning of the light. If you set it to 100, it just uses the end color of the gradient for the whole light. Try it out. You can type in a number, or you can use the little double headed arrow button to the right of the gradient preview. (Why would that be useful, you might ask? Animation. But we aren't getting into that in this course. That's the next one.)
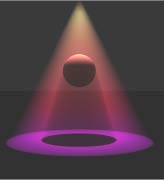
 Light gradients in Bryce are opaque by default, but you can change that, too.
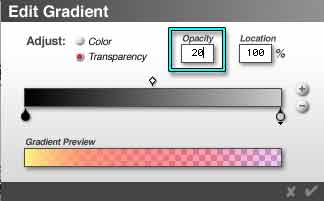
Click to edit the gradient again, but this time, click on the Adjust: Transparency button. A percentage appears where the color swatch was. Other than that, the controls work exactly the same way.
Try it out!
 Opacity gradients cause realistic dissipation of the light, if used this way. Of course, you can also make the light transparent in the middle, if you are so inclined, which isn't as realistic.
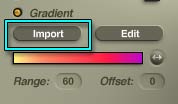 In addition, you can import any gradient that you have saved from Photoshop. To do that, click the Import button. A normal browser window will open, that will allow you to locate the Photoshop gradient file you want to use. Simply click to open it, and it's imported. I've included one in this weeks download, if you want to try it. It's called Candlelight.grd.
Now, I've been showing you all of this with the Light Visible, and set to Volume, to make it easier to see. But all of these controls still work, even if the light beam itself isn't visible at all. Try that, too.
Then let's go explore Light Gels on Page 2