Note: I haven't used Bryce in years; so these tutorials are archived "as is." I can't accept questions, because I don't remember the answers.
This is page 2. If you haven't finished page 1, please do so before starting this page.
 |
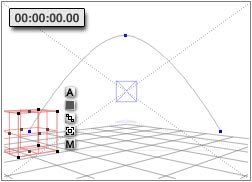 |
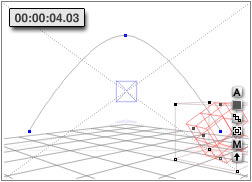
| Rotate the Cube at the Last Frame | Cube is unrotated for the First Frame |
Try this. Move the Scrubber back to the end of the animation, hold down the Command/Ctrl key to get the rotation handles, and rotate the cube on any axis. Now use the Scrubber to move back to the beginning of the animation. You will notice that the cube straightens back out, so that it is in the upright position again for the first keyframe.
Remember this, because it will save you untold grief.
Whenever you are making any changes in a picture that is animated, look first to see where you are in time.
This is important, because unless you are trying to animate something, you must be in the first frame. If you aren't, then your change will be animated if you are using Auto Key, and may be lost if you are not.
(When Auto Key is disabled, any changes made to something that has keyframes are lost if a new keyframe isn't made at that point in time. However, any changes to things without keyframes are present for the duration.)
Of course, if you are changing something that has already been animated, like the ball, you will have to change it for every keyframe where you want that change to be, or remove the keyframes that animate that particular feature. We'll get to that later.
 |
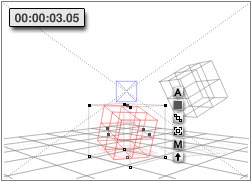 |
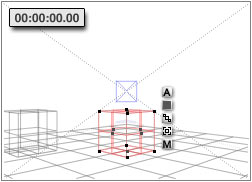
| Frame Zero; no rotation on second cube | 3 Seconds, 5 Frames; rotation on second cube |
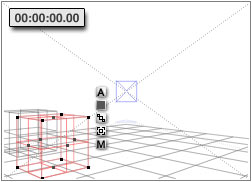
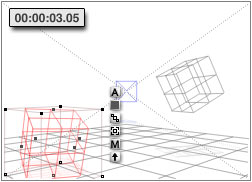
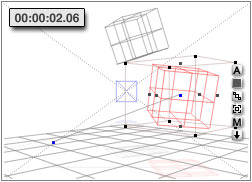
Try this. Make sure that Auto Key is enabled. Move the scrubber back to frame 0, and create a new cube. Move the scrubber towards the end of the animation, and rotate that cube. Play the animation, or simply move the scrubber manually from the start to the finish. You will notice that the cube rotates, even though there is no trajectory.
Trajectories are formed only when the position of an object changes.
 |
 |
| Move at Frame Zero | 3 Seconds, 5 Frames; move is not animated |
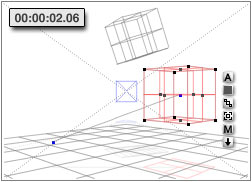
Make sure Auto Key is still enabled, move the scrubber back to frame zero, and move the cube someplace else. Now run the animation. You will notice that the cube doesn't move, but it does rotate. As long as you move it at frame zero, you can put it anyplace you want, and it will stay there for the whole animation.
This is because Bryce makes keyframes only for those channels that show change after frame zero. A channel is an attribute that can be animated. Position, Rotation, Scale, Sheer, etc. each have their own channels. (Materials have lots of channels.) Since there was no change in the Position channel, there is no keyframe, and no animation. (Frame zero is constantly updated, as long as you have Auto Key enabled.)
Keyframes can be eliminated; but it's time consuming if you have a lot of them. If you are going to be using Auto Key, it's better to get in the habit of simply watching where you are in time before you change anything.
 |
|
| Frame Zero; change made but no Keyframe created. | Frame Zero; animation is unchanged, change in position is simply lost. |
Try this. Disable Auto Key, move your scrubber, and change something. Now play the animation from beginning to end. Your change has disappeared. No keyframe, no change.
 |
 |
| Add a Keyframe | Trajectory Appears |
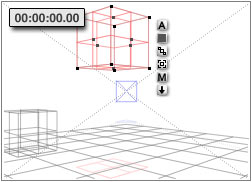
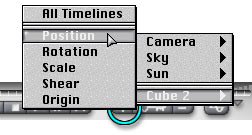
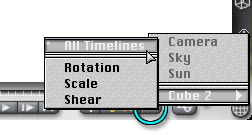
Leave Auto Key disabled, select the second cube, and move the scrubber to a place on the timeline before you applied the rotation. (The easiest way is to hit Shift and the comma or period key (< or >) to move to the appropriate keyframe, and back up using the comma key.) Change the position of the cube. Now, click on the plus sign to the left of the button with the key on it. A pop-up menu appears with Camera, Sky and Sun on the Top, and Cube 2 on the bottom. These are the things you can make a keyframe for.
Choose Cube 2. Notice that you can choose to make a Keyframe for "All Timelines" or for only the position, rotation, etc. Choose "Position." The trajectory appears, and the key turns yellow to show there is a Keyframe there.
 |
 |
| Remove the Keyframe | Rotation Disappears |
Play the animation. Notice that the cube slowly rotates as it moves. Both keyframes are still active. Now, advance to the keyframe with the rotation. The key should be yellow, to show that there is a keyframe there. Click on the minus sign to the right of the Key icon. Once again, you get the menu, but this time the controls for the Camera etc. are dimmed because there are no keyframes there to remove.
Choose Cube 2, and you will see that you have a choice of All Timelines, Rotation, Scale or Shear. Only Keyframes that exist can be removed individually, and the only thing that you changed here was rotation. (Scale and Shear always go with Rotation. Remember that when you are adding keyframes.) Click on All Timelines, to eliminate them all in one step, and you will see the Key go from yellow to white, to show there is no longer a Keyframe there.
Move the scrubber back to Frame Zero, and play the animation. Notice that this time, although the cube moves, it no longer rotates. That keyframe is gone, and where there is no keyframe, there is no change.

Alright. There are just a few things left on the Animation controls.
To the far left, you will see a group of six white lozenges on a gray bar. Those are memory dots, and they work exactly the same way they do everywhere else in Bryce. These control your position on the timeline. Move the scrubber, click on one of the white dots to turn it blue, and move the scrubber again. Click on the blue dot, and you will return to the exact moment in time where you were when you first clicked there. (Well, on the timeline in Bryce, anyway.) Option/Alt click to clear them, as always.
To the right of the Keyframe buttons is a button that looks like it has a picture of a wave crossing a line on it. (It's not really a sideways 8.) Click on that, and it will take you into the Advanced Motion Lab. (You knew there had to be a lab connected with animation somehow, didn't you?) We aren't going to be exploring it this week, so if you went there, click on the crooked arrow in the bottom right hand corner to leave it and return to your normal Bryce window.
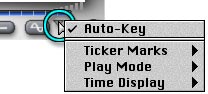 To the right of that is the Flippy Triangle that will give you the Animation Options. The first of those, Auto-Key, we've already worked with.
Below that, you can choose how many ticker marks are displayed, what the Play Mode is, and whether your Time Display will show frames or SMPTE.
Ticker marks are the little white lines. There are a number of choices for how many frames each one will represent. (This becomes more important in longer animations, where too many can be confusing.)
There are three Play Modes to choose from. Once, of course, will play the wireframe preview one time. Repeat will play it all the way through from beginning to end, over and over until you stop it. Pendulum will play it from the beginning to the end, backwards to the beginning, to the end again, and so on until you click anywhere on the screen to make it quit.
SMPTE will display the time and frames, and Frame Count will just display the frames, as always.
You might want to play with all of these for a few minutes to acquaint yourself with them.
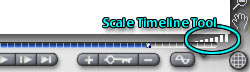 Above that, tucked up right under the working window, you will see a series of tiny vertical bars that start very small, and get taller. That is the tool to scale the timeline. If you click on it, it will get white. Drag, and you will see the tick marks spread out or condense. They are still showing the same amount of time, but you are essentially zooming in and out of the line. This allows you to pick out single frames very easily, or to move over a longer animation with relative ease.
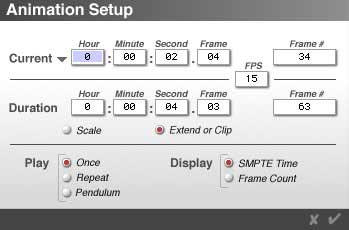 Finally, double click the scrubber itself. The Animation Setup dialog will open. It will tell you exactly what frame the scrubber is currently on, how many frames per second your animation is set for, and how long your animation is going to run, given that rate.
All of these are text boxes, and you can enter numbers into them. You move from field to field by hitting the Tab key.
Go on to Page 3, and we'll explore it in depth.