Note: I haven't used Bryce in years; so these tutorials are archived "as is." I can't accept questions, because I don't remember the answers.
This is page 4. If you haven't finished page 3, please do so before starting this page.
| Specular Halo | ||
 |
 |
 |
| White | 50% Gray | Black |
It's time to set the colors. This part is really fun. Feel free to try out a lot of different colors at each step, to see how they interact.
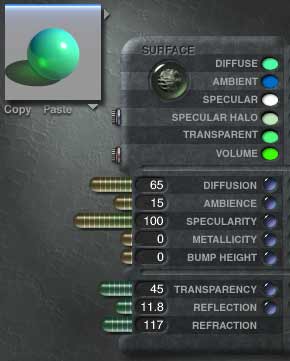
Ambient color is the color cast on the object by indirect light that is reflected from other surfaces. In Bryce, there isn't really any indirect light reflected, so we fake it by choosing an ambient color that shows what that light would be. For instance, if we know that the object we are making is going to be lying on a red surface, we would choose red, because that color would reflect strongly onto the surface. This rattle is going to be lying on a blue wagon bed in my picture, so I'm going to choose a blue color. You might want to choose a color that will reflect some of the principle color of your wagon bed. This isn't necessary, but it does add to the realism of your piece.
Specular color is the color of the bright spot that will show in the middle of the object's highlight. Since the object in question is plastic, I'm going to leave that white. Plastic generally has white highlights.
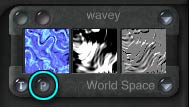
Specular Halo is the color at the outside of the highlight. In Bryce, the lighter this color is, the larger and more diffuse the highlight is. The darker the color you choose here, the sharper the highlight is. Softer highlights make the material appear softer. Sharper highlights make the object look harder. Plastic is fairly soft, so I'll be using a light gray here.
| Specular Halo Color | ||
 |
 |
 |
| Red | Blue | Green |
Adding color to the halo adds the appearance of another color just below the surface of the object. I'm going to use the same green I used for the diffuse color, but slide it just a bit to the yellow. To do that, click on the swatch so you get the eyedropper, as usual. But this time, slide the eyedropper off the color palette, and up to the center of the diffuse color swatch. The swatch you are coloring picks up that color. In fact, the eyedropper picks up the color of whatever pixel is directly under it.
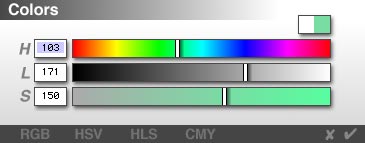 Now, hold down the Option/Alt key, and click the Specular Halo color swatch again. You will get the advanced Bryce color picker. This one is far more accurate, and it's the one I usually use.
You have your choice of 4 color spaces. RGB (Red, Green and Blue), HSV (Hue, Saturation, Value), HLS (Hue, Lightness, Saturation) or CMY (Cyan, Magenta and Yellow.) You get the sliders for each one by clicking on the corresponding initials at the bottom of the dialog.
I prefer the HLS, but this, once again, is a matter of personal taste. I'm going to slide the Hue slider a bit to the left, or yellow, side. I'm also going to make it lighter, and dampen the saturation a fair amount.
| Transparent & Volume Color | ||
 |
 |
 |
| Red Transparency Color | Blue Volume Color | Red Transparency & Blue Volume Color |
Transparent color is the color that shows through a transparent object. It will tint anything you can see through the object, as well as the caustics and shadows cast by the object. It will also show up strongly on the shadowed side of the object. In this case, I'm going with a slightly yellower version of the green I used in the Diffuse color channel.
Volume is the color of the inside of transparent objects. It also tints the shadows and caustics, as well as things seen through the object, and interacts with the transparent color. I'm going with yellow-green, here.
An exhaustive exploration of these channels is beyond the scope of this class, but you can learn a lot by playing with them on your own.
 When I'm finished, the Materials Lab looks like this.
Go ahead, if you haven't already, and play with your own material. The only thing I require is some transparency, because I want to show you something else.
 When you are happy with the color of your rattle, pull it out of the ground if it's in there, and do a test render.
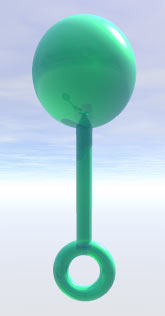
Do you see the problem? The lovely (not to mention enormous) rattle is transparent. We wanted that; but it means that you can see where we stuck the three pieces together. Mine looks like this. We will fix it by using the third Boolean operation; Union.
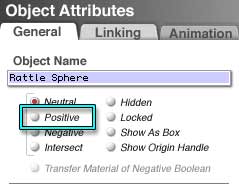 Select each part in turn, without ungrouping, by either using the Control-click method, or selecting from the Selection Palette at the bottom of the screen. Open the Object Attributes for each one, and change the Boolean attribute to Positive.
 Notice that the bounding box for the group gets the diagonal lines in the corners after the first one. This is to show there is a Boolean here, as you will remember.
When you are finished, render again. Beautiful! A lovely rattle, of megalithic proportions, but all one seamless piece.
![]() Alright. It's time to put it in the wagon. Copy, save, open the Wagon again, paste, look at it from the Right View, and shrink the rattle down to a reasonable size.
Alright. It's time to put it in the wagon. Copy, save, open the Wagon again, paste, look at it from the Right View, and shrink the rattle down to a reasonable size.
Landing the rattle so it doesn't float at all is a bit trickier, because it doesn't have a flat bottom. In order to do it, lets hide some of the other stuff, so we can see what we are doing more easily.
Select the wagon and the rattle, by going to the flippy triangle on the Selection Palette, and choosing Select Groups > Wagon Body (or whatever you called it.) Now, hold down the Shift key, and once again choose Select Groups > Rattle 1 (the 1 is there because you pasted it in. You can delete it if you want to.) Both of them will be selected.
Now, to the right of the flippy triangle is a set of controls called VCR controls. (Don't ask. I have no idea why, except that they kind of look like that.) In the middle is a button that should be a sort of light turquoise. Click on it. Notice that it turns red, and the wheels and blocks vanish.
They are hidden. You are now working in Solo Mode. This is one of the things these controls can do. We will get to the others later.
Solo Mode not only makes it easier to see what you are doing, it also makes Bryce faster, since it doesn't have to redraw every single thing in the scene every time you move. Anything not selected will be hidden. To reveal it again, click the button, and all the hidden objects will be shown once more.
To hide only one thing, select it, and go to Invert Selection under the flippy triangle in the Selection Menu. All the selected things will be unselected, and all the unselected will be selected. Now, when you click the button, the unselected thing that is hidden is the one you chose.
You can add to the hidden things by selecting only those things you want to remain visible, clicking to reveal the hidden stuff, which will be unselected, and then immediately clicking again to hide all unselected things. That will include both those originally hidden, and the ones you didn't select this time. All of which sounds much more complicated than it actually is. Try it out, and you will see how easy it is in practice.
 Alright. Back to the rattle. Make sure that everything except the rattle and wagon are hidden.
Click to select just the rattle. Now, we need it to lie down. So we will first rotate it so you are seeing the side of the ring on the bottom, if you aren't already. Which axis is that? Yes, the Y axis. (I know, I keep stressing the axis, but knowing which one you want, instead of having to run randomly through them, saves worlds of time.)
Hold down the shift key to constrain the movement, and use the Rotate Tool to rotate the rattle until the side of the ring on the bottom is towards you.
Now we need to rotate it so that it's horizontal, not vertical. Here's another trick. The Control Point in the middle of the bounding box, facing you, will always rotate the object around the axis you are looking down. So, if you want the object to rotate like the hands of a clock, just hold down Command/Ctrl, grab that point, and rotate. In this case, hold down the shift key, too, to constrain the rotation. Rotate so the handle is horizontal.
Now drag it down until the sphere just touches the bed of the wagon. Zoom in as close as you need to, in order to do this.
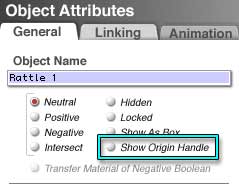 We are going to use the Object Attributes again, and force the rattle to rotate around the point that is on the wagon bed. So open 'em up.
See the second column of attributes? We've used locked, and now we are going to use Show Origin Handle, at the bottom. Click on it, and then click the checkmark to close the dialog and accept the changes.
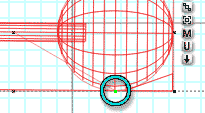 Notice the little bright green square in the middle of the rattle? That is the origin handle. Put your cursor on it, and it will change to a four headed arrow. When it does, click and drag to the point where the Rattle Sphere touches the wagon bed. A line will extend from the original origin point to the new spot, but you won't be able to see that green square when you are dragging it, just the cursor. When it's in the right place, let go, and it will turn into a green square again.
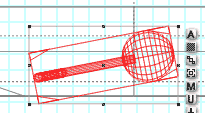 Now, hold down Command/Ctrl, grab the Control Point in the middle of the rattle, and rotate until the ring is as close as it will get to the bottom of the wagon bed. (It will probably be a bit below it.) At this point, the sphere will probably be just a hair below the bed, as well. Move the whole thing up until it just touches. Something like this.
And there you are. The rattle is lying realistically on the bed of the wagon.
 Open Object Attributes, and hide the origin handle, because we don't need it any more and it will only slow Bryce down to draw it. Then click the red button in the middle of the VCR controls to leave Solo Mode and reveal all the other stuff.
Go to Top view to make sure the Rattle isn't interpenetrating anything, and move it if it is. You might also want to rotate it a bit on the Y axis, to make it look a bit more natural.
When you are happy with it, do a test render.
 Let's add a tennis ball to the wagon. (I think the baby borrowed it from the dog.) This one is easy, and we will do it all with materials.
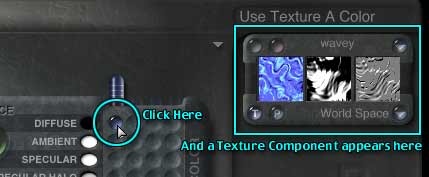
Create a sphere, and take it into the Material Lab. Now, see all those little dimples to the right of the labels? Those are for using textures, and we are going to use a few of them right now.
Click on the dimple in the A column, next to Diffuse. A blue jewel fills the dimple, and a Component palette appears over the letter A in the column on the far right. It looks like this. This is a procedural texture, and Bryce will always default to one of them unless you are using a picture object as a primitive.
 But you can put pictures on anything, and we are about to do just that.
Look at the lower left hand corner of the Component palette. See the T and the P? Those stand for Textures and Pictures. We need a picture, so click on the P now.
 The texture is replaced by a picture of Leo. But, as nice as Leo is, he doesn't look much like a tennis ball, so we are going to replace him, too.
See the pinkish dot, the second one on the top left? If you put your mouse over it, the title "Texture Source Editor" will appear above it. Click on it now.
 This brings you into the Picture Editor. You will see the picture of Leo in the large thumbnails across the top of this palette, and also in the small square at the top left of the Picture Library. We need to load another picture into the Picture Library.
So click on the first empty square after Leo. A dialog box will open that allows you to browse to the image you want to load. Bryce can read a number of different file formats, including .jpg, .pict, .psd, .bmp, and .gif. The picture we want to use is a .jpg file that you should have downloaded with this lesson. It's called TennisBallColor.jpg. Browse to it now, and load it.
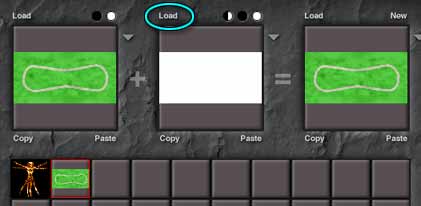 As you can see, it automatically appears in the color channel of the Library. But tennis balls have texture, too, so we are going to add a bump map. Bump maps must go in the Alpha Channel, which is the thumbnail in the middle.
Click on the Load button above the middle window. A dialog box appears that allows you to navigate to an image. Find TennisBallBump.jpg, and load it.
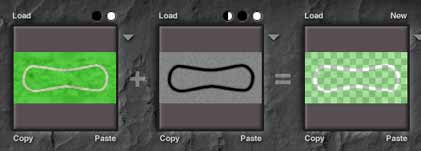 The grayscale image appears in the alpha channel, and part of the image in the last channel appears transparent. This is because Alpha channels can also be used as transparency maps. We'll do that later, but not right now.
For now, just close the Picture Editor using the checkmark, to keep your changes.
Go on to Page 5