Note: I haven't used Bryce in years; so these tutorials are archived "as is." I can't accept questions, because I don't remember the answers.
This is page 4. If you haven't finished page 3, please do so before starting this page.
 Okay. What if you want rain in Bryce? There are several ways to do it.
The easiest is to use a picture on an infinite plane, so that's the one I'm going to show you first.
Start by setting your picture up with a cloudy sky; one where it's obvious that it might be raining. Lower the cloud plane, reduce the frequency and amplitude of the clouds so they are big and heavy, increase the haze; whatever makes it look right to you. Don't forget, if you are using water, it should have a bump that shows it's being hit by raindrops. You may also want to change to Soft Shadows on the Sun & Moon tab of the SkyLab, since you usually don't have hard shadows when it's raining. But this will increase your render time, so bear that in mind.
 Now, for a gentle, all over rain, we are going to start by putting a picture of slanted lines (raindrops) on an infinite plane. I've provided one, SeamlessRain.jpg, with this lesson.
So, use the Create palette to make an infinite plane. (It doesn't matter which kind; I used a Cloud plane.) When you have it, take it into the Material Lab. Right now, it has a texture on it. We are going to replace it with a picture. So, in the lower left of the Component Palette, click on the P to change to a Picture. Leo will appear in the thumbnails, as always, unless you have other pictures in your library (in which case it's random, and Leo may not even be there.)
Click on the pinkish dot to edit the picture, and load the one called SeamlessRain.jpg, just as we have done before. Copy and paste the same picture into the Alpha channel. (The thumbnail in the middle.) Exit the Picture Editor, and return to the Material Editor.
Alright, first we want to make sure that the material between the raindrops is invisible. So click in the dimple next to Transparency, so that the alpha map will be used. Now, go up to the Material Options flippy triangle next to the Component palette, and switch to Blend Transparency, just as we have done before.
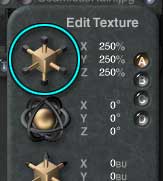
Finally, we need to make sure the picture will be applied to the plane the correct way to make it look the most like rain. So, switch the Mapping Mode to Parametric Scaled. This will place the picture on the plane, and allow us to tile the image. To do that, we need to change its size, so click on the greenish Editor dot. You know how to scale things already. I did some experimenting with this particular picture, placing it right in front of the camera, and I think that it looks best at around 250%. (You can take my word for it, or you can do your own experimenting.) Change the scale by clicking and dragging in the center of the Resize cube, and then close the Editor.
Set the Diffusion and Ambience values fairly low (I used 23.7%) set the specularity high, and leave the other values at zero. I added 10% transparency, which makes the "solid" part a bit transparent, and then set the refraction value to 133.3 (100 X the Refraction Index of water, which is 1.333)
You know how to do all these things; we've done them all before.
Close the Material Lab.
 Now, switch to one of the side Orthogonal views, and rotate that plane so that it is more or less vertical, and right in front of the camera. (We want some perspective in this, so we won't line it up exactly with the camera.) Switch to Top view, duplicate it using Command/Ctrl-D, and position the new one farther back. Tweak the rotation in all three axis just a bit, and repeat the whole process. Make as many planes as you think you need. Just be sure to keep them all lined up in front of the camera. This will give you several layers of "rain." Render to see how it looks.
To make heavier clusters of drops, you can make nested cones using this same texture, one inside the other. (Use Cylindrical Mapping Mode, and resize if necessary.)
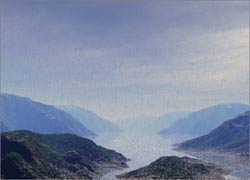 There you are! A steady, gentle rain.
Stormier skies are only slightly harder. They use several of the things we have learned this lesson.
To make one, start with the same basic sky that you used for the last one. (Clear the planes and things, though. We won't use them this time. If you liked the last picture, Save As.. to start a new one without overwriting the old one.)
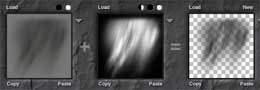 Create a picture object, exactly the same way we did for the Moon, and load RainSquallColor.jpg as the image, and RainSquallTrans.jpg into the Alpha Channel. Make sure that Blend Transparency is checked in the Shading Mode menu.
Line them up square to the camera, the same way we lined up the moon. (Check the rotation settings in Edit Camera, and then change the settings in Attributes to match.)
 Line it up square to the camera, the same way we lined up the moon. (Check the rotation settings in Edit Camera, and then change the settings in Attributes to match.)
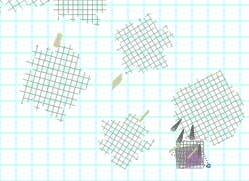
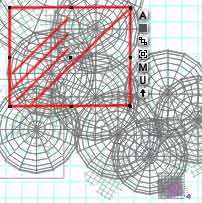
Duplicate, change the sizes of some of them, and place several in a staggered row. Group them. Now make a few spherical cloud objects, just like you did for mist a little while ago. But this time, put them higher in the sky, and make sure that they are nice and dark. (Turn down the Ambience and Diffusion values, change the colors, or both.)
Place them over and around the Squall Group, so that it looks like the rain is coming from those clouds. (I enhanced the outline around the picture group in this view, because it was impossible to see in the .jpg otherwise.)
You may need to tweak the haze, or the other parameters, so that you can see those squalls clearly.
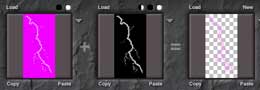 As a final touch, you can add lightning! Create another Picture Object, but this time load LightningColor.jpg for the image, and LightningTrans.jpg into the Alpha channel. Square it up as normal, and put it where you want.
 Alright; are you ready for the best hint yet? If you want to rotate the lightning, so it's not at the same angle I drew it, you can; and without losing the angle to the camera, either.
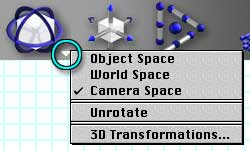
Under all the Transformation tools on the Edit palette (Resize, Rotate, and Reposition) there is a flippy triangle. If you click on it, you can choose whether to transform your object using World Space, Object Space, or Camera Space.
So far, all the transformations we've done have been using World Space. If you think of Bryce as a map, with the North at the top in the Top Orthogonal view, Y has been up and down, X has been east and west, and Z has been north and south.
But it doesn't have to be that way. If you use Object Space, then the coordinates change, so that Y becomes the axis that was up for the object when it was created, no matter where it is now. X becomes that object's own side to side, and Z becomes its front to back.
You can also use Camera Space, and that's the one we are going to use now. In Camera Space, no matter where the camera is, or what angle it's been rotated to, Y is up and down as you look through the camera. X is side to side, with no zigzagging, and Z is straight toward you, or away from you.
So, in order to rotate the lightning with respect to the camera, just change to Camera Space. (It doesn't matter which tool you use for that; if you are in Camera Space for one object, or one tool, you are in Camera Space everywhere.)
Now, if you hold down the Command/Ctrl key, and grab the control handle in the front face of the bounding box, you can rotate the lightning around the axis you are looking down. So you can rotate it to your heart's content, and it will still be square to the camera.
Is that neat, or what? And it works with either camera. Which means, of course, that if you want to rotate an object just so, all you have to do is line it up in Directors view so that the rotation is square to the camera, switch to Camera Space, and rotate. Simple as anything.
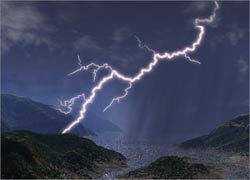 Set your scene up the way you want it, and render. Now, that's a storm! Of course, if you were doing this for a real picture, not just for practice, you would probably want to use several different squall pictures, instead of just copying the same one over and over. Small details like that can add a lot to your finished picture. You would want to add a light, too, since this bolt is in the foreground, to cast the objects around it into stark relief, like real lightning does.
Just one final hint about atmosphere in Bryce. What you see is dependent on the altitude of your camera. Some effects, like fog, actually work better under ground. Don't hesitate to select your whole scene, including the camera, and drag it up or down. Remember that the ground plane you use (if any) is wherever you say it is. You aren't limited to what Bryce thinks is the ground at all. Try it out, to see what I mean.