Note: I haven't used Bryce in years; so these tutorials are archived "as is." I can't accept questions, because I don't remember the answers.
This is page 3. If you haven't finished page 2, please do so before starting this page.
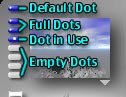 Okay. Look to the left of the Nano-Preview. See those white lozenge shaped buttons? Those are Memory Dots, and you can save your camera views with them. Anytime that you have a view you like, you can click on one of those buttons, and it will save the view. Click on the first gray one now.
As you can see, it turns blue. This indicates that there is a saved view there. The white dot in the middle means that you are currently using that view.
Now, click on the blue Memory Dot that is at the top, a bit separated from the others. That is the default view, and you can't change it. As you can see, this is the view you started with.
Click on the view you saved to return to that one. You can save up to seven different views at once.
To clear a view, hold down Option/Alt, and click on a full (blue) dot. It will turn gray, to show that it's empty, ready to save a different view.
 You can't name the views, but you can easily see which number you are working on. Look at the bottom left of the screen, and run your mouse very slowly over the Memory Dots.
Notice that the word Control shows up, in large letters, and the name of that dot (Saved View #n) is below it. That's the Text Display Area, and will tell you what all the icons and things are if your mouse is over any of them.
If it's not, that area will tell you how many objects are in your scene, and how many polygons. It will also give you other useful information, so remember where it is.
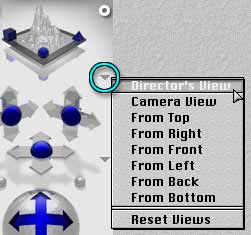 Look below the Flyaround View Icon. You will see four flippy triangles, on the very edge next to the workspace. Click on the top one. A list of possible camera angles comes up.
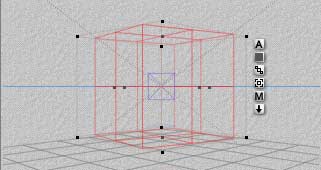
OK. Up to this point, we have been looking at the scene in a Perspective View. This means that you see things the way they would look in real life, with closer objects appearing larger, and farther objects smaller. This is great for rendering an image, but sometimes it makes it very hard to position objects just where you want them.
 |
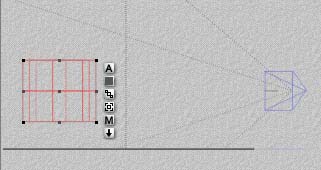 |
| Perspective View - Distortion; realistic objects | Orthogonal View - No Distortion; flattened objects |
To do that, you need what is known as an Orthogonal view. That is, a view without any perspective distortion. In Orthogonal views, if it looks like objects line up along the bottom, they really do. If it looks like two things are the same size, they really are.
One of the real problems in 3D work is interpenetration. Since we aren't working with things here, but just with mathematical descriptions of things, there is no reason that two things can't occupy the same space. This is nice at times, but not at others.
Orthogonal views let you see if you are doing this or not.
All the views in Bryce except the Camera View and the Director's View are orthogonal views.
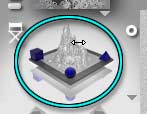 Lets take a look at some of them. Directly below the Nano-Preview is a little picture of a mountain on a square, with blue geometric shapes on the corners of it. This is the View Control. If you put your cursor on it, it will change to a double headed arrow. Drag to the right or the left, and you will see the control change, to show you the scene from different angles; top, right, left, bottom, etc.
Release the mouse when it's at one of these, and you will see your workspace update to show that orthogonal view.
You can also get to them by using the flippy triangle to the right of the View Control. Click on it, and a drop down menu will appear that gives you a choice of which view you want to use. I think this is a lot easier, myself. Which one you want to use, of course, is up to you.
Choose one of the orthogonal views now.
 Notice that as soon as you do so, the controls below that become dark. Those are the Camera Controls, and allow you to move the camera. Since the Orthogonal Views don't use the camera, they aren't available right now.
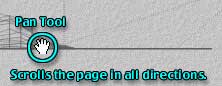
It's easy to get around here, though. Just hold down the space bar to get the Panning Tool. Your cursor will change to a hand shape. Drag it around the screen, and the view you are looking at moves right along with it.
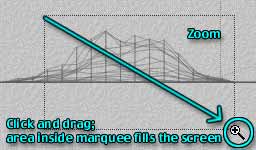 To Zoom into your picture, hold down the spacebar and Command/Ctrl. Your cursor will change into a little magnifying glass with a plus sign in it. Click to zoom in.
Or hold down the mouse button and drag to make a marquee enclosing the area you want to zoom into. The area enclosed by the marquee will zoom to fill the screen as soon as you let go of the mouse button.
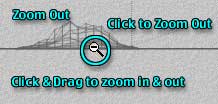 To zoom back out, hold down Option-Command-Spacebar on a Mac, or Alt-Ctrl-Spacebar on a PC. Your cursor will change to a magnifying glass with a minus sign inside it. Click to zoom out.
Or click and drag the mouse right to zoom out, and left to zoom in.
Play with that for a few minutes, in different views, until you get the hang of it.
When you are finished, you can leave these views where they are, or, if you want to return all the views (including the camera views) to their original positions, use the View Control drop down menu under that flippy triangle. At the bottom is a choice labeled Reset Views. If you choose that one, all the views will return to the factory default positions.
Return to the Director's View, either using the View Control or the View Control drop down menu.
We are about to experiment with the Camera Controls, but before we do, we have to discuss 3D space for just a moment.
 |
 |
| Axis from the default Camera Position | Axis from the Top Orthogonal view |
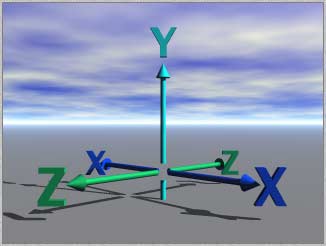
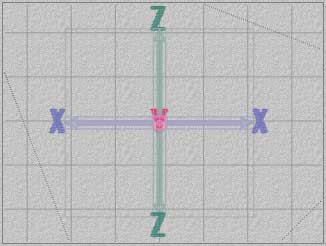
When you are making a flat picture, using a 2D program like Illustrator or Photoshop, you are working in two directions; up and down and side to side. These can be though of as two axis. The up and down axis is called Y. You can remember it because the letter looks like a 'v' for vertical, with a vertical line leading down from the point of the v, showing the direction of the vertical Y axis.
The side to side axis is called X. You can remember it, because the letter looks the same from every side.
In 3D space, we add a third axis, the one that moves toward you and away from you. It's called the Z axis.
Everything in Bryce is positioned somewhere on those three axis; X, Y, and Z. Cameras are no exception.
 Now, look at the Camera Controls. The first three are directional controls. If you put your cursor over one of the arrows, you will see it change to a little black square with a white letter in it. That letter tells you which axis you will move the camera on if you drag that part of the arrow.
Cameras always move on their own axis. In other words, no matter where the camera is on the World axis, Z will always move it forward into the scene, or backwards out of it. X will always move it right and left, and Y will always move it up and down.
If you put your cursor over one of the blue balls in the center of these controls, you will be able to move along two axis at once. Look in the Text Display Area, at the bottom left of the screen, to see which two.
Put your cursor over the top branch of the first arrow on the left, so that it says Y, click, and drag the mouse up and down. Notice that, as you drag, the wireframe view changes, moving in the direction that you move the mouse. Notice, as well, that the perspective changes, too. The higher you move your mountain, the less you see, until you are looking at the bottom of it. When you drag down, the mountain appears to move down, until you are looking at the top of it.
Try this out with the other controls, holding and dragging to move in all sorts of directions.
Notice that this is different from the pan tool you were using in the orthogonal views, because that one didn't change the perspective. Those tools are still available here, though. You use them exactly the same way, in case you don't want to change the perspective, just crop the picture differently. Try it out.
Okay. When you have played with those long enough to get the hang of them, select the mountain (click on it.) We are about to use the trackball.
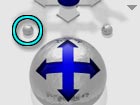
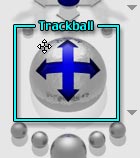 It's the control that looks like a hemisphere, with a four pointed arrow on top of it. Move your mouse over it, and the cursor will change to a four pointed arrow. Click and drag, and you will rotate around the center of the workspace.
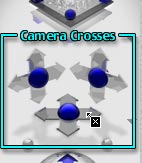
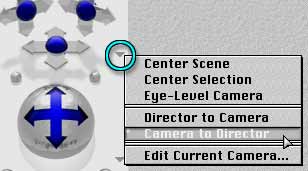
 Now, click on the flippy triangle third from the top, next to the Trackball, to access the drop down menu there. (Make sure you are using the Director's View for this.)
You will see several choices. The first is Trackball, which you have just used, and which rotates around the center of the world.
Below that is Center to Selection. Choose it by moving the mouse to it and releasing. Now use the trackball again. Notice that it now revolves around whatever is selected, which in this case should be the terrain. (If it's not, select it to see how this works.)
The next choice is Tripod. It puts the camera on a virtual tripod, so it moves around its own center. Check it out.
The final choice is free camera, which allows the camera to move anyplace at all. It's a bit tricky to use, and I don't recommend it at this stage, but feel free to play with it. You can always hit the default memory dot if you get lost!
Now, change to the Camera View by clicking on the Director's Chair. Look at this drop down menu again. Notice that everything except Free Camera is dimmed. None of the other choices are available with the Camera. But that's OK, because there is an easy way around it.
 Go back to Director's View, Center to Selection, and get your mountain just where you want it to make a nice picture. Don't forget to use the Nano-Preview to see what the actual picture will look like!
When you have it where it suits you, click on the flippy triangle that is second from the top, next to the Camera Control arrows. There are a number of choices there. Choose Camera to Director. Change to the Camera View. Notice that there is no change.
You have just put the camera exactly where the Director's View is. That's the trick for positioning the camera using the Director's View controls, and as you can see, it's pretty easy.
Don't forget, you can also use the Camera Memory Dots.
You can use this drop down menu to center the selection, too. Or center the entire scene, or move the camera to eye level. Editing the camera is something we will do much later. But feel free to experiment with the other choices
 For now, there are only two other camera controls you need to know about.
Go back to a nice view, if you want to, either by using Camera to Director again (but be careful, because Camera to Director and Director to Camera switch places on the menu, depending on which one you are currently using) or by using a memory dot.
Now, below the arrows but above the trackball you will see two little round buttons. The one on the left controls the banking of the camera, just like banking an airplane. Click a memory dot to save this camera position, if it isn't already saved, and then click and drag on the Banking Control to see what it does.
Click the memory dot to return to the saved position.
 The button on the right controls the camera Field of View. This is the same as using a telephoto or wide angle lens on a real camera. Click and drag to see the effect.
Remember, this control, unlike the arrows you used earlier, doesn't move the camera; it just changes the lens. This makes a difference with the perspective. Just like a real camera, the wider the field of view, the more spatial distortion you have.
To get a closeup of something without much distortion, you will want to narrow the field of view, not to move the camera in really close. To get a distance view of something without distortion, you will want to move the camera farther away, not widen the field of view until it's a fisheye lens.
Of course, if you want distortion, doing the opposite of this will get it for you.
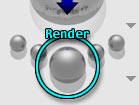 Alright. Below the Camera Controls is the last set of controls on this side of the screen. Those are the Render Controls. These are what you will use to actually render a picture.
The big ball in the middle is the Render button. When you click it, it will clear any previous renders, and render your entire scene, according to the ratio you set up in the Document Setup box at the beginning of this lesson. Go ahead and do that, to see a render. As long as the render continues, this button will glow red. That lets you know there is a render in progress.
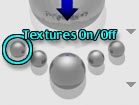 The two buttons to the left of it allow you to make quick renders to check position, lighting, and so on at a larger size than the Nano-Preview. The one on the far right lets you turn the textures on or off. Click it now to see the clouds in the Nano-Preview vanish.
Rendering without textures can save a lot of time. It can also reveal problems in your picture that the textures masked, so it's a very good idea to use it at some point in the process. Or at several points, depending on how complex your composition is.
At this point, since there is no texture on your mountain anyway, it won't make much difference.
If you enable it, the textures will stay off until you disable it again. (You can tell if it's enabled, because it will turn blue.)
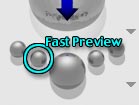 The second button on that left side enables Fast Preview mode. Once again, this is for a quick render. It uses a different rendering algorithm, and is much faster than normal rendering. (Fast Preview takes only 41.7% of the time a normal render takes, for an average scene.)
Change the camera angle by moving any of the Camera Controls, if you want to see this. (The render that is on the screen now will automatically disappear, and let you see the wireframe, when you move the controls.) Click on the Fast Preview button. It will turn blue, but nothing else will happen. Click on the big Render button to actually start the render.
When the render is finished, if you still have the default settings, a dialog will appear telling you how long the render took, and giving you information about what the computer was doing all that time. (Pixels, rays, hits, misses, etc.) Click the check mark at the bottom of this dialog to make it go away.
(If you don't have time to wait for the whole render, you can click anywhere on the screen to stop it.)
Once again, Fast Preview will remain enabled, and the button will remain blue, until you click again to disable it.
 Click the Fast Preview button to turn it gray again if it's blue, and move the Camera using the Camera Controls to render from a different point. Now click the Render button.
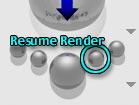
Now, before it's finished the render, click anywhere on the screen to stop it. Any kind of render can be stopped at any point this way.
Click on the first button to the right of the Render button. Your render will resume from the point where you stopped it. This is how you can handle a long render, especially if there is something else you need your computer for.
Interrupt the render by clicking anyplace, and save the file. You can even close it if you want to. Next time you open it, you can click the Resume Render button, and it will start rending again from the point where you stopped it. (This one is red if there is a Resumed Render in progress.)
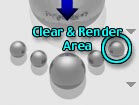 The last button Clears and Renders a selected portion of the picture, called a Plop Render. Hold down the mouse button and drag to make a rectangular marquee around part of the picture. If all the settings are still at the defaults, you will see that area of the screen appear to pop out from the rest.
Now, click the last button to the right of the Render button. That section clears and renders all by itself. To stop the render, click anywhere, as always. Resume Render will remember if you had a Plop render, and resume the rendering within that section.
If there is no render selection (you haven't drawn anything with the Marquee) the whole picture will clear and render.
As always, a red button here signals a render in progress.
 While we are looking at the Plop Render, notice that there are two buttons and a flippy triangle to the left of this section. The top button is exactly like the button you just clicked. It will cause the section inside the marquee to clear and render. This gets rid of old information in case you have changed that area since the last time you rendered it.
The button below that allows you to resume the Plop Render.
The flippy triangle gives you a drop down menu with three choices. The first zooms the selected area to fill the screen, the second hides the marquee and graphics, but leaves that area selected, the third drops the marquee.
When you are familiar with the render tools, it's time to move on to Page 4.