Note: I haven't used Bryce in years; so these tutorials are archived "as is." I can't accept questions, because I don't remember the answers.
This is the lesson where we start to demystify the Deep Texture Editor.
The DTE is where all the marvelous textures in Bryce come from. (Textures are not to be confused with Materials. Materials can be made without textures, or they can use up to four. Textures made in the DTE are also not to be confused with Picture Textures. Textures are the procedurals that show up in the Texture Components in the Material Lab.)
If you can use the DTE, you have immense control over what those textures look like. If you can't, you are more or less confined to textures that others have made, or happy accidents.
For many years, the DTE was considered too scary to contemplate; but most of that was because it wasn't documented at all. In fact, for the first two versions of Bryce, it was hidden from the casual observer. (But we quickly discovered where to find it, and many of us started to muck about there even before Susan Kitchens blazed a trail for us.)
These days, all that has changed. The DTE is easy to find, and has been given an elegant interface. There are even several pages in the manual devoted to it. It's not exactly uncharted territory any longer; but the maps are all labeled with strange words, so it still wants explaining.
Allow me to explain.
Because, you see, it's simply not true that it's difficult to use, or that the best you can do is poke around aimlessly and hope that when you come up with Lark's Vomit, it's at least a Lark's Vomit that you like. I admit, I approached it with trepidation too, until I had to buckle down and actually learn it so I could teach this course. As it turns out, it's really pretty simple and predictable, once you understand what is going on in there. And it's not hard to understand, either!
To being with, all the textures in Bryce are really based on noise. (If you remember that, all the terms become much easier to understand.)
Bryce interprets that noise as a grayscale picture, using 256 shades of gray from 0 (black) to 255 (white.) That grayscale pattern is the Alpha channel. It's used to determine the values of everything in the Value channels of the material lab. Most of them are simply interpreted as being completely present when the pixel is set at 255 (white,) to completely absent when it's at 0 (black.) The values in between are seen as partially present, depending on the number that is returned for that pixel. In other words, if you are looking at, say, the Transparency channel, a pixel with a value of 255, which is pure white, is completely transparent. A pixel with a value of 0, or pure black, is completely opaque. A pixel with a value of 128, which is 50% gray, is rendered as 50% transparent.
The exception to this general rule is the Bump channel, which is treated as a separate thing. For the bump, the value of the pixels is read as a height map. Pixels that are completely white in the Alpha channel are read as the highest point of the bump map. Pixels that are completely black are read as the lowest point, and those in between are read as being in between.
To add color to a texture, Bryce maps color to the Alpha channel. This can be done in a number of different ways, called Color Modes. We will be discussing them in detail during this lesson. Basically, you choose colors for Bryce to start with, and then Bryce assigns them to the pixels using the Mode that you have chosen.
Each component of a texture potentially has an Alpha channel, a Color channel, and a Bump channel. Each texture has from one to three components. Together, they are combined into the Texture Component that you use in the Materials Lab. (Yes, it's confusing that all of them are called components; but I didn't write this, I'm just teaching it! You should be able to tell from context which ones I mean. I think it would at least be easier if they were called Texture Components in the DTE and Material Components in the Materials Lab; but that's not the way the manual does it, and when you start using tutorials from the web you will find that there are no naming conventions. Context is all you will have, most of the time.)
Are you still with me? Great. Time to roll up our sleeves, get to work.

Lets explore a texture. Create a sphere in Bryce, and take it into the Material Lab. Click on Diffuse Color, to load a random texture.
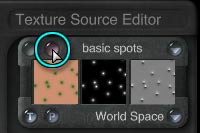
To get the Texture presets, hold down the shift key, and click on the flippy triangle to the right of the Component Palette. This will open the Texture Library Thumbnails, so you can see what the textures look like. Choose Basic Spots (the first one) just so we are all looking at the same thing.
 Now, click on the pinkish button on the top left corner of the Component Palette to enter the DTE.
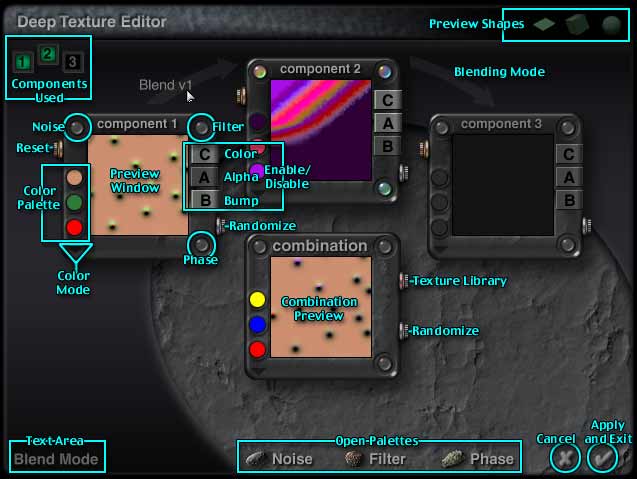
Looking at the interface of the DTE, from the top, you will see three icons on the right side of the title bar; a flat plane, a cube, and a sphere. These are the available Preview Shapes. Clicking on one of them allows you to see your texture on that shape. The default is the plane, but you can learn a lot about your texture by viewing it on a cube or a sphere. Click on each of them now, just to see. Then please return to a cube for this exercise.
Below the title, you will see three little boxes, with the numerals 1-3 in them. Number 1 is lit up, and green. This shows you how many components you are using in this texture. Right now, it is a single component texture. Click on the two, and the three.
Random textures are generated to fill components two and three. You will see them in their windows in the main section of the editor.
You will also notice that the gray arrows between the component windows now have words on them. Those are the blending modes, and we will get to them soon.
 |
 |
| Randomize Component Button | Reset Component Button |
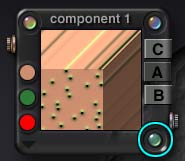
Place your cursor on the silver button that sticks out from the lower right side of the second component window. That is the Randomize Component button. You can shop for components by clicking there. A new one will be randomly generated each time you click. Click it a few times, just for fun. (An important note here; you get one (1) undo in the DTE. That is all, so be careful with it.)
Now, place your cursor on the gold button on the top left side. That is the Reset button. When you click it, your component will be restored to the way it was when you entered the editor, or first generated the component. Click it, and see.
 |
 |
| Randomize Texture Button | Open Texture Library Button |
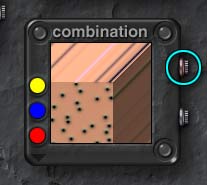
The middle window on the bottom, labeled "combination" is the combined texture. This is what you will see in the texture component window in the Material Lab. It has a couple of buttons, too. Click on the silver one on the bottom. You will generate a completely new random texture, using as many components as Bryce feels like using. Remember, there is only one undo in here, so be careful.
Now, click the copper button just above it. You get the Texture Library presets, thumbnails and all. From here, it's easy to save a nice new texture that you have generated, or to return to the one you started with. Please click on the Basic Spots again, so we are back where we began.
You can also get the Texture Library by holding down the Shift key, and clicking on the word "combination" at the top of this palette. You can get the menu list by just clicking on the word, without holding down the Shift key. Try them both out.
 |
 |
|
| Opens Noise Dialog (below) | Opens Filter Dialog (below) | |
 |
 |
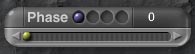 |
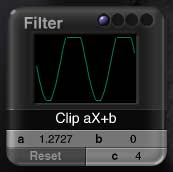
There are a few things that go into each component. First, there are the most basic functions; noise, filter, and phase. We will be going into each of those in much more detail in a few moments. For now, just look at the first component palette. You will see three glassy gray buttons, in the three corners of the palette. The one on the top left opens the Noise dialog. The one on the top right opens the Filter dialog. The one on the bottom right opens the Phase dialog. Click on each of them now, to open the dialogs.
![]() Along the bottom of the Editor, you will see three buttons that look like rocks, also labeled Noise, Filter, and Phase. Click on them, and the dialogs will close.
Along the bottom of the Editor, you will see three buttons that look like rocks, also labeled Noise, Filter, and Phase. Click on them, and the dialogs will close.
All three dialogs can be opened using either the buttons in the corners or the ones that look like rocks along the bottom. They can only be closed using the buttons along the bottom. Which ones you use to open them depends on which seems easiest to you at the time. Play with them for a few moments to get used to them.
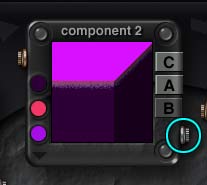
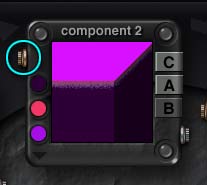
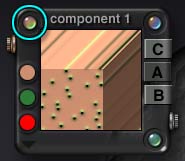
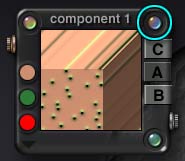
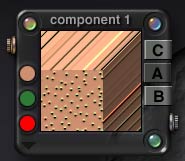
Returning to the palette for Component 1. You will notice that the buttons in the corners of the Component Palette are now softly glowing in various opalescent colors. (They may, or may not, have been gray before.) That shows that the dialogs are referring to that component. Since it's the only one we have right now, that's pretty obvious. But when you are working with more than one, you may find that visual cue handy.
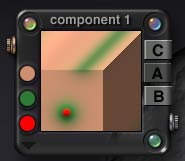
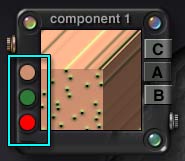 Looking at the palette for component 1 again, you will also notice the three color swatches down the side. Those are the basic colors used in this texture. We'll be getting back to this; for now just remember where they are.
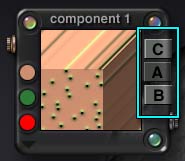 Finally, you will notice three letters, CAB, down the right side of the palette. Those stand for Color, Alpha, and Bump. Any that are light are used in the texture. Any that are dark are ignored.
Color and Bump are pretty obvious. Alpha is the part of the component that is used to determine any attributes that are not color or bump, such as transparency, specularity, etc.
As you can see, this particular component is using Color and Bump. Click on the C for color to turn it off. The color vanishes from both the component window and the combination window. This is because there is only one component. There is nothing left now but bump. Click the C again, to return the color, and click on the B for Bump. No bump. (If you leave the DTE, and check the thumbnails in the Material Lab, you will see this. The thumbnail on the right, where the bump is shown, will be blank.)
If you lose track of what thing does what, just move your mouse and look in the text area. When your cursor is over a button or dialog, its name will show up there.
 Alright. So much for the very most basic of the basics. Lets explore those parts in more depth.
We are going to start with noise, since that's where it all starts.
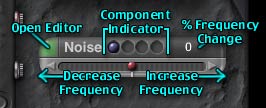
If the Noise dialog isn't already open, click on the upper left corner glassy button, or on the Noise button on the bottom, to open it. You will notice that there is a green corner, the dialog title, a series of hollows with blue balls in the first one, and a number. Under them is a slider.
You can move the palette around by clicking on its name, and dragging. Try it out. It will return to the default position when you close and reopen the DTE.
The green color in the corner shows that this component is using Noise. Clicking on it opens the Noise Editor. We'll be doing that in a moment. For now, you can click on it if you want to, but then just close it again.
The blue balls shows which component you are viewing. The first one corresponds to the first component, and so on. The last one is for the combination.
Click on the 3 in the top left corner of the DTE so you are using three components, and then click on the Filter and Phase buttons to open those dialogs, too. Notice that when you click in a hollow to move a blue ball in any of the dialogs, the balls move for all the dialogs, and the glassies light up for the component that you are viewing. Try it out, and see.
When you are done, go back to a single component, and close the other two dialogs.
 |
 |
|
 |
 |
|
| Increase Frequency = Smaller Size Pattern Occurs More Frequently |
Decrease Frequency = Larger Size Pattern Occurs Less Frequently |
If you've been playing with it, return Component One to the state it was in when we first entered the DTE. (If that's been lost, just reopen the Basic Spots texture from the Presets by using the copper button on the combination palette.)
Move the slider under the buttons in the Noise palette, and watch the texture. As you can see, if you move it right, the texture gets smaller, and if you move it left, it gets bigger. When you release the slider, it recenters itself, and the counter returns to zero. Do it several times in a row, and you can make the texture tiny, or so large that you cannot even see it. (You can also adjust it by holding down the arrows at the end; but it adjusts itself constantly for as long as you hold them down, and is impossible to control on a fast computer. I never touch those arrows.)
What you are doing, of course, is changing the frequency of the texture. But, since you cannot see the numbers, I find this particular control less than useful. However, if you like it, feel free to use it. The advantage of it is that it scales all three frequency axes at once, maintaining the relationship between them, (and you don't have to open the Noise Editor.)
Move on to Page 2, and we'll start exploring the Noise Editor.