Note: I haven't used Bryce in years; so these tutorials are archived "as is." I can't accept questions, because I don't remember the answers.
This is page 2. If you haven't finished page 1, please do so before starting this page.
 Open a new scene, or simply delete everything in this one and reset your views. Make sure that Auto Key is enabled, and create a sphere, a cube, and a cylinder. Put the sphere on the right side of the space, and the cylinder on the left. Select the cylinder, and make the cube its parent.
Move the scrubber to the middle of the timeline, and put the sphere on top of the cube. You can see the blue bar of the working area, and if you hit the play button, you will also see the sphere move to it's current space. (It cuts through the cube to do it, but we can't all be perfect.) Save this, just to be safe. Make sure that you are in default director's view and that the sphere is highlighted, and we'll go off adventuring.
 Click on the icon to enter the Advanced Motion Lab.
To begin with, you will notice that some things in here look like a lot of the rest of Bryce, and some don't.
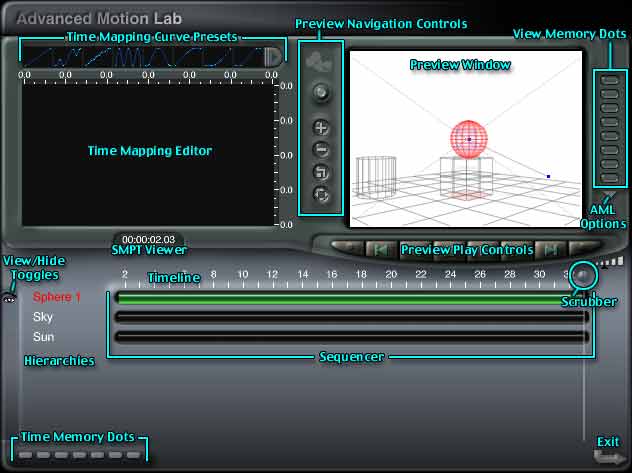
Starting in the upper left hand corner, you have a bar with lots of blue squiggly lines on it, and what looks like a tab you should be able to pull at the end. Those are the Time Mapping Curve Presets. We'll be getting there in a bit.
Directly under that is a black box with tick marks on the top and right, and a time counter under it. That's the Time Mapping Editor, which is used with the presets. Once again, we'll get there soon.
To the right of those is a Preview Window, with your animation showing in wireframe view. The Sphere should be highlighted, the paper background matches what you are using; it looks like a tiny version of the main screen. And it is.
 To the left of it are a bunch of icons. Click the top one, of a movie camera.
The view switches to camera view, and a green light appears below the camera icon. That lets you know that you are in camera view.
Click on the green light, or the camera icon, and you will return to normal Preview view. You can move the preview around as if on a virtual trackball by clicking and dragging, as usual. And you can zoom in and out while panning right and left by holding down the Control/Ctrl key and dragging, as usual. But the other navigation tricks don't work here.
It's alright, though, because there are special navigation controls. Click on the plus on the top to zoom in. Click the minus sign to zoom out.
The next button down returns you to director's view when you click on it.
The bottom icon, with the four arrowheads, allows you to pan. Click and drag, as you would on one of the editing buttons in the Edit Palette, to move around the area.
Now, click on the camera icon again, to return to Camera view. None of the other navigation icons will work, nor can you move directly in the preview window. As long as that green light is on, you are seeing exactly what the camera sees. Period. Your view will only change as the Camera view does. (And, since the Camera can be animated, that really means something.)
 To the right of the preview window are the Preview Memory Dots. They work like all the others throughout Bryce; click on them to save the view you are in, Option/Alt click to clear them. The only real difference is that you can't tell by looking if you are using a view. Try them, if you'd like to.
 Below them is a flippy triangle with that contains the AML Options menu. Take a look. We'll be coming back here, too.
 Below the preview window is a set of play buttons. They work exactly like you would expect them to. The left one goes to the beginning of the working range, the next one to the previous keyframe, the one with a square stops the animation, the one with the arrow plays it, the next one goes to the next keyframe, and the final one goes to the end of the animation.
There are also two buttons at either end of the play buttons. The one on the left opens the Animation Setup dialog, which we explored last week. (But don't use it here if you have Bryce 4 or below; there was a bug that caused a discontinuity between the time frames here and in the main window. Go back outside to use it.) The one on the right renders the current frame.
Below that you should see a green bar, labeled Sphere 1 in red.
Above it is a bunch of tick marks, and a little round button with a white line depending from it.
The tick marks and ball are the AML version of the timeline and the scrubber. Click on the ball, and move it, and you will see your animation play out, just as you would by scrubbing in the main window. Try it now.
At the end of the tick marks is the familiar icon to scale the timeline. Try it out. You will notice a gray button at the point where the green line, and the animation, ends. That's the end of the working range. Drag it to the left, and play the animation. You will see that it stops where this ball is, even though the animation is longer than that. There is a corresponding ball at the far left. That, of course, is the beginning of the working range. You can move it too. Try it.
You can scroll the timeline either by scrubbing along it, or by clicking anywhere on it, and dragging to the right or left. Try it out.
Those tick marks, of course, are showing frames. To see the SMPTE, you will have to look at the readout below the Time Mapping Editor. Watch it while you drag the scrubber, and you will see the familiar SMPTE readout change.
With me so far? Good.
 There are three things in the scene (four if you count the ground plane.) Why is the Sphere the only one showing?
Because it's the one that is selected, and all you have showing are selected objects. Go to the flippy, and disable "Show Selected." The plane and the cube, and even the camera, have timelines now. But where is the Cylinder?
 Notice the tiny cyan flippy next to Cube 1? It's under there. Click on it, and you will expose it.
That flippy allows you to expand and collapse hierarchies individually. (You can also expand or collapse them all, from the AML Options flippy.)
 Go back to the flippy and uncheck "Show Animated," and the sun and sky join the list. (You may have had one or both of them showing right along, depending on the settings in the Sky Lab. If you did, that just means that they have keyframes, too, and are considered animated. Since they cannot be selected, they are always showing in that case.)
Uncheck Display Hierarchy, and the cylinder gets its own line, instead of being listed under the cube. (I personally prefer to have the hierarchies showing all the time, to prevent confusion. They are easy enough to see if you want to. But that's me.)
I'm going to quickly cover the rest of the things here now.
Snap to Frames allows you to change the way the scrubber moves. You will want it enabled when you are lining up keyframes, and occasionally disabled when you're fine tuning actions.
Realtime Linking toggles back and forth between playing the animation as you scrub the timeline, and waiting until you are finished to update it. The former is nice if you want to see what is happening at a given time. The later is nice when the animation is complex enough that Realtime Linking causes lag.
Link Timeline Scale does just that. It links the scale in the AML to the scale in the working window, so if you are using the Default Bryce window, in which the palettes hug the edge of the Working Window, the same number of frames are shown in each place. This can be really handy. However, if you have toggled to the Expanded display, so the pallets hug the edge of your screen instead, there will be many more frames showing in the Working View when the scale is the same. Try it out to see what I'm talking about.
Finally, expanding or collapsing all Timelines and Hierarchies is a quick way to open or close them all at once. Hierarchies you have just seen. We'll be getting to timelines in just a moment.
 To the left of the names are little icons that look like eyes. Click on the eye for Cube 1. It vanishes from the Preview (but its child does not.) It's hidden, so that you can concentrate on the other things in the scene. If you leave the AML, though, it's not hidden out there. Just in here.
Click on the icon again to show it once more.
You can also hide things by selecting (or unselecting) them, and choosing to show only selected objects. To select and unselect objects without leaving the AML, hold down Command/Ctrl, and click on the name to toggle the selection. Selected objects have red names, unselected ones do not. (They can be either white or yellow, depending.)
 You will notice that everything that is animated has a little colored line at frame zero. That shows that there are keyframes there.
Sphere 1 has a green line that extends for the length of the animation. That shows that it has more than one keyframe. The beginning of the bar shows the location of its first one, and the end shows the location of its last.
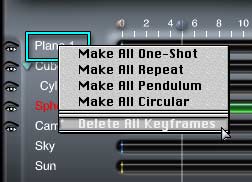
Everything has a keyframe, because Auto Key was turned on. But we don't really need some of these. Hold down the Shift key, and click on the name Plane 1. A menu drops down, that allows you to manipulate the keyframes. You've seen this before, when we were giving the butterfly wings their flap. This time, select Delete All Keyframes. The line disappears. Go back to the flippy triangle next to the preview window, and check Show Animated, and the very name Plane 1 disappears. The plane isn't animated any more, which will make a smaller file. And that, of course, is a Good Thing.
 Click on the name Sphere 1. A list opens up, that shows you the various attributes of that object. This is its timeline, (so now you know what all the parts of the AML Options menu refer to.)
There are keys for everything, since Auto Key was enabled; but only Position is actually animated. You can tell that it is because of the long green bar. Here, you can see the actual keys on it. They are the paler lines; one at the beginning and one at the end. We'll be coming back to them soon.
At the bottom of the list, it says Material. Click on that, and a list of all the animatable material attributes will appear, each with a keyframe. Once again, none are actually animated at the moment, but they are all there, making the file larger. You can delete these, too. Just hold down Shift, and click on the name of the timeline you want to eliminate. Choose Delete All Keyframes, and the entire thing vanishes.
If you want to blow away several at once, just draw a marquee around the all the surplus keys you can see, and hit Delete. They all vanish. Unfortunately, the window doesn't automatically scroll, and you can't make it larger, so you can only eliminate eight at a time; but it's still better than taking them out one by one.
 Click on the word Position, which should be white. The word will turn yellow, and a blue line will appear in the Time mapping editor. You will also notice that it now says "Position" to the left of the SMPTE display, and "Sphere 1" to the right of it. The attribute will always show to the left, and the object to the right, so you know what you are working on. It's easy to get lost in a large animation, so remember to check here if you do.
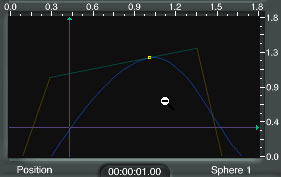
There are scales along both the top and the right of the Time Mapping Editor. They show time in minutes, seconds, and tenths of seconds; which is neither SMPTE nor frames, so it doesn't match the scales used everywhere else. You can't change this scale to frames or SMPTE, but you can change all the other scales to thousandths of a second. To do so, just tap the D key and then do anything that changes the frame, to switch to Decimal Time. (You can use the scrubber, hit the comma or period key, play the animation - anything.) That makes it harder to find out what frame you are on, of course, but easier to figure out how the setting here relates to the time in your animation. To change back, simply choose SMPTE or Frames from any of the normal places.
Move the scrub bar, and you will see two purple lines appear. The vertical line shows you where you are in time. The horizontal line shows the current event. As you can see, they cross at the blue line, which is the Time Mapping Curve. And that curve can be changed. Not all events in Bryce animation have to be strictly linear, which is a Wonderful Thing.
![]() Click the second blue squiggly line in the Time Mapping Curve Presets. You will notice that the blue line is no longer straight, and there are yellow boxes every place that it changes direction.
Click the second blue squiggly line in the Time Mapping Curve Presets. You will notice that the blue line is no longer straight, and there are yellow boxes every place that it changes direction.
Move the scrubber now, and you will see that the horizontal line moves up and down to match the curve. Look at the preview window, and you will see that the sphere moves forward and back on its trajectory, as well.
 Put your cursor on one of the yellow squares, and it turns into a four pointed arrow. That means, of course, that you can move that square. And indeed you can. Click, and drag it someplace else. The curve follows. Scrub the animation, and you will see the changes you have instituted in the motion.
Drag the point so far right that it crosses the imaginary vertical time line of another point, and watch them change order. For example, the fourth point becomes the fifth, and the fifth becomes the fourth, while the curve changes completely to accommodate the new order. Scrub that, too, to see what happens to the motion.
 Place your cursor on the blue line where there isn't a yellow square, and it will turn into a pen. Click, and you will add another yellow square to the line. Once it's added, of course, you can manipulate it, too.
Hold down Control/Ctrl, and click on the yellow square, and it disappears. You can add them, and you can delete 'em, as easily as that.
 Hold down Option/Alt and click on the blue line, and you will be able to see the tangents that form the curve. Do it again, and you will hide them.
Hold down Shift and click on a point, and the curve to the right of it stops being a curve, and becomes a straight line. Events in Bryce can be completely linear, if you want them that way. Do it again, and the line becomes a curve once more.
Put your cursor anyplace in the Time Mapping Editor that isn't a point or the line, and it will turn into a magnifying glass. You can use that to pull out a marquee, so you can zoom into a specific area of the curve to see it more closely. (The zoom marquee is centered on the hot point of the cursor.)
 Hold down the Shift key to get the zoom out tool, and click to zoom back out.
Click on the first Time Mapping Preset, the one with a single diagonal line, to return your animation to a straight linear curve; just like it was before you began to tweak it.
We'll be working more with the Time Mapping Editor later; if you have any questions about it so far, don't forget to post them!
For now, go to Page 3, and we'll get into the Sequencer!