Note: I haven't used Bryce in years; so these tutorials are archived "as is." I can't accept questions, because I don't remember the answers.
This is page 5. If you haven't finished page 4, please do so before starting this page.
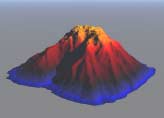
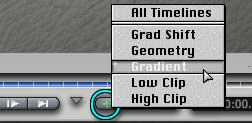 Go to Frame Zero, choose a colored gradient, and make a Gradient key.
Hit Shift+Period to go to the end, and change to a different gradient, any different gradient. Make another key. Play the preview there in the Terrain Editor, and you will see your terrain gradient melt from one into the other.
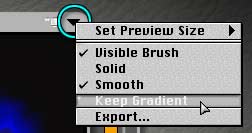 Go to the top of the Terrain Canvas, to the flippy there, and choose Keep Gradient to use the gradient on your terrain in the Real Bryce world.
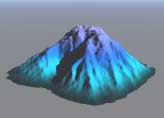
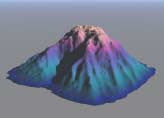
| Gradient Animated | ||
 |
 |
 |
| 00:00:00.00 | 00:00:01.00 | 00:00:02.00 |
Now, preview the animation with the Movie Preview control, and watch the Nano Preview to see the terrain melting and shifting, while the colors change.
 Go back into the Terrain Editor by hitting Command/Ctrl+E (which saves all the clicking to get out of the movie preview, etc. Assuming that your terrain was still selected, that is.)
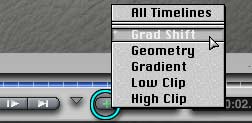
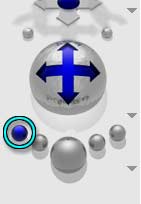
Make sure you are at frame zero, delete the Gradient key, and create a Grad Shift key. Go to the last frame, and change the break point on the gradient. Put it anywhere you like it. Create a Grad Shift key, and take a look at that in the Preview window in the Terrain Editor.
Leave the Editor in the normal way, and run the Movie Preview again. Notice anything? The gradient may not be running the same way in the actual render that it did in the preview inside the Terrain Lab. In other words, the movement may be from bottom to top in the Editor, but from top to bottom in the actual animation. (At least, that's what happened in every test I ran. It appears to animate the distance the gradient was shifted, and that's all.)
But that's alright, because you can take this into the AML. Once there, you can edit the curve, and even turn it upside down if you want to, so the position that was the last is now the first and vice versa.
Any of the tools available in the AML are available for all the terrain attributes you can animate, which gives you a great deal of flexibility. I'll let you figure out things to use this for, if you are interested. Remember, you can make a lot more with terrains than just mountains!
| Trees: Only the Materials can be Animated | ||
 |
 |
 |
| 00:00:00.00 | 00:00:01.00 | 00:00:02.00 |
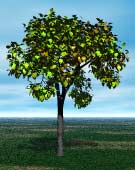
I'd like to mention here that several people have asked me about animating the Bryce trees. Well, I'm really sorry, but you can't. Anything you do in the tree lab is constant over all of time. You can animate the materials the trees use, just exactly the same way you animate any other materials; but that's it. (You get there through the Tree Lab, of course; but once you click on Edit Material you are right there in the Material Lab, where you can change things and set up keyframes to your heart's content. You may find that you have to edit the colors and things in the DTE, though. For some reason, trees don't keep other changes very well, in my experience.)
So if you want to show a tree changing from green leaves to yellow or red, you can do it. If you want to show the branches whipping around in the wind, I'm sorry, but you can't. Also, you cannot edit the material changes on trees in the AML. Trees don't have an M in their Icon Columns, so it can't be done.
Lights, on the other hand, do. So not only can you animate lights in the Light Lab, you can animate their materials directly in the material lab, and you can tweak those material attributes in the AML.
I'm not actually going to go into animating lights. It all works exactly as you would expect it to; the controls are as familiar as anything by now, and I haven't found anything that I think would be a "gotcha."
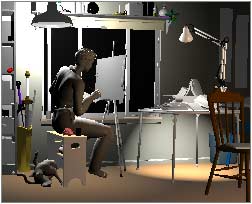
| Rendering Extremely Complex Pictures - Example shown has 708 objects, using 613,839 polygons The times shown were for renderings at the size shown. |
||
 |
 |
 |
| Render Time; 1 hour, 13 sec. | Textures Off | Render Time; 29 min. 51 sec. |
Which brings us to a couple of tips for reducing the time it takes to pull a picture, especially a large or complex picture, together.
First, I'd like to talk briefly about ways to decrease the rendering time.
For test renders, just to check for placement and things, it helps a lot to turn off the textures by clicking on the texture on/off button. When you turn them off, though, they are off throughout Bryce. There will be no textures in the Nano Preview, and none in any of the other preview windows either, including the Material Lab preview, until you turn them back on here.
One of the textures that gets turned off is the sky. All the atmosphere will vanish, from the render and all the previews including the sky lab. So don't wonder and worry. Just turn it back on if you need to work on the sky. You will still be able to change the Sun, and see those changes, but that's it.
However, some things will remain. For instance all the colors (diffuse color, ambient color, etc.) and all the values (Ambience, transparency, reflection etc.) are still visible. Only the textures, those things which are driven by the component palettes, will be gone.
Which makes this an extremely valuable tool. Because often the textures mask other attributes of your objects that you don't need, or that are actually undesirable. It's worth it to render a few times with textures off, even if you have all the time in the world, because it will show you those things. Things like a reflective value you aren't using, or an object that has an odd ambient color setting or too much (or too little) ambience value.
You will also be able to see where objects actually are in relation to each other, without the distraction of texture to fool your eye.
So I highly recommend using textures off now and again, just to be sure you have what you think you have.
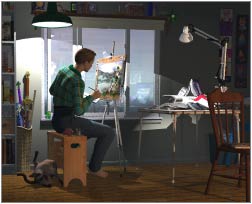
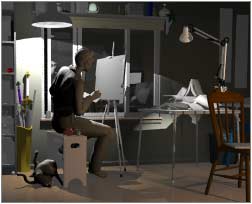
 You can also use the Plop renders to save yourself a world of time when putting together a complex scene. For instance, when working on this scene, I set the camera up early on, and rendered the whole picture. Then, as I added things, I would render that section and that section only.
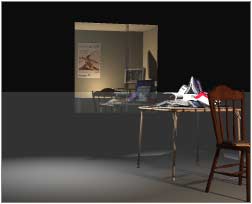
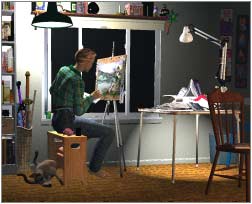
As an example, in this shot I'm rendering just the reflection of the lamp in the window. Nothing else has changed, so nothing else needs to be rendered. (If you are having a hard time seeing the spot, just roll your mouse over the image.)
This would let me see the new things in relation to the rest of the picture, but without the long render times. I only rendered out the whole thing when it was time to quit for the night. It rendered while I slept; so I could see the whole piece rendered fresh, but didn't have to wait for it while I was trying to get it done!
 This worked because I built each piece separately, in a different file, and then assembled the pieces in separate, smaller files as well. I highly recommend this, too, for complex scenes.
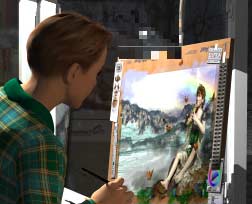
It saves a world of render time; for instance, this part of the scene above took only 41 seconds to render at this size, with full Ray Trace and textures, as opposed to the hour it took for the whole scene, as shown above.
It's also safer. If the unthinkable happens, it gives you some extra backups. You can assemble the scene more quickly than you otherwise would be able to.
I copied the main camera by using the memory dots. In order to do this, you must make a memory dot while using the camera you want to use. Then open a new scene, and your dots will still be there. If you open a saved scene, you only have the dots that were saved with that scene. (In that case, you will have to copy the camera settings onto a piece of paper, and type them into the document. Or, if it's small enough, you can just open a new scene, and copy and paste everything in the scene!)
Once I had a new scene, I copied and pasted any walls or furniture I might need from the main picture into the new one. That allowed me to place things on shelves, arrange things on tables, and put posters on the walls without being bogged down by a large and complex scene.
It works because whenever you copy things from one Bryce scene, and paste them into another, they keep exactly the same position in space that they had. So I could put a pile of books on the table, arrange them so that there was no interpenetration, etc., and then just copy and paste them. They would wind up on the corresponding table in the main scene already precisely placed and ready to roll.
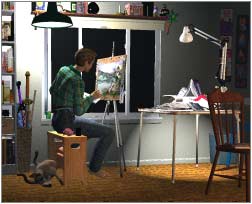
| All Optics Disabled | |
 |
 |
| No Textures or Anti-Aliasing; 47 seconds | Textures and AA; 13 min. 13 sec. |
The things that are expensive to render in Bryce are multiple light sources, reflections, transparency, high contrast textures, high contrast bump maps, and imported objects with lots of polygons. If you can minimize those things, you can minimize the time it takes to render in Bryce.
Consider turning as many as you can off for test renders; either in the Material Lab, or in the Render Options dialog. You can get the dialog by clicking the bottom flippy in the Camera Controls palette. This is also where you can increase your render time a whole bunch (and also increase the quality of your pictures, of course,) by choosing the Super and Premium render modes. But you won't need to use those until you are just about ready to actually render your picture. For test renders, other methods work just fine.
So turn off anti-aliasing and all the optics for test renders where you don't need them. The picture will render in record time. Use the Preview render without textures or optics for blinding fast placement renders to check for things like interpenetration. If it looks good there, then turn the shadows on and see if it's still good. They add only a little time, but they let you check for floating objects.
| Disabled Transparency Maps | |
 |
 |
| Textures, AA, Optics also disabled; 15 seconds | Optics also disabled; 3 min. 44 sec. |
You can also get a huge speed boost by disabling all the transparency maps in your textures; especially those that use Blend Transparency.
In the example above, I was able to cut almost ten minutes off the textured, anti-aliased render by simply removing those maps. (If you want to keep them with the texture, put them in a channel that isn't being used.) With textures and anti-aliasing disabled as well, the render took only 15 seconds.
| Fast Preview Mode Render | ||
 |
 |
 |
| Fast Preview Mode | Everything Disabled; 3 seconds | Textures & AA enabled; 2 min., 53 sec. |
Finally, for the speediest possible renders, disable all the Optics, and Transparency Maps, the Textures, the Anti-Aliasing and use the Fast Preview Render.
Notice that Fast Preview can leave gaps in things with small apparent diameters (look at the table legs, as compared to the render above.) But for fast placement, it can't be beat!
You can see the difference in the render time, depending on the choices you make. In this case, it took only 3 seconds flat to render this scene the fastest possible way; the very same scene, at the very same size, that took slightly over an hour to render with "normal" settings. (It would have taken even longer to render it with blurred reflections, soft shadows, or any of the other Premium effects.)
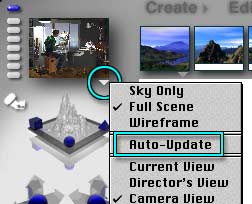 By the way, in case I haven't mentioned it five or six times before, it's absolutely imperative that you turn off Auto-Update on the Nano-Preview when working with large scenes. Bryce won't let you do anything until that little window has been redrawn, and that could take a significant amount of time. At the very least, use Wireframe View or Sky Only.
Also, at the bottom of that menu, you can choose between Fast Preview or Full Rendering. Fast Preview is on by default, but sometimes it's worth it to switch to Full Preview when you want a really tiny thumbnail to be rendered. If your Nano is taking longer than it should to redraw, check and make sure that it's set to Fast Preview.
Still with me? Good. Go on to Page 6, and we'll briefly explore the different Optimization Modes and Levels.