Note: I haven't used Bryce in years; so these tutorials are archived "as is." I can't accept questions, because I don't remember the answers.
In this lesson, as promised, we are going to continue with Animation. You will need the files in LessonI-2.sit or LessonI-2.zip if you want to follow along.
But first, I thought I'd tell you how to set up a Default Document.
 This document will load the first time that you open Bryce. If you choose to use it, you can set things up just the way you like them. Anything that is kept in a saved document will be there; settings for Auto Key, everything in the Sky Lab, camera positions, the color of the ground plane; anything that remains when you save a document and reopen it.
To make one, all you have to do is get everything the way you like it, and save the document to the root level of your Bryce folder as "default.br5" (It is case sensitive.) When Bryce opens, it will look for this document, and if it finds it, will open it. Otherwise, it opens a new document with the factory default settings.
Now, this doesn't mean that when you hit "New" it will open this. It won't. But it can be a great time saver, in any case. (And if you want it for each new document, just open it, not "New.")
Anyway, I thought you might find that useful.
On to animation!
 We are going to start with Linking; both some things I didn't tell you about Parenting, and more of the ramifications of Tracking.
Last week, if you remember, I had you parent the wings of a butterfly to its body. At that time, I said to simply leave all the characteristics under "Propagate" alone, and we would discuss them later. Well, it's later.
Let's take a look at each of them.
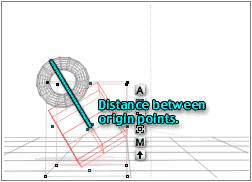
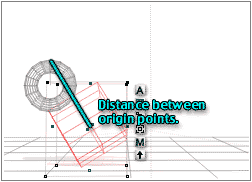
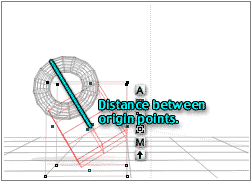
The first one is Distance. If this is checked, the child will maintain the same relative distance to the parent's origin point at all times. If it's off, it won't.
 Try this. Create a cube and a torus. Position them so that the torus is centered on top of the cube, just touching it. (Use the Land function; it's easiest.) Create a link, so that the torus is the child of the cube. (Either use the tab in the Object Attributes, or drag from the linking icon to the cube.) Finally, move the origin point to the top of the torus, so it's more obvious what is going on in these exercises. Save it, so we can come back here.
 This is the beginning point for all the rotations and resizing below.
 |
 |
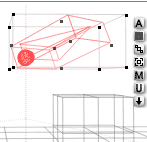
| Distance Enabled | Distance Disabled |
Now, disable Distance propagation, and change the cube. Drag it around, resize it, rotate it. Notice that it both objects do the same things; but they do them around their own origin points.
Undo, or revert if you don't have enough undos, and turn Distance propagation back on. Notice that now, they both perform all the functions around the origin point of the parent.
With Distance still enabled, pull the torus away from the cube slightly, and try it again. They maintain the same relative distance, no matter what you do.
|
 |
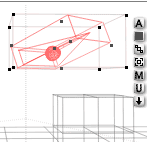
| Offset Enabled | Offset Disabled |
Now, leave Distance enabled, but disable Offset. Notice that they no longer move together, even though Distance is enabled. Rotation, movement, and scaling are propagated; but each object moves around its own origin point. You need both Distance and Offset checked, if you want to lock objects together. (On the other hand, if you don't, it can be quite handy to have a child responding to a parent that's not even in the scene.)
With Distance and Offset both enabled, the two objects maintain the exact relative distance between their origin points.
If either one is disabled, they don't. If Distance is enabled but Offset is not, movement from the Parent is not translated to the child. If Offset is enabled but Distance is not, the child travels with the parent, but uses its own origin as the center for all its movement.
 |
 |
| Rotation Enabled | Rotation Disabled |
Disable rotation, and enable everything else. Rotate the cube, and you will notice that the torus does not actually rotate. But its origin does try to maintain the same distance and offset from the parent's origin, so if you rotate along the X or Z axis, it goes along. However, since its origin is offset, and it is not rotating, it "falls off" if you push it too far.
Enable rotation again. Once more, the child faithfully copies everything the parent does.
|
 |
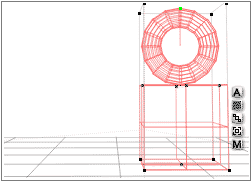
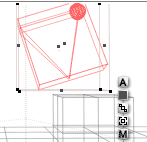
| Size Enabled | Size Disabled |
Finally, disable size, and leave everything else enabled. Resize the cube, and you will see that the same things you had with Rotation are going on here. The torus, while not changing size itself, maintains the same relative distance and offset between its origin point and that of its parent. The end result is that it pulls away from the cube, or sinks into it, depending on the size of the cube. ( In the illustration above, the cube has been shrunken; the distance between the origin points remains the same, but the torus retains its larger dimensions if size is disabled.)
Lock the torus, and try some of these again. You will notice that, although you can no longer move the torus independently, it still inherits all the changes from its parent. Remember that, in case you ever want a child really locked to its parent. It's easy to do.
You can do your own experiments to see what happens if two or three of the properties are enabled, and the others are not. They are pretty predictable, though, and I don't want to take the time here for it.
It is important to remember, however, that the transformations that are not controlled by the parent's origin point all happen around the origin point of the child. So, if you want it to rotate or grow from a certain point as the animation progresses, you can do that easily. Simply place the origin point there, and you are all set. (It's important to note here that the placement of the origin point can be animated. So the point around which transformation occurs can change during the animation.)
 |
 |
| Select Both Objects | Transformations are applied twice to child. |
Finally, make sure that all the Propagation choices are enabled. Select both the cube and the torus, and use the controls on the Edit palette to resize, rotate, move, etc. What is happening? Simple. Each object is being told by Bryce to move this distance, resize by this percentage, rotate this far. But the child object is being told to do it twice; once directly by Bryce, and once through the parent/child link.
If you don't want that to happen, make sure that you are only selecting the parent when you change something.
However, that very thing can also be used to good effect; for instance, I've seen it used to cause a telescope to extend all the tubes. Each one moves for itself, and with its parent, so the end piece moves far enough to extend completely.
Got all of that? Great.
![]() Now we are going to look a bit more closely at Tracking.
Now we are going to look a bit more closely at Tracking.
Begin by changing the torus to a pyramid using the Convert fly out on the Edit Palette. This will, of course, give us a pretty flat pyramid (the converted object has the same dimensions as the original object,) so it will be easy to tell one side from another.
Drag it a little ways away from the cube, and unparent it by going to the Linking tab of the Objects Attributes, and choosing None for Parent.
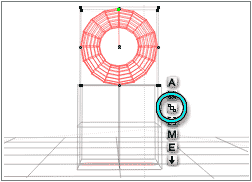
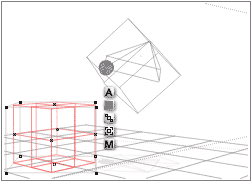
Create a ball, shrink it by hitting the / key a couple of times, and stick it on one corner of the pyramid base, to make it even easier to tell which side is which. Group the ball and pyramid, and name it Tracker.
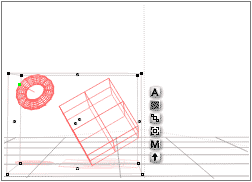
![]() Select the Tracker, if it's not already selected, and drag from the Tracking icon in its icon column to the Cube. Notice that it looks exactly the same as parenting. But it's not. So be careful. If you child or your tracking object doesn't behave like you expect it to, check the Object Attributes to make sure that you weren't accidentally dragging from the wrong icon.
Select the Tracker, if it's not already selected, and drag from the Tracking icon in its icon column to the Cube. Notice that it looks exactly the same as parenting. But it's not. So be careful. If you child or your tracking object doesn't behave like you expect it to, check the Object Attributes to make sure that you weren't accidentally dragging from the wrong icon.
As soon as you release the mouse button, the Tracker will flip over so that one side is facing the cube.
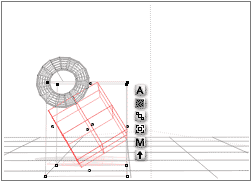
| When you move the cube, the Tracker group changes position so the same face always faces it. | |
Switch to a perspective view, if you are not already using one. Move the cube around, or move the Tracker, or move both. You will notice that the Tracker always keeps the same face to the cube. (You may also notice that when the center of the cube moves directly under the Tracker, the Tracker flips. Remember that it will do that.)
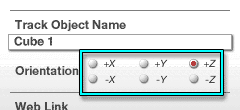 We have actually told it what face to be using, although you may not have realized it. But it's all there, in the tracking dialog under the Linking tab of the Objects Attribute box. Open it now.
You will notice that there are six choices under the tracking portion of that tab. Each one corresponds to a side of the object, using its Definition Coordinates.
 |
 |
| Positive X | Negative X |
|
|
|

|
| Positive Y | Negative Y |
Right now, it's using the default tracking of +Z. Change to -Z, and you will notice that it flips over, so that the opposite side is now facing the cube.
Try out each of the other orientations, as well.
 As you can see, you have pretty much complete control over what side is facing the trackee. If you visualize the newly created group or object, the co-ordinates are exactly what you would see looking at the workspace. Positive X is the right side, Negative is the left side; Positive Z is the front, Negative is the back. Positive Y is the top, and Negative is the bottom.
 Take a look at the General tab of the Object Attributes for the Tracker group. You will notice that the Rotate text fields are all dimmed. You can read them, but you cannot change them. That, of course, is because they are being controlled by the tracking relationship.
 |
 |
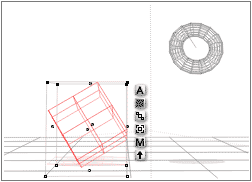
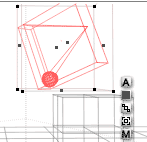
| Grouping changed, so the sphere is always closest to the cube. | |
Since this is a group, it doesn't have Definition Coordinates you can change. (They are defined when the group is made.)
Break the tracking relationship by changing tracking to None, and rotate the group so the sphere is pointing at the cube.
Ungroup, and then Group. This defines the group according to the orientation it has now. You will notice that the bounding box changes. It has the effect of changing the Definition Coordinates, and is what you do if a group isn't tracking the way you want it to.
Reestablish the Tracking. You will notice that the new bounding box is being used for tracking. If you change the tracking face, you can set it up so the sphere is pointing directly at the cube all the time.
 Now, ungroup again, delete the sphere, and we'll take a look at changing the Definition Coordinates.
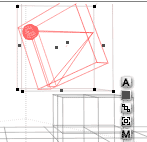
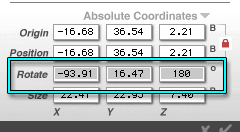
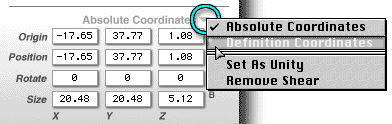
Select the pyramid, and open its Object Attributes. Reset the Origin, if you haven't already done so, by unlocking it and changing the numbers to exactly match the Position numbers. Then, use the flippy triangle to toggle to Definition Coordinates.
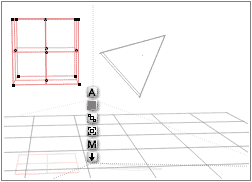
In the Rotation field, set the rotation to -45° on the Z axis. Click on the Checkmark to close the dialog. You will notice that the pyramid is now standing on one of its base points.
 |
 |
| Change the Definition Coordinates to change which part of the pyramid tracks the cube. | |
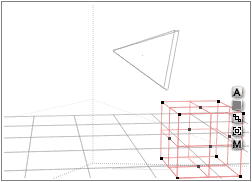
Reestablish tracking, and change the face to -Y. That point will now face the cube no matter how the two objects are moved.
As you can see, you have a lot of control here.
Once you've played with this enough to get a good feel for it, move on to Page 2, and we'll begin to explore the Advanced Motion Lab.