Note: I haven't used Bryce in years; so these tutorials are archived "as is." I can't accept questions, because I don't remember the answers.
This is page 3. If you haven't finished page 2, please do so before starting this page.
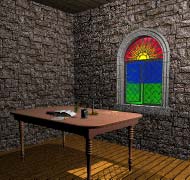
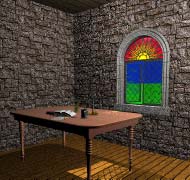
 Okay. Enough of this studying by candle light. Let's get a real task lamp in here. Use the Save As feature to save this scene with another name, delete the Radial Light, and make the candle flame completely transparent. (Transparency value 100%, Shading Mode Blend Transparency.) We are blowing that baby out.
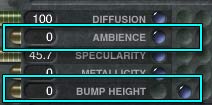
You will need to change the Candle Wax material, too, so it won't glow. Take it into the Material Editor, and click in the "no map" dimple right next to Ambience, so it won't use the map any more. Then, click in the dimple in the A column next to Bump Height, to keep the map assigned to the candle. Leave the Bump Height at zero, and it won't have any effect. But if a component isn't assigned to anything, it will vanish as soon as you close the Material Lab by clicking the check mark. Since you may want to light the candle again, we'll just keep it handy.
If you look at the Nano-Preview now, your scene should be completely black.
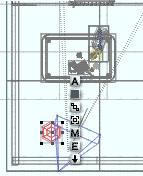
 Go to the Create Palette, and click on the flippy triangle next to the title to bring up the presets.
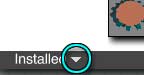
At the bottom left of the Preset Objects window that appears, it says Installed. That means that you are looking at the presets that came with the program. As you know, you can add other presets to the list. (We did that with the materials, remember, and they all work exactly the same way.)
Well, there is another whole section available, called User, where you can store the presets you make or import, so you can get them easily. Click on the flippy triangle next to Installed and choose User from the list.
 At the moment, there is only one category, called User, and you are looking at it. You can add more categories; it tells you how in the Users Manual for Bryce. For now, we are just going with this one.
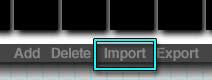
You probably have a whole bunch of black squares. We are about to import an object. Click on Import in the bottom menu bar to open the browser for your platform. In the downloads for this lesson, there should be something named Lamp.obp. Open it.
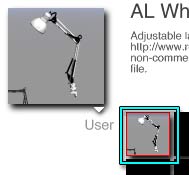 Your computer will think for a moment, and then a thumbnail of an adjustable task lamp will appear in the first black box. Click on it, then click the check mark to close the window and accept the changes.
You have just created the lamp in your picture. Furthermore, it will be there, in the Preset Objects, until you delete it. Anytime you want to use it, it will be readily available. You can save your own objects the same way you save your materials or preset skies. And you can export them to share with friends, and import them as easily as that. Handy, huh?
 Alright. You probably can't see the lamp in your picture, because newly created things tend to show up in the center of the Bryce World. But you will be able to see the Icon Column. Click on the A. We are going to numerically input a new position for the lamp, since I happen to know just where it should go.
In the Position row, type in 37.3, 21.29, -58.36. (You can use the Tab key to move to the next field.) Press Enter, and the lamp will move to the table, just where it should be.
Drag the Field of View button, to the right under the Camera Crosses, so that you can see the top of the lamp, and use the hand tool (press and hold the spacebar) to pan the picture so it's roughly centered. You can't just back the camera up this time, because if you try you will send it through the back wall. If you rendered then you'd just see the unlit wall. Not very interesting.
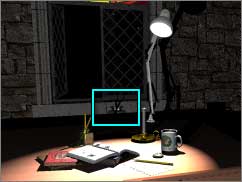
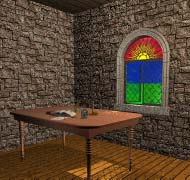
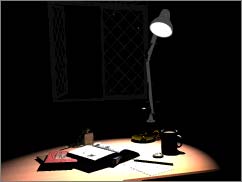 However, if you've done this right, and you render, you will see the table top and the stuff on it again, but with a whole different kind of light.
We have already covered the things that you can do with spotlights, when we explored the Light Lab. You can try some of them out here, with real objects to illuminate, if you want to. Don't forget, if you want the light to spread out more, just make sure you are using Resize by Object Mode, and change the size on the Y axis of the light to make it shorter. Render, and you will find that you are lighting more of the things on the table.
But the shadow side of everything, and the rest of the room, is very, very dark. Black, even. The only thing outside the light that you can see at all is the lamp itself, which has an Ambience value assigned to its material. (If you want to eliminate that, by the way, just select color Family 18 in the Select by Family menu, and turn it down. All of that part is on a map, so the various bits will remain the colors they should. The lights are separate, so they won't pick up the maps as a gel.)
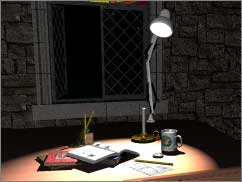
These inky black shadows aren't terribly realistic, and may not be the look you want for a piece. You can change it with fill lights.
 Fill lights in Bryce, just as in real world photography, are used to shed a little light into the shadow areas. In Bryce, they are normally radial lights, although you can use any kind of light at all.
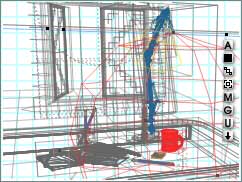
Create a new radial light, and name it Fill Light. It will probably be outside the room, and may be outside the picture. Here's a trick to bring things you've created into the area that you are working in. Lock something in that area; anything will do. This time, let's lock the coffee mug.
Go ahead and do that. You know how. Then, while the mug is still selected, hold down the Shift key, and select the Fill Light from the Selection Palette. (Click on the yellow ball there to see all the radial lights in your scene. You are in the habit of naming everything, aren't you? (Nudge nudge, wink wink.) Just select the thing you want from the list.)
Use the align tool to align them on all three axis (click the blue button in the middle,) and it will drag the new object right into the heart of your scene. Unlock the object, unless you want to use it as an anchor some more.
Alright, the light is inside the mug now, and isn't illuminating anything. (Remember that the size of the wireframe doesn't make any difference to the light cast for radial lights.) Select the light, make the wireframe smaller, (so it's easier to handle,) hold down Option/Alt to constrain movement to the Y axis, and pull it up so it helps to light the scene.
 Wow! That's more than just fill light. Take it into the Light Lab, and tone that puppy down. This time, since we want the light to reach a fair way into the nooks and crannies, leave the Falloff set to Linear, but change the Intensity Amount to 10 or so, and leave the Lab.
 We need the light to illuminate the back of the objects that are in shadow; the side of the coffee mug facing us, the window wall, and so on. In order to do that, we will have to move it. Right now, remember, it's over the cup.
Change to the Top orthogonal view, and position the light so it's above and a little to the left of the camera. It should also be just a touch lower than the camera. Check one of the side views to make sure it is.
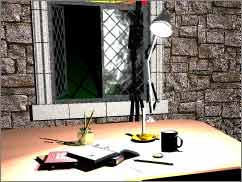
 Now, render the scene. That's better, but notice that the pencils in the inkwell are casting a distracting shadow on the window frame. (If you are very lucky, you'll even have caustic bright spots, like the ones you see here.) We can eliminate that very easily, by doing something that I've wished many a time I could do with fill lights in the real world. We can turn off shadow casting for the fill.
 Make sure the fill light is still selected, take it into the Light Lab, and disable Cast Shadows. Render again. The distracting shadows are gone.
You can add as many fill lights as you want to a scene, to get the illumination you desire. Just remember, each one adds to the render time.
It can also get too bright, and things can be washed out. Take the page of notes under the pencil, for instance. The rest of the table seems about right, but the white paper is too bright, and looks blank. And after all that work to put Useful Information on it for you, too!
 Let's fix it the simple way. Select the page (Ranged Light Notes) and take it into the Material Lab. Now, decrease the Diffusion Value from 100 to 50 or so. Render the page. That's better! Anytime that a few things in the scene are over lit, you can decrease the Diffusion Value for just those things, and balance them out.
Alright. You can play with this later. For now, save this scene, and then Save As. We are going to look at the room in daylight.
 Select the lamp, and delete it. Select the Notes, and change the Diffusion back to 100%.
Click the second Camera Memory Dot to move the camera to the position I saved for this part of the lesson.
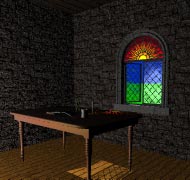
Now, go into the SkyLab, and enable the sunlight. Click on the moon icon by the Sky Dome, to toggle it to the sun for a day scene. Go back to Camera View, and render the scene.
You should have light shining in through the window. (If you don't, you will need to reset the sun. Go to the SkyLab, to the Sun Controls, and make sure Link to View is enabled. Then, set the Azimuth to 41.8 and the Altitude to 49.5. That should do it.)
But the room is still quite dark, which just isn't right.
 The answer, of course, is fill lights again. Drag the one you already have up closer to the ceiling, and move it nearer to the window. Duplicate it, and put the duplicate over the table. You can also change the intensity of the light coming from each one, and decide if you want shadows or not. I used one light at position 58.96, 33.17, -51.96 set at 15% with no shadows, and one at 27.43, 42.07, -53.91 at 7% with shadows for this render.
 Now, if you look under the table, there is quite a spill of sunlight there. In the real world, that light would reflect a fair amount up onto the underside of the table. In Bryce, you can fake that by putting a spotlight with a very large half angle right in the light spill. You use a spotlight, instead of a radial, so it won't interfere with the light spill itself. On the other hand, if you want bloom from the light, a radial is the thing to use.
Duplicate one of the fill lights, and change it into a spotlight using the Convert Selection To... pop out palette under the double headed arrow at the far right of the Edit palette. Rotate it 180° on the X axis, so it points straight up.
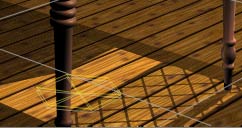
Change Display Modes to combined Render and Wireframe mode. Land the new spotlight by clicking the down arrow in the Icon Column. (If it lands on the table, hold down option/alt to constrain the movement to the Y axis, drag it under the table, and land it again.) Then, using the X and Z keys to constrain the movement, maneuver it into the middle of the light spill under the table. Grab the top control handle, and squish it down on the Y axis so that it's nearly flat.
 Now, render the underside of the table. As you can see there is light there. Adjust the intensity until it looks about right. Convert it to a radial light to see the difference, and choose the one you think looks best. It's subtle, I know; but little subtle things like this can make all the difference.
 You can also adjust the amount of diffuse and ambient light that objects have, to do things like lighten the floor under the table (increase the Ambience value for the floor) or sharpen the distinction between the two walls (decrease the Diffusion value for one, and increase the Ambience value for the other.) Don't forget you can change the color of the light, too, to change the feeling of the whole scene.
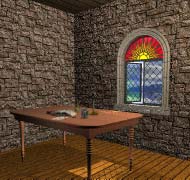
For this render, I did all of the above. I gave the top two fill lights a warm tone, the floor an ambience value of 22 (decreasing the diffusion value to 72.8 so it wouldn't start to glow,) decreased the diffusion value of the front wall to 95 and increased the ambience value of the left wall to 11. I made the front wall darker because the light is behind it. More reflected light would end up on the side walls, so that's where I put it.
 |
 |
| Anti-Light Placement | Anti-Light in Action |
Now, this would be perfect, if there was only some way to put a tiny shadow right where the table leg meets the floor. Well, there is. All you need is a little Anti-Light. Create a tiny spotlight, leave it aiming downwards, and place it inside the table leg, just a little bit above the floor. In the Light Lab, give it an Intensity of minus two or three, an Edge Softness of 100%, and disable Shadow Casting. Use the RaySpray or a plop render to render just the foot of that table leg. There is your tiny shadow.
 Which leaves only one glaring error in this scene. (Well, except for the complete lack of a Center of Interest, but I'm leaving that up to you.) The view outside the window is horrible. So much for any illusion of reality.
Remember the trick with the moon and the lightning bolt? We are going to use the same thing to add a view, without adding a lot of polygons and rendering time. It's all stuff that you have done before.
Go to the Create palette, and click on Leo to make a Picture Object. In the Picture Editor, click on an empty square, and then browse your drive until you find the render of one of your outdoor scenes. (Bryce saves renders with every scene, even if they are blank. On the Mac, they will be Scene Name.pct. On the IBM, they are Scene Name.bmp) Pick something sunny. If you were really setting up a picture, you would want a scene with the sun and the camera in the same positions they have here; but for now anything will do.
Take it into the Material Lab, disable the Component in the Transparency channel, set the Transparency and Diffusion values to zero, and the Ambience value to 100. Go to Shading Mode (top triangle, remember) set the mode to Normal and disable all shadows (cast, receive and self.) All of this causes this panel to be fully lit, no matter where the sun is, or what other objects are around it.
Now, remember how we made the picture objects square to the camera by copying the information from the Camera into the Attributes box in the last lesson? We need to do that again. This time, select the blue wireframe perspective object, open the Attributes for it, and copy down the rotation values. Select the Outdoors picture object, and type those values into the rotation row there.
Move the Outdoors, so that it is behind the window, and overlaps it on all sides, including the top semicircle.
 Render now, and the view outside the window is vastly improved. But if you look carefully, you will notice that there is still a bit of a problem. In the left window, which is partially open, you can see the reflection of the green and blue from the flat ground and sky. Sort of ruins the illusion, doesn't it?
I'll explain how to fix that on Page 4.