Note: I haven't used Bryce in years; so these tutorials are archived "as is." I can't accept questions, because I don't remember the answers.
This week, I'm going to show you some tricks with the Terrain Editor and the Sky Lab, and then we'll have some fun playing with water! We won't be making everything during the lesson this time, so if you want to follow along, you will need the files in LessonI-5.sit or LessonI-5.zip.
 To begin, open Bryce, if it's not already open, and create a new Terrain. Take it into the Terrain Lab by clicking on the E in the Icon Column.
As you know, there are many things you can do in here to change the shape and character of terrains. But right now, we are not going to do any of that. Instead, we are going to generate a whole grid full of tiled terrains, to make a very large landscape; much larger and more detailed than could be done with a single terrain or a group of unrelated terrains.
We can do this, because when Bryce generates a fractal terrain it generates an enormous one; far, far larger than the little square that you get on your Terrain Canvas. It also keeps track of where in that huge generated terrain the last square came from; so it can give you the next one in any direction, or that same one again. (It can't tell what is on the Terrain Canvas, though. So if you lose your place, or decide to add more tiles later, you will have to start again from the beginning. This is your warning.)
As you might suppose, we are going to use the Fractal button on the Elevation tab of the Editing Tools palette to generate the fractal.
The first part of the process is called "Shopping for Terrains." (We did some of this last week, if you recall, so part of this will really be review; but we are going into a lot more depth this time.) It's necessary because we are not going to be editing these terrains a bit. (We can't, or they won't match up.) So we need to find one that will fit in with our idea of what the landscape should look like in the first place.
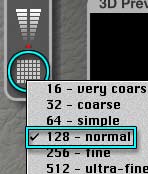
Terrains draw more quickly if they are small; so go to the Terrain Grid Size button, and make sure it's set to 128.
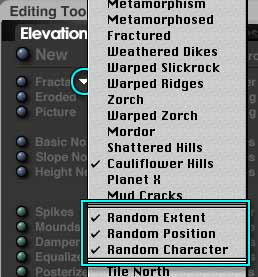 Now, move to the flippy triangle next to the Fractal button on the Elevation tab of the Editing Tools. This shows a list of all the different terrain types. The first one, Bryce Classic, is useless for our purposes, but it's probably the one that is selected.
If you look at the bottom of the list, you will see a number of controls that are dimmed (which is why Bryce Classic Fractals are useless.) Choose any other terrain type, and they will become available. Go ahead and do that now.
You will notice that near the bottom of the list there are choices for Random Extent, Random Position, and Random Character. These allow the fractal generated to change in the extent of the fractal that shows on any given square of the terrain, the position of that square of terrain on the huge invisible fractal that has actually been generated, and the character, or "look" of the terrain. By default, they are all chosen. Make sure that they are.
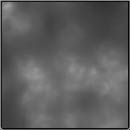
| Alpine Valleys - All Randoms Enabled | ||
 |
 |
 |
Click the button (don't drag it, we want the new fractal to completely replace the original.) Do it again, and again. You will notice a new terrain each time. Sometimes the characteristics seem much larger, sometimes they seem smaller. Sometimes there are large areas that are smoother, sometimes there aren't, and so on. These are the random factors at work.
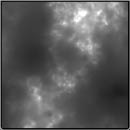
| Alpine Valleys - Random Extent Disabled, Random Position and Character Enabled | ||
 |
 |
 |
Click around until the scale seems about right, then uncheck "Random Extent." Click a few more times, and you will notice that the scale seems to be about the same, even though the other things about the terrain still change.
| Alpine Valleys - Random Character Disabled, Random Position and Extent Enabled | ||
 |
 |
 |
Uncheck "Random Character," and you will notice that the terrains generated have the same kind of look.
When you are shopping for terrains, start with all the randomness settings checked. Click the button until a terrain is generated that is about the scale you are interested in. If it looks good in other ways, too, you can stop there. If not, uncheck Random Extent and keep looking. Just click away until the sort of thing you want comes up. Then stop. Do it now.
When you have a terrain type that suits you, uncheck all three randomness settings. Now, go to the Terrain Grid size button, and choose a size that fits the project. For now, go with 256. Click the button again, and the terrain you have chosen will be redrawn at the new size. (You need to redraw it, instead of simply extrapolating it, because it needs to fit perfectly with other terrains that are going to be drawn at this size.)
Leave the Terrain editor.
 You will have one piece of terrain that probably doesn't look very good. After all, the edges don't meet the ground, and you can see right under them. But that's OK. We are going to make such a large group that it won't matter any more.
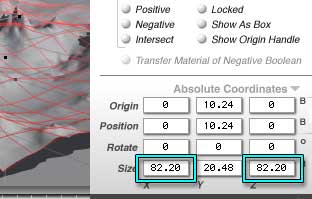
With the terrain still selected, check the Object Attributes by clicking on the A in the icon column. Set the size to 82.2 B on the X and Z axis. Close the dialog.
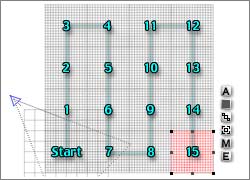
 Decide how large you want your grid of tiled terrains to be. For now, we are going with a 4 x 4 grid, for 16 tiles. When you are doing this on your own, you can go with any size you want. (You can even add to it later, if you need to, although that is Much More Work.)
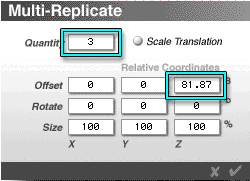
Go to the Edit menu, and choose Multi-Replicate, (or tap Option-Shift-D on a Mac, or Alt-Shift-D on a PC,) to open the Multi-Replicate dialog. Choose 3 copies, because we already have one, and offset them 81.87 B on the Z axis. (Make sure that all the other offsets are zero, and the sizes are 100%.) That will give us duplicates of this terrain that butt up to each other pretty closely. (It would be easier if the terrain square were exactly the size of its bounding box; but it isn't, as a quick visual examination will verify. Because of this, if you are making a large grid, it's worth it to check the alignment, and tweak it if necessary, since the error will compound the more tiles you make. You can't replicate them so that they need no tweaking at all. (Believe me, I've spent hours and hours trying.) But you can get pretty close this way.)
 You should now have a line of four terrains, all exactly the same, that touch each other along the Z axis. Select them all, and open Multi-Replicate again. This time, though, make 3 copies that are offset by 81.87 B on the X axis. That will give us our 4x4 grid.
| Go to Terrain 1, choose Tile North, and click the Fractal Button | |
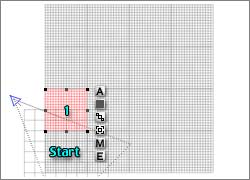 |
 |
Switch to Top view, so you can see and select them all easily. Now comes the only part that is even slightly tricky. We have to change the fractal pattern on 15 of these tiles, and we have to do it right or they won't match up.
So choose the one just to the North of the first one. If you followed these directions exactly, the original tile will be in the bottom left corner of the grid, row 4 of column 1. The next one to the north, therefore, will be in row three of column 1. Select it, and take it into the Terrain Editor.
Go to that same flippy triangle, next to Fractal on the Elevation tab of the Editing Tools. This time, scroll all the way to the bottom, and click on Tile North, because we need the next tile to the North. Click on the Fractal button, and the next square of the terrain will be placed on the Terrain Canvas.
| For Terrain 4, choose Tile East, and click the Fractal Button | |
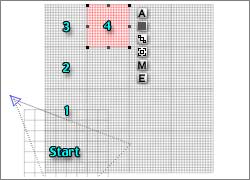 |
 |
Continue in this way, until you reach the northern edge of the grid (another two tiles.) The Tile North button will remain checked until you change it, so all you have to do for more tiles that are running the same direction is click the Fractal button.
When you reach the end, choose the first tile in the second column; the one to the East. Take it into the Terrain Editor, and click on "Tile East," because you need the tile to the east of the last one. (Directions are always taken in relation to the last tile generated.) Click to generate the new terrain, and close the Terrain Editor.
| Continue until all Terrains have been Generated | |
 |
 |
Select the tile to the South, the one in row 2, column 2, and choose "Tile South," of course. Continue in this way until you have worked your way through all 16 tiles. If you did it correctly, you will have a seamless terrain that stretches over all 16.
If you made a mistake somewhere, it will be obvious. It can be corrected, of course. Simply go back to the Start, and do the whole thing over again, including the Start tile. You cannot correct it from someplace in the middle, because Bryce doesn't keep track like that. It knows the tile it just generated, and the next one in any direction, but that's all.
 Okay. Group these. Now we can resize them, to get any size we want. Hit the * key on your numeric keypad four times. Each time you hit it, the terrain group doubles in size. We need it Really Big, because Bryce geology looks better if it's big. Drag them up out of the ground plane, and resize on the Y axis if you decide that would be better.
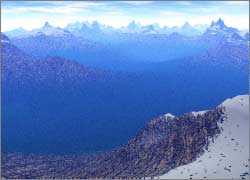
Position your camera, and you should find yourself looking at an endless vista of whatever you chose for your fractal. In my case, it's Alpine Valleys. Pretty cool, huh? Save this, so that you can use it for a scene next week, and open a new document. I want to show you some more things.
 Create a terrain again, and take it into the Terrain Editor. Now, I'm assuming that you are all familiar with Clipping Planes. (If you aren't, and you can't figure it out from this, please check your manual or on-line help.)
Did you know that you can use Clipping Planes to mask parts of the terrain that you don't want to alter? You can, and it's easy to do.
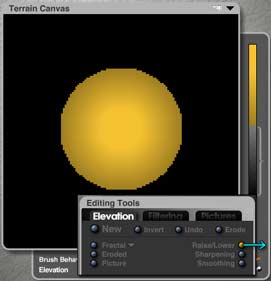
Click the New button on the Elevation tab of the Editing Tools, so we can start from scratch with this one. We are going to build a ring to use as a wall, and it's going to be perfectly round and easy to make.
Click once on the Blob Maker, to put a conical mountain in the middle of your Terrain Canvas.
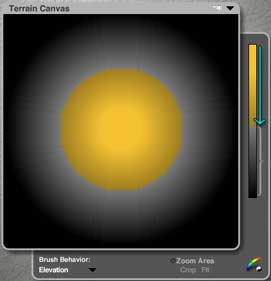 Now, grab the top of the Clipping Plane bracket, and move it down until the yellow that shows Top Clipping is active is about halfway down the cone.
 Drag right on the Raise/Lower button to lower the area outside the clip to black.
Notice, as you do this, that the values of the area inside the yellow clipping plane aren't changing at all. They are protected by the clipping plane.
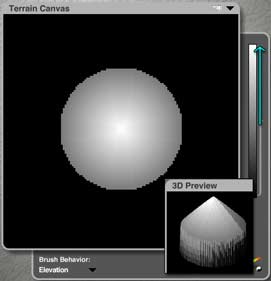 Drag the top of the bracket back to the top. Notice that your mountain looks like a tower with a conical roof at this point. The cone was untouched where the clipping plane covered it.
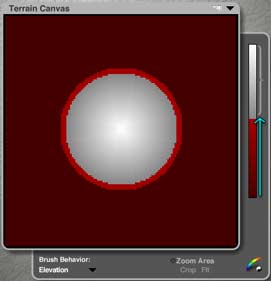 Drag the lower end of the Clipping Bracket up until it covers all of the black background, and just a bit of the former clipping area.
 Once again, drag right on the Raise/Lower button to lower all the uncovered terrain to black. As you do so, it will fall below the level of the clip, and look like it is masked as well. But don't let that alarm you. As long as you don't stop the drag, it will not be protected by the clipping plane.
 Open the bracket again, so nothing is clipped, and you will find that you are looking at a perfect ring wall. Run a little smoothing on it, to even out the edges, and admire it. This wall is very rough, because we used a low resolution. (Well, I did, anyway!) If you were doing this for an actual piece, and not just for practice, you would want to increase the resolution first, of course.
I'm sure you can think of tons of other applications for this particular trick.
Want to see another one? Go to Page 2.