Note: I haven't used Bryce in years; so these tutorials are archived "as is." I can't accept questions, because I don't remember the answers.
This is page 4. If you haven't finished page 3, please do so before starting this page.
 Go back into the DTE, and open the Phase dialog by either clicking the button in the lower right hand corner of the Component 1 palette, or the Phase button at the bottom of the DTE.
Make sure the blue ball is in the first hollow, so that you are working on Component 1, and click the corner to open the Editor.
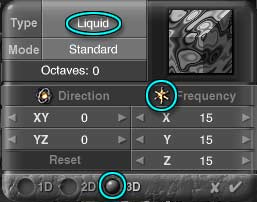
Now, remember, this one works exactly like the Noise editor, but this noise is used to displace the other one. So we need something that will look like eddies and ripples when used to drag the original ripple noise out of shape. It wouldn't hurt if it increased the contrast, too; we could use more height in the bumps. Looking at the Appendix, I think that Liquid will do the job the best. So choose Liquid from the pop up menu under Type.
Click in the 3D hollow to set it to three dimensions.
Set the Frequency to between 15 and 20, so the ripples won't be too small.
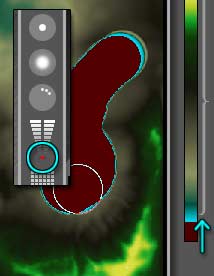
![]() Move over to the Phase Dialog, and slide the slider to the right, so we can see what this is actually going to look like.
Move over to the Phase Dialog, and slide the slider to the right, so we can see what this is actually going to look like.
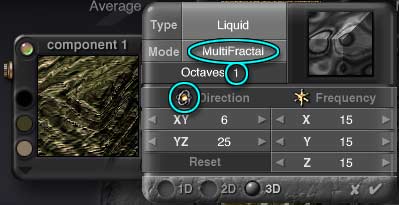
Drag the direction sliders in the Phase Editor, so that this noise isn't lined up with the other one. They aren't anything like the same, but it still won't hurt to have them offset.
Change the Octaves a bit, to see if that's better. I like 2 the best, so let's use that. We need that contrast, so let's run through the Modes and see which one gives us the most. Humm. I like MultiFractal best, again. Now look at the Octave settings once more. If we can get away with less, we should, to save render time. Ah. Almost no difference between 1 and 2 with this mode; so we'll use 1.
 Hit the enter key three times, (once for the Phase Editor, once for the DTE, and once for the Material Lab) and we'll render a bit of this. If you like it, save it as a file and as a Preset. If you think it needs more tweaking, you know how to do that now.
And that's the process of using the DTE. As you can see, it's really not hard or scary at all. The more you use it, the easier it will get, until you are quickly making custom textures for everything that you need. As easily as that. (Imagine sound of snapping fingers here.)
 Alright. Let's leave the DTE, and do something else for a change. We've been working on things to put in a stream scene. Let's do the actual stream bed next. We are going to do a stream with steep muddy banks, and a little waterfall.
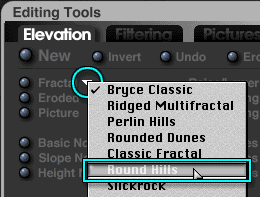
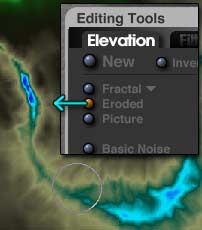
Start by opening a new document, and creating a terrain. Take it into the Terrain Editor. Go to the Elevation tab of the Editing Tools, to the Fractal flippy. Choose Round Hills as the Fractal Type, and click (don't drag) on the Fractal button to completely replace the current terrain with a new one.
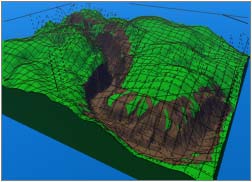
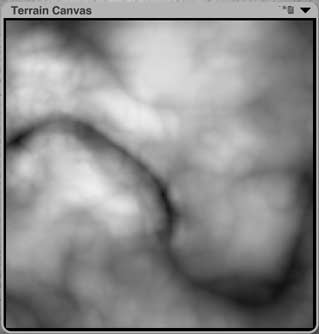 We are going to "shop" for a terrain. What we are looking for is something that has medium resolution, and a fold between the hills that we can easily make into a stream. Something like this.
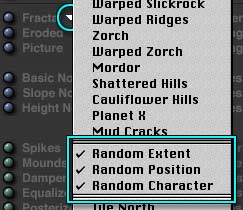 As soon as the random terrain generator throws up something with the correct scale, go to the Fractal flippy, and scroll down to the end, where it says "Random Extent" and uncheck it. If Random Extent is disabled, all the terrains that are made will be the same scale.
If the right look comes up first, or whenever it does come up, go to the Fractal flippy, and uncheck "Random Character." This will make all subsequent terrains have the same sort of geography.
If the perfect one comes up, then go to the Fractal Flippy and uncheck "Random Position." That will cause Bryce to keep generating terrains from the very same infinite block. We'll be doing more of this next week. For now, though, we just want to generate this one again, at a higher resolution.
 Because you can regenerate the terrain at a high resolution, it pays to "shop" at a low resolution, because it's much faster.
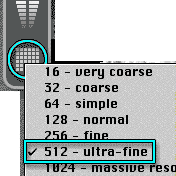
Once you have a good terrain, change the grid to 512, make sure that all the Randoms are unchecked, and click the Fractal button one more time to make a high resolution terrain.
Then click the checkmark to leave the Terrain Editor.
(If the terrain is alright, but not perfect, you can come back in and shop some more. That way, if nothing better comes up, you can still use the alright terrain. If something better does come up, then you're golden.)
Name the terrain "Stream Bank" and take it back into the Editor. Going out and coming back in means that we can always go back to this terrain while in the editor simply by holding down Control/Ctrl and clicking on New. It's an easy way to make sure that we can't mess it up too badly.
 Once back inside, go to the Elevation tab of the Editing Tools again, and drag to the left on the Raise/Lower button to raise the terrain. Raise it up some, and then hit undo. We are raising one end so that there is a reason for the waterfall, so raise it as much as you want the water to fall; more for steeper falls, less if you want shallow steps in the falls.
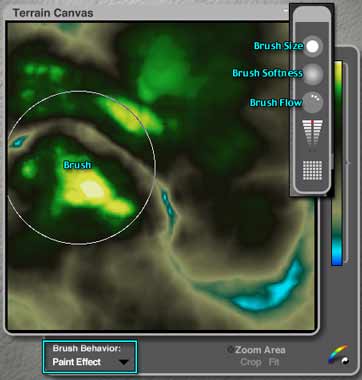
As soon as you have the height you want, hit Command/Ctrl-Z to undo. Change the brush mode to "Paint Effect," and get a very large brush with little flow, as soft as it will go. Paint the area at the top of your stream to raise the terrain there. (In case you have forgotten, the Brush Behavior is on the expanded palette. Click the size icon in the upper right corner of the Terrain Canvas, just to the left of the flippy, to get it.)
Repeat this step as often as you wish to get one end of the stream bed raised above the other. Make sure that you don't cause any of the hills to level out at the top while you are doing this. Also, don't forget that it's often easier to see what you are doing if you use one of the colored height maps, instead of the default black to white one. (Click the rainbow in the lower right corner of the Terrain Canvas to choose a colored map.)
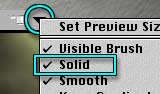 When you are satisfied with it, make sure it's solid, and hit the enter key to leave the terrain editor and keep the changes.
 Duplicate this terrain, name the duplicate "Stream Bed" and take it back into the editor. We are going to make another terrain to hollow out the stream bed in the first one.
We will be flipping this in the main window of Bryce, so keep that in mind while we make it.
Start by adding some erosion. Go to the Elevation tab of the Editing Tools, and drag to the left on the Eroded button. That will create erosion by removing height. (Dragging right adds height.) Drag out a fair amount, then undo and use the brush to Paint Effect just along the stream bed.
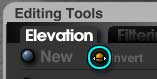 Once again, repeat if necessary. When you think it's eroded enough, go to the Invert button at the top of the Elevation tab, and click on it to invert the terrain.
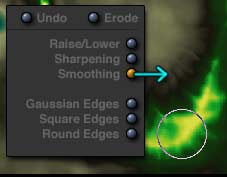 Use the Smoothing button and drag to smooth the terrain a little. Then undo, and paint the smoothing just along the bottom of the stream bed. Work with it until it looks like the inverse of a stream bottom.
 Finally, change the Brush Behavior to Elevation, choose a low elevation, drag up on the clipping bracket, and clip the edges around the stream bed. (Don't clip too far in, because you don't want to leave sharp edges on the hills and things.)
When it looks good, leave the Terrain Editor.
 Give the Stream Bed a quick brown material, just so you can see where you are. Give the Stream Bank a green one.
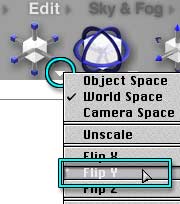
Now, make sure the Stream Bed is selected, and go to the Edit Palette. Use the flippy under the Resize Tool, and check "Flip Y" to flip the terrain on the Y axis.
 Open the Object Attributes, and give the Stream Bed a Negative Boolean attribute. Close it, open the Attributes for the Stream Bank, and give it a Positive Boolean. Group them, to see what you have so far.
You should be able to easily see your brown stream bed cutting into the green bank. If you need to edit the stream bed to eliminate any problem areas, do so now.
When you are ready, go to Page 5 and we'll put a small waterfall in the scene!