Note: I haven't used Bryce in years; so these tutorials are archived "as is." I can't accept questions, because I don't remember the answers.
This is page 5. If you haven't finished page 4, please do so before starting this page.
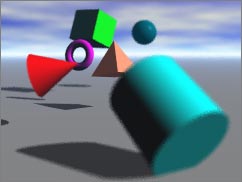
 Open a new document, create a few primitives (it doesn't matter what,) color them (use the tab key to step through them, so you don't have to waste time selecting each one by hand, then choose a preset from the Edit menu,) and scatter them with the Randomize tool. Tweak them if you need to, so they are spread out nicely, but all within the camera view.
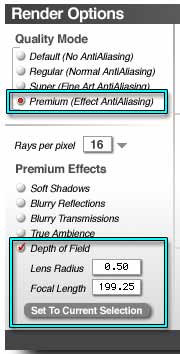 Now, look at the Render Options again, but this time look on the left side. There is a section there called Quality Mode. You can choose the amount of AntiAliasing you want here, just like you can in the Document Setup, or from the fly-out menu under the Render Options triangle. But, if you choose Premium, you can add additional choices. Click it now, to enable the Premium Effects.
The first thing you can change is Rays per pixel. Remember that I told you that Bryce sends a ray into the scene for each pixel, and determines the color of that pixel based on what it hits? Well, it can send more than one. You can determine how many if either Super or Premium quality are chosen. The numbers are on a pop-down menu. The more rays, the more better the image, but the slower it renders. I strongly suggest that you use extra rays only if you are doing something for fine art. Set them to a higher number now, and notice how much longer it takes to render this simple image.
As soon as you choose either Super or Premium, this control is enabled and set for a fairly high number. Be aware of that, and scale it back if you want one of the effects, but don't need that much quality.
Soft Shadows is pretty self explanatory, as are Blurry Reflections and Blurry Transmissions. True Ambience we used last week.
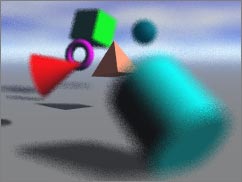
The one we are going to take a closer look at today is Depth of Field. Just as in real life photography, this is used to limit sharp focus to a small area a specific distance from the camera, leaving the rest of the picture blurry.
 |
 |
| Depth of Field: Lens Radius .15 | Depth of Field: Lens Radius .50 |
Select an object in the middle of the pack. Open the Render Options dialog, and select Premium quality. Set the Rays per pixel at 16, and enable depth of field. The two text fields for Lens Radius and Focal Length become active. Below them is a button labeled Set to Current Selection. Click on it.
The focal length is automatically set, so you don't have to do any math. You can still set the Lens Radius manually, so that you get the effect that you want. (Actually, you can still set either one of them manually, if you need to tweak it.) The higher this number, the greater the effect. The lower, the slighter. If you use whole numbers, you can effectively blur out most of a small scene like this, leaving your selection floating alone. Try it out.
Remember, the quality of the effect is based on the Rays per pixel. So is the render time. As always, it's a trade off.
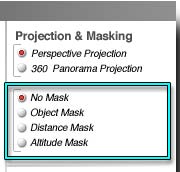 When you are ready, select a few of the things, and reopen Render Options. Disable Depth of Field, switch to Regular quality, and look at the right hand side again, at Projection and Masking. We discussed projection briefly last week. This week, we are going to look at masks. (They are also available from the Render Options Menu, the same place you get the Render Options Dialog; just look farther down. This is because they are used fairly often, so it's nice to have them handy.)
Masks are used in post production work, when you want to take a render from Bryce into another program and do further work on it. In such cases, it's nice to be able to isolate some objects in the scene. That's what masks are for. You can use them as alpha and selection channels in other applications.
 The first on the list is No Mask, which is what we have been using. It will give you a normal render.
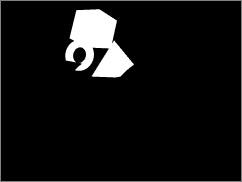
The next is Object Mask. When it is enabled, your render will show any objects you have selected as white on a black ground. Booleans will render the way you expect them to, but any transparency in objects is ignored; including blended transparency. What you will get is the actual shape of the object or mesh, so be aware of that. Go ahead and try it out. Create Leo, if you want to see what I mean about transparency. Picture objects like him render as flat squares, not as shapes.
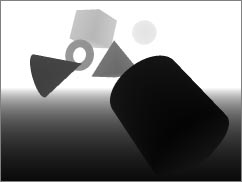 Next on the list is Distance Mask. It renders everything in your scene; but the nearer objects are darker, and the farther ones are lighter. Once again, all transparency is ignored, but Booleans render correctly. Choose it, render, and see what I mean.
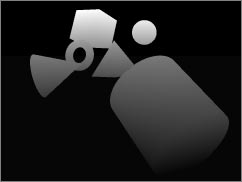 Finally, there is Altitude Mask. It behaves like the Distance Mask, but the dark colors show lower altitudes, while the lighter ones show higher. Try that, too. It's easier to see with mountains, if you happen to have some sitting around you would like to try it on.
And that concludes the Beginning Bryce course.
Enjoy Brycing! You are no longer beginners, but now know your way around the program fairly well, including a number of tricks, and several undocumented features. Have fun with it!