Note: I haven't used Bryce in years; so these tutorials are archived "as is." I can't accept questions, because I don't remember the answers.
This is page 5. If you haven't finished page 4, please do so before starting this page.
 |
 |
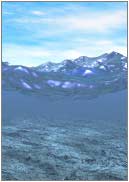
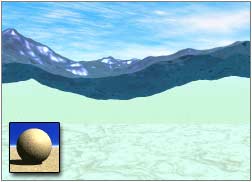
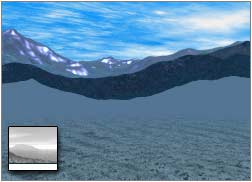
| To get this... | Put your camera in a hole in the water! |
As the final junket of our underwater journey, we are going to look at pictures that are half submerged. There are several ways to set them up, but they all start with the same basic principals. You need a water surface, either a plane or a terrain, and you need a transparent box to put your camera in.
I prefer to use a terrain, because a water plane is too flat for my taste. But you may prefer to use a plane, because it has a larger surface. (I find that I'm inclined to make a terrain grid if I need more surface area.)
The water surface needs to have a Positive boolean, and the box needs a Negative boolean and the Null material we made before (so its surface won't interfere with your vision.) Group them to get the clear box for your camera; essentially a hole in the water. Put the camera into the hole.
The placement of the hole will determine the shape of the wave in front of the camera. This is not at all important if you are using a water plane, but can be very important if you are using a terrain. Don't be afraid to move it around.
Then you set it up essentially the same way you set up a totally submerged scene; but don't disable the sunlight. Also, you won't want the clouds to match the fog, obviously, since you are going to be using the sky as a sky this time.
 Let's set one up, just for practice.
Save what you have been working on, if it's still open and you like it, and open a new document.
Create a terrain, and take it into the Terrain Editor. Go to the Elevation Tab, to the Fractal button, and use the flippy to get one of the "wave" terrains. (Pocked, Warped Ridges, or whichever one you have found that you really like.) Shop for a good extent and character, and when you have found it, make sure all the Random choices have been disabled, pump the resolution up to at least 1024, and regenerate it. Then tap the enter key to leave the Terrain Editor. (Your terrain does not need to be solid, although you can get some interesting effects that way. For this exercise, leave it as a shell.)
Enlarge your terrain if desired, name it Water Surface, and give it a positive Boolean. Rotate the camera 45° so it is square to the edge of the terrain. (Hold down the shift key to constrain the rotation.)
 Switch to a side orthogonal view, and drag the terrain up so it's in the middle of the Perspective triangle.
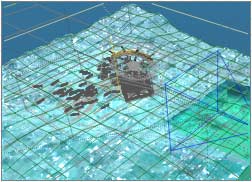
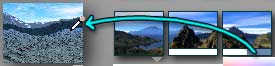
| Why you need the "Hole" (Images show finished scene, with differences noted. All other settings are constant.) |
||
 |
 |
 |
| Shell Terrain No Hole |
Solid Terrain No Hole |
Shell with Hole |
If you look in the Nano Preview now, you will see that you can already see under the wave. But if you try using it like this, instead of making a hole, you won't be looking through the water material, and you won't have any underwater color under your water. The hole is the trick; and it works even if the wave you like best really is on the edge of the terrain. (In other words, it doesn't have to actually touch the water terrain to do its magic.)
 Create a cube, and place it over the camera, making sure that it's large enough to comfortably fit the camera into. Take it into the Material Editor, and give it the Null material you saved as a preset before. Open its Objects Attributes, give it a Negative boolean, making sure that "Transfer Material of Negative Boolean" is enabled, and name it Camera Space.
 Finally, group it with the Water Surface terrain. Set the Nano Preview to Camera view, and switch to the top orthogonal view if you aren't already there. Select just the terrain, and move it around, keeping an eye on the Nano Preview. Keep going until you have a wave shape that you like in the camera view. Don't be afraid to resize your terrain while you are doing this, of course.
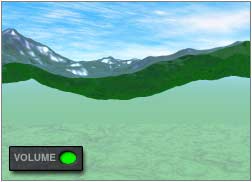
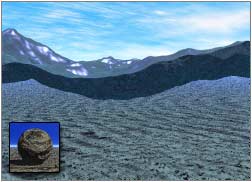
| The Effect of Volume and Ground Plane Color on "Water" | |
 |
 |
 |
 |
When you think you have it, take the terrain into the Material Editor and give it the material you want to use for your water. See if you still like it; because the material can change the view. Still, it's worth looking for a view without it, since it will render so much more quickly in the preview.
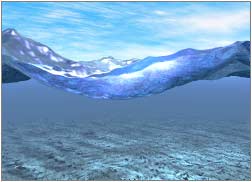
At this point, you should see a half submerged picture in the Nano-preview.
There will probably be color under the water surface; that color is caused by the volume color of your material, combined by the color of your ground plane. So, if you want it to be bluer or greener (or pink, if you happen to be looking at the ocean on an alien world) all you have to do is adjust those two colors.
 When you have it the way you like it, go to the Fog color palette, and use the eyedropper to grab a color for the distant water right from the Nano Preview. (Of course, depending on how little of the color you want to use is showing, you might be better off rendering a bit and grabbing from there, or just eyeballing it. You should also feel free to simply ignore this, and make the water whatever color you want it to be!)
Then drag up a bit, and to the left a little to give yourself a bit of fog that hugs the ground. (Or do it the easy way by making sure you are in the Camera view, going into the Sky Lab, and using the Preview in Scene control while you fine tune it all.) This will hide the line where the Bryce caustics caused by the Water Surface terrain end.
If you want to make a pretty dense fog right above the ocean bottom, select everything in your scene, including the Perspective, and drag them all ever so slightly below the ground level. This will ensure that you will mask the edge of the terrain. How much you need will depend on things like the amount of visibility you want, and how large your water terrain is. (Don't forget that you can make a tiled terrain if you decide you need it.)
Of course, as you can see from the last example in the "Color" section above, you can also mask the edge by judicious choice of ground material!
 |
 |
| Haze Enabled | Haze Disabled |
What you have now will really depend on things like your wave shape, and the colors you are using. If you find that you have a little bright color from the haze on the horizon under your wave, and you don't want it there, you can do one of several things. Disable the Haze by holding down Option/Alt and clicking on the Haze thumbnail in the Sky&Fog palette. Or change the haze color to the match the fog color and lower the Cloud Height to zero so the underwater color won't leak out above the waves. Or tilt the camera a bit so you can't see the horizon any longer. Or select the Water Material terrain, and drag it down to cover that line. Which one you choose will really depend on what you are doing with the rest of the picture.
| Size and Position of Light | |
 |
 |
| Front View | Top View |
Finally, put the same large parallel light that you used for the totally submerged scene in this one, too. Set the edge right around the surface of the water, and you won't have objects that should be in sunlight catching the gel. (But do make sure that you match the directions of sun and the parallel light.) You might also want to add some Edge Softness to the light, depending on the amount of visibility you have, of course, to avoid a harsh edge.
If you want the light to be at an angle, of course, just skew the parallel light by rotating it in the direction opposite the one where you want the light to come from, and resizing it on the Y axis. Rotate it back to fit the waves while retaining the angle. (Of course, depending on the transparency of your water, you may decide that you don't need a light at all. In that case, feel free to go without it. But I like them because, among other things, they make the water itself much brighter, and I like the effect most of the time.)
 |
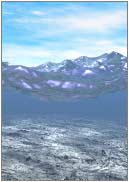
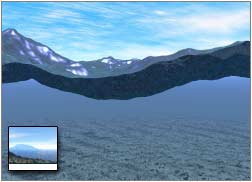
| Rendered Picture using Light Setup Above |
Now all that remains is for you to populate the rest of the scene. I'll leave that up to you!
Remember, too, that like all the other lessons, this is just a jumping off point. Try making half submerged pictures using solid terrains. Try using several lights in the underwater shots. Try using the same technique to give yourself a clear space before heavy fog or haze. Let your imagination run wild, and don't be afraid to experiment!
I'll just mention in passing that if you want to have realistic caustic reflections cast back up onto a boat, swimmer, etc. all you need is a parallel light with this kind of gel on it. There. Do what you like with that information! <g>