Note: I haven't used Bryce in years; so these tutorials are archived "as is." I can't accept questions, because I don't remember the answers.
This is page 2. If you haven't finished page 1, please do so before starting this page.
 We need to combine the two Texture Components so that the moss is only on one side of the trees. That means that we use Blend Orientation. Change the blending mode by clicking and holding on the arrow between the two components and choosing Blend Orientation from the menu.
But I don't like this as well. I chose the noise I did because I liked the effect of the gray bark peeking out from the green moss.
So forget this! Let's go back to Combine for a blending method, and use a filter to get the correct orientation blending. Change it back using the same method.
 Open the Filter dialog if it's not already open. (Top right corner glassie, or the button at the bottom of the DTE.)
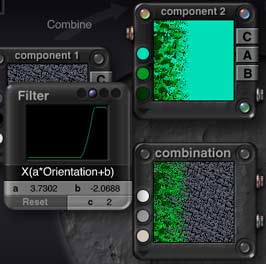
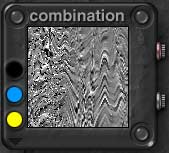
We are still after orientation, so make sure the blue ball is in the second hollow (so you are filtering the second component) and check in the formulas for the one with Orientation in the name. That would be X(a*Orientation+b). Now all that remains is to play with the a and b numbers until the moss takes up the correct amount of room in the window. You want it to hug the right side of the thumbnail, leaving plenty of gray bark to the left.
Remember, to increase the contrast, (the difference between the mossy bits and the bark,) put your mouse on the a and slide to the right. To increase or decrease the amount of coverage, (to make the moss cling to the left and leave more bark on the right,) put your cursor on the b and slide right to increase it, or left to decrease it. Since you can watch the change happening in real time, it's pretty simple, really.
You can also change the colors or the noise at any point in the process; tweak it until you like it!
When it looks about right, save it as a Preset (just in case. You wouldn't want to lose it if someone trips over the computer cord. Click the Copper button on the Combination window, or hold the shift key and click the Combination window title, remember?) and leave the DTE.
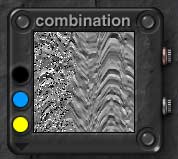
 Check it by previewing it on a pyramid. If one of the sides is mossy, and the other three are plain bark, you've got it.
 Now, to put the moss bump into the Forest texture, so we have it on the moss.
Reopen the texture you were just working on, and copy all the settings from Component 2 onto a piece of paper, or a whiteboard, or something. (I keep a whiteboard by the computer for just such temporary notes. Saves a ton of paper.)
For this texture, if your settings look like mine, the notes will read;
N: Voronoi ID1 : 0 : 0,0 : 109,109,109 : 3D (That's the noise, octaves, direction, frequency, and dimensions.)
F: X(a*Orientation+b) a = 3.7302 b = -2.0688 (That's filter, formula, and values for a and b. C isn't used, so it's not listed.)
It's almost impossible to get the exact numbers on the filter a and b settings. Get as close as you can, and don't sweat it.
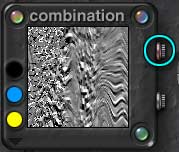
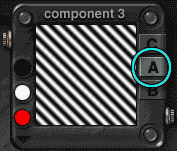
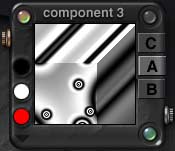
Finally, take the Forest texture into the DTE, click the third component to activate it, make sure the ball is in the third hollow, and the glassies on the third component are glowing, and set this up. Then turn off the color in all components so you can see the bump easily. After all, that's the one that matters at the moment. The color and alpha aren't even being used. So turn the Alpha off, too. (Click on the CAB buttons to disable any that are enabled.)
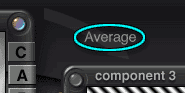
We need to see that bump superimposed on the bump under it, so set the blend mode to Average, so that both will come through. (Click on the Blending Mode arrow, and choose from the list.) But there is still a problem. That pesky phase is messing up the moss bump.
 The solution? Put the phase on the first component, not on the Combination. It was there so it could distort both components, but we aren't using the alpha from the second component for this texture, and we don't need it. (In fact, if you want to, you can drag the thumbnail from the first component to the second, change the Blending Mode to Average, and use only 2 components. That will save time when rendering, since the texture won't be quite as complex.)
Open the phase dialog and then the phase editor, to see what it was. (Click on the bottom right glassie to open the Dialog, and then on the green corner to open the Editor.) And this is where you run into another of the weird Bryce oddnesses. It would be logical to assume that you could simply copy the settings for the phase, and use them on the first component. But you can't. For some reason (I have no idea what) it simply doesn't work that way. The easiest way I have found to do it is to copy the settings, and then tweak until it looks about the same. This is easier to do using a cube preview, so click on the cube in the upper right corner of the DTE to change preview types.
Copy the stats, like you did before, so you can reproduce it on component 1.
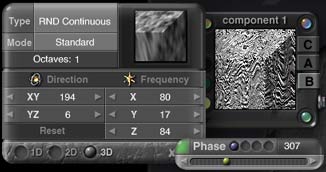
N: RND Continuous, Standard, 1, 90-0, 66-5-65, 3D : 307 (That's noise, mode, octaves, direction, frequency, dimensions and then phase number.)
With the Editor still open, click on the first hollow in the Phase dialog, to put the blue ball in there. Now you are working with Component 1. Set the fields, just as you did before, and then move the Phase slider to 307 to match the Phase in the combination palette.
As you can see, this doesn't look right. Change the YZ direction to 180, and it will look a little closer. At this point, I'm afraid that you just have to tweak and eyeball it. You can see what the original phase looked like at any time by setting the Type to nothing on Component 1. Set it back, and you will have Phase here again. (You can also turn off Component 2, and enable only the Bump, to make it easier to see.) Keep tweaking until it looks like it has the same feel. (I've never managed to get them anything like exact; but it doesn't need to be exact, so that's alright.)
 As you can see, that really displaces the combination, so we'd better change its phase to Nothing. Do that now, by placing the ball in the fourth hollow, clicking the green corner, and choosing Nothing as the noise type.
 There. The moss bump is averaged in with the bark bump, but it's no longer being displaced. Click the copper button on the Combination palette, save this in the presets as Moss Bark Bump, and tap the Enter key to leave the DTE and keep the changes.
Back in the Materials Lab, save the new material as a preset, too, so you have it handy to apply to the tree trunks at the edge of the stream.
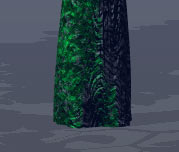 Just what we wanted. Moss that grows on only one side of the tree bark. Perfect. See, that wasn't so hard, was it? And the effects you can get are astonishing.
If you feel like playing around, you might want to see if you can get the moss to stay on the bottom of the trunk, as well as on one side. Post your results, if you get it, along with how you managed it. (If you can't, and you want to know how I would do it, I'll tell you at the end of the week if you ask.)
 Let's say it's just starting to rain in our picture. We'll change the water to show ripples that are just now beginning to be tickled by raindrops.
Put a water plane in your picture, if you don't already have one, and select it. Take it into the Material Lab and we'll get to work on it.
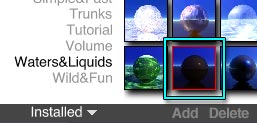
Start by opening the water texture. I'm using Bryce Cola for the water. (It came up as the random preset when I created the water plane, and I liked it.) You can find it in the Presets under Waters&Liquids. It's the second one in the fifth row.
 Select it, and open the DTE, as usual. (Pink button.) It's already using two components in the Bump channel. We are going to add a third. So click on component 3 to activate it.
All we want is a bump; but it will be easier to see what we are doing if we work in the Alpha channel. (Remember, all the light areas will be bumps up, and all the dark will be bumps down.) So, for now, make sure that Color and Bump are disabled, and Alpha is enabled.
 We also know that we want this bump to be blended with the bump that is already there; and we want equal weighting on all of the bumps, so it looks like the ripples from the water and the drops are interacting with each other. Equal weighting means Average for the Blending Mode. So go ahead and set it to Average now by clicking on the Blending Mode arrow and choosing Average from the menu there.
We won't be able to see what we are actually getting for the surface by looking in the Combination Palette for this one, because we are looking at the sides of 2D textures that have been built to have the interesting part on the top. (Water is almost always built this way, and we are going to be moving this component to the top, too, once it's built.) So go ahead and look at it if you want to, but don't worry about exactly what is happening there.
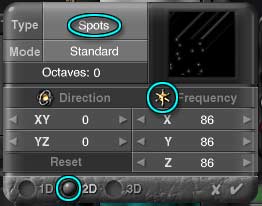 Time to make the drops! Open the noise dialog if it isn't already open. (Top left glassy, or Noise button at the bottom of the DTE.) Make sure the blue ball is in the third hollow, and click the green corner on the Dialog to open the Noise Editor. Set the Octaves to zero, and the direction to 0 along both axis. Make sure the frequency is the same in all three directions so the drops are round, and set it to around 80 or 90. Set the dimensions to 2D. We want the drops to be on the top only. (I know, right now they will only show up on the side. We'll fix that once we have them set. It's easier to work with them this way.)
Now, we want just a few irregular drops. So let's go with spots for the noise type. That gives us dimples. They are bumps, not dents, but it's the right sort of basic thing. We can work with it.
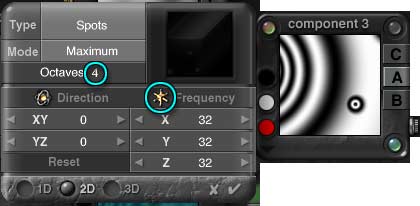
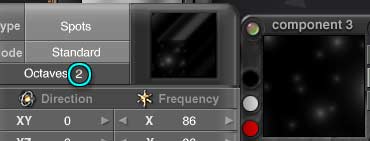 We want several sizes, so we need to increase the Octaves. Let's set it to 2 Octaves. Standard Mode is fine, so we will leave it there. (If you want to see why we are leaving it, run through a few of the others quickly, and see what they do to the bumps.)
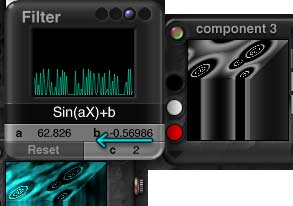
 We want to add rings around the bumps, so they will look like water drops. That means a filter. Open the filter dialog. (Upper right glassy, or button on the bottom.) Now, remember reading through the appendices from the last lesson? I mentioned a filter that was good for rings around things. Remember which one? Well, I didn't really expect you to. Checking the printed appendix quickly, you will find that it's Sin(aX)+b. (You did print the appendices, didn't you?) Sine and SawWave give you rings, since they bounce the top and bottom of the curve. SawWave is sharper, and Sine is smoother. We want smooth, so Sine it is.
Choose it. Ordinarily, since we want the rings to be concave in the middle, not convex, the first thing we would do is flip the wave.
But, in this case, the wave is going to be bouncing back and forth anyway. All we have to do is make sure the last bounce gives us a dark spot in the center.
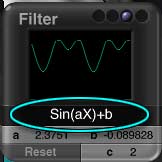
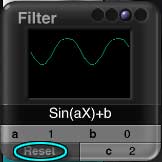 I'm not sure what you have in your Filter, but we need these rings to be exactly centered between the light and the dark. That means that we need to hit the Reset button before we start to drag. (The value of b needs to be zero, if you don't mind a little math, and that's the easiest way to get it there.)
 The drag also needs to be constrained to the vertical; and there isn't an easy way to do it in the graph. But it's easy enough to do it if you think of the a as vertical dragging, and the b as horizontal (which is, after all, essentially what they are.)
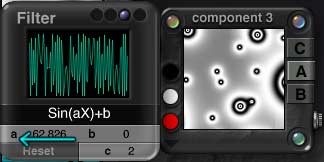
So put your cursor over the a, and start to drag to the right or the left, either one. Notice, as you do so, what is happening to the wave. See what I mean by bouncing? Also, keep your eye on the thumbnail, and notice that the rings are developing around the original spots. Drag until you have a good number of rings around the larger spots; the a value should be somewhere between 30 and 70. Just make sure the spot in the middle is dark. (You can drag farther, up into the hundreds, and you will get lots and lots of rings; but they get messy and difficult to render.)
That's good, but the drops are little small. Reopen the Noise editor, and change the frequency so they become larger. Remember, the closer the numbers are to zero, the larger the texture will appear. I think 35 in all three directions looks about right. (Remember, you can scale symmetrically by dragging on the little gold Frequency button.)
Now that we have the filter active, let's take another look at the Octaves, too. Using fewer octaves makes more rings, but using more increases the difference in size between the drops. More will also take longer to render, though. I'll probably settle for three, but I wanted you to see four.
Let's take another look at the Mode for blending the Octaves, while we have the Noise Editor open. Try a few of them out. Maximum is giving me more rings for my work than Standard was. I'm switching modes. See how the tweaking process works? I highly recommend that you do this with all of your textures, even when you are very used to the DTE. It only takes a moment, and can bring your textures from "very nice" to "wow!"
When you are happy with yours, click the checkmark to close the Noise Editor.
 If you change to cube preview now, you will see that the texture is appearing on the side of the cube only. (Go ahead and do it. Just click the cube in the top right corner of the DTE to change previews.) That is not what we want; the drops are supposed to be on the top of the texture.
The solution is simple. Just change the YZ direction to 90.

Open the Noise Editor again, by clicking on that green corner, and change it by either dragging the number itself, or holding down the arrow until it hits 90. (Remember, clicking the arrow will advance or retract the numbers by one.)
They will look distorted, but that's just an artifact of the cube preview. (And half the reason we worked with them facing the side, not the top.) In reality, they will be perfectly round.
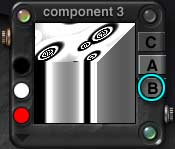 Click on B to enable the bump. If you look in the Combination Palette now, you will be able to see the drops interacting with the ripples.
Click on the copper button on the Combination Palette to save this as a Texture Preset, just as you have done before. (Backing up is Good.)
 Close the DTE, and take a look at your new Texture Component. Don't be alarmed that you can't see the drops in any of the thumbnails. They are on the top, and you can only see the side in the flat plane view. (That's the other half of the reason we didn't turn them until we were finished with them.)
 Change the preview here to Cube, as well, and take a look at the top of it. (It will be easier to see if you change the transparency to 100, and we want to do that anyway, so go ahead and do it now.)
Hmm. Those drop ripples are awfully deep, aren't they? More like rocks hitting the stream than raindrops. Let's fix that.
 Go back into the DTE, and take another look. We need to reduce the contrast of that third component. In this case, we can't reduce it the way we normally would, or we'll lose the rings. So we will have to make the whole thing lighter, or the whole thing darker. That means moving it up or down, which means vertical motion. But we don't want to interfere with the rings around the drops, so we will have to constrain our drag. And that means that we drag on the numbers for b, which control the vertical motion, not on the graph.
Drag b just a little in either direction, and watch the whole graph move to the top or bottom of its window. Make it about half the height it was, because we need about half the contrast, (which will make those drops about half the height they were,) and leave the DTE. Take a look at the preview. That's better. I like the look best with the graph hugging the bottom of the window. You might like it best at the top. Try it both ways to be sure.
 Finally, leave the Material Lab, and render the texture in the real Bryce World. If you think it needs it, go back to the DTE and tweak it a bit more. (I'm increasing the frequency on Component 3 of mine, to make the rings a bit larger in relation to the ripples in the rest of the water.) You can also tweak the other components; for instance, if you decide that you want the ripples (as opposed to the rings) to be more pronounced, you can increase the contrast in them.
When you are happy with it, I suggest that you save it as a Material Preset. That way, you will always have it at hand. (Don't forget, if you tweaked the texture, to resave your Texture Preset, too. Save this one, copy anything you wrote, and then delete the old one so you don't get confused. When you are saving presets, by the way, it's a good idea to include your initials at least. That way, years from now, you know which ones you made and which ones you didn't.)
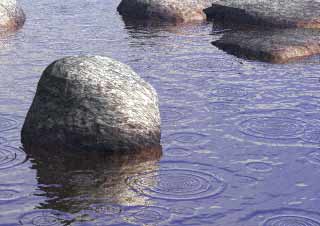 So there you have it; circular patterns appearing on the surface of the rippling water. Is it rain, or is it fish biting? Only you can tell us, by what you do with the rest of the picture.
Go ahead and tweak this until you are really happy with it. When you are ready, join me on Page 3.