Note: I haven't used Bryce in years; so these tutorials are archived "as is." I can't accept questions, because I don't remember the answers.
This is page 4. If you haven't finished page 3, please do so before starting this page.
 Okay then, we are ready to actually make the first Bryce Animation. And, surprise! It's not going to be a bouncing ball. (First animations are always Bouncing Balls. I think there's a rule. But we are breaking it.)
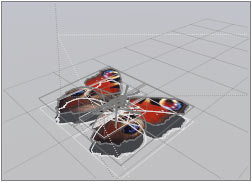
Open the Butterfly.br5 file that was in this week's download. You will find a butterfly, composed of three groups. One each for the wings, and one for the body. If you click on them, you will find that the Origin Handles for the wings are already set up to be against the body. (I assume that you know how to move them. If you don't, please let me know, since that information is vital for animation.)
We want the butterfly to move around, and we want the wings to stay with it and flap. But grouping it, moving it, ungrouping it and changing the wings, grouping it, moving it etc. won't work, even if we wanted to do all of that, because Bryce is tracking the group. As soon as you dissolve it, the keys disappear. Bryce thinks that you have deleted that object, so there is no point in keeping the animation keys.
For the same reason, moving the wings while it's still in the group won't work either. The animation tracks the group as a single thing, not the members of that group.
The answer is Linking, or Parent/Child relationships. Whenever you want things to stay together, but move around each other, you use Parents and Children.
They work like this; Children stay with their Parent. They can move independently, but all motion is in relation to their parent; not to the rest of space. Wherever Parents move, they take their children with them.
Each Child can have only one Parent. Parents can have as many Children as you want, and they can have Children in their turn.
As an example, if you were building a model of the solar system, the Sun would be the Parent. The planets would be Children of the Sun, because they move around it. The moons would be the Children of the planet they revolve around.
So, when you are thinking through Parent/Child relationships, you first have to decide which one should be the parent. In cases like this, it's simple. You want the body to be the Parent, because you want the wings to stay with it and move around it.
 It's easy to set up Parent/Child relationships. We have two wings, so I'm going to show you two ways to do it. Choose a wing, and open its Objects Attributes. Under the Linking tab, the first choice is Object Parent Name. Click and hold, and a list of all the things in the scene will appear. Choose Io Body from the list. (It's a Inachis Io butterfly, and Io is shorter than Butterfly.)
 A number of choices will become available, allowing you to propagate Distance, Offset, Rotation or Size. The default has all of them checked. This means that whatever you do to change the parent will be done to that child as well. (The Child will inherit the characteristics of the Parent.) Just leave it all checked for now. Click the checkmark to close the box and make the change.
 |
 |
| Click on this Icon | Drag to the Body |
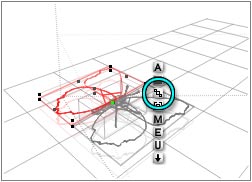
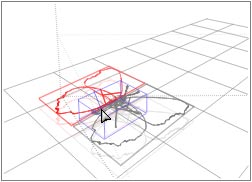
The second way is easier, especially if you have a lot of things in your scene. Select the other wing. Now, in its Icon column, go to the third icon from the top, right under the Selection Family swatch. It shows three squares lined up diagonally. When you put your courser on it, you will see Link To Parent show up in the Text Area. Drag from that icon, and you will see a blue line. As it touches various bounding boxes, they will also turn blue, to show that they are available for selection. Release the button when the bounding box for the Io Body is blue. (You can open the Attributes to see if you got it right, if you want to check your work.)
Now we can make the wings flap, and they will stay with the body wherever we move it.
 |
 |
| Upstroke | Downstroke |
Drag the Working Range out to four seconds or so. (Move the scrubber so you can get to it, then grab the little square handle, and drag it to the right.)
Make sure you are still at Frame Zero, select the right wing, open the Objects attributes, and set the rotation to 60° on the Z axis. Make sure that there is a keyframe here. If there is, the key icon will be yellow. If there isn't, click the + next to the Key, and make one, just as we did before. (Don't forget, since we need Rotation, to also choose Scale and Shear.)
Move the scrubber ahead to frame 6, or hit the period key until you get there, and make another keyframe. This will be the return of the upstroke, and it needs to match Frame zero. Making another keyframe while it's still at that position not only saves time, since you don't have to reset anything, but assures that the two will be in perfect alignment. (Animations don't have to be made in order, and it's often better not to.) Since you haven't changed anything, you will have to make this one manually whether you are using Auto Key or not. If you are using it, just click on the + to make one. (This makes a keyframe for all Timelines. We don't need them all, but this will be a small animation, and the extra size will be negligible.)
Move back to frame 3, open the Object Attributes, and set the rotation to -60° on the Z axis, for the downstroke. Make a keyframe, if Auto-Key isn't set.
Do the same for the left wing, moving back to Frame Zero before you start. The only difference is that this time, you will have to set the Z rotation to -60° at Frame Zero and frame 6, and to 60° at frame 3. Don't forget to make your keyframes; Auto Key won't make one for you at Frame 6.
If you play the animation now, you will see the butterfly flap its wings once, and then just hold them up for the rest of the time. That won't do! We want them to keep flapping; but it would be tedious to animate the same motion over and over again. Fortunately, we don't have to.
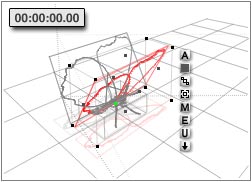
 Select both wings, and then click on the AML Button to enter the Advanced Motion Lab. We aren't going to explore much of it this week; that's next week's lesson. But we are going to look at a couple of things.
 You will notice that there is a list of things in the scene, with the names of both wings showing in red. Hold down the Shift key, and click and hold on the Right Wings name.
 A menu will pop down with several choices. They are pretty self explanatory. The one we want, of course, is Make All Repeat, so the motion will repeat. (If you click without holding down the shift key, you will see more things. We aren't going into them now. Just click on the name at the top of the list again, and they will all go away.)
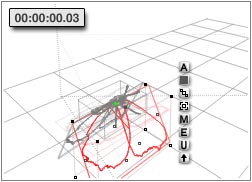
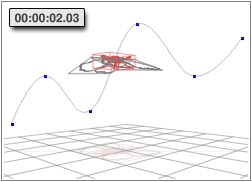
If you click on the play button under the preview window there, you will see the tiny butterfly pumping its wings like mad. Don't worry; they aren't really going to go that quickly. It's playing as fast as your computer will redraw, that's all.
 Click the arrow to leave the AML, and play your animation. That was easy, wasn't it? But the poor butterfly isn't going anywhere!
 I'll bet you know what needs to be done next, don't you? And you are right.
Change to Camera View, so you can see the animation from the Rendering viewpoint.
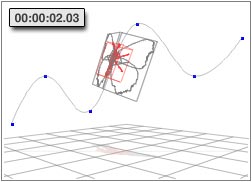
Make sure you are at Frame Zero, select the body, and make sure there is a keyframe for it. Now scrub forward a number of frames, move the body, and make another keyframe. (If you have Auto Key on, the computer will do it for you. If not, you will have to make it manually.) Give it five or six new positions, evenly spaced throughout the 4 second animation.
Okay, that looks better. But you may notice that the butterfly keeps exactly the same orientation in space the whole time. Depending on how your trajectory looks, he may even be side slipping! The answer to that, of course, is to orient him to the trajectory. Open the Objects Attributes, go to the Animation Tab, and click to enable Align.
 Play your animation again, and you will see the butterfly automatically following the line with his little proboscis.
 Still not very interesting, though, is it? Go to the Top view, and pull some of the points that make up the trajectory to either side, so he's not flying in quite such a straight line. Make it loop around itself, or something else that will add visual interest. (Notice that the position of the handle is being shown in the Text Area. This can be really handy for lining things up as you get into more complex animations.)
Play the Animation Preview. Notice that when the Trajectory Points are not evenly spaced, the butterfly will speed up and slow down as it travels along. This is because the blue control handles exist as specific points in time as well as space. The object must travel the distance in the time allotted between the points. If that means it has to speed up, it will. If it has to slow down, it will.
Butterfly motion is very erratic, so don't worry too much about it right now. There are tools to change the time between motions, which we will get into next week. For now, just be aware of it; and use it, or avoid it; whichever you prefer.
You may also notice that your butterfly is flying upside down for portions of the trajectory. That's one of the problems with aligning things to trajectories. Good thing butterflies do fly upside down, huh? Once again, don't worry about it for right now. If it really bothers you, change the curve until it no longer does.
 Now, you may have noticed that the curves between the points here are very smooth. Perhaps that's not what you want for your butterfly. You can change the curve at any handle by adjusting the Tension (making the curve steeper or gentler) the Continuity (making the curve continuous or breaking it into two pieces; rather like a smooth or corner point in a vector drawing program) and the Bias (allowing the curve to favor one side of the trajectory handle, or the other.)
Go to the Objects Attributes of the Butterfly, to the Animation tab, and choose Show Tangents from the list there, so this next part will be easier to see.
 |
 |
| Hold "t" and Drag Right to Increase Tension | Hold "t" and Drag Left to Decrease Tension |
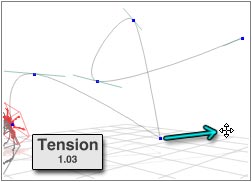
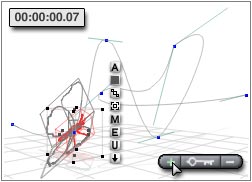
Now, hold down the T key, and move your mouse over a Trajectory Handle. You will notice that your cursor turns into a four pointed arrow, and a box appears around the Handle. Drag to the right, keeping your eye on the Text Area, which should say Tension as soon as you begin to drag.
Notice as you drag that the Tension increases, the Tangents become shorter, and the curve becomes steeper.
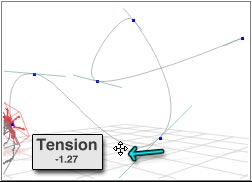
Drag left, and the numbers drop as the handles lengthen and the curve becomes gentler.
Notice that you can drag so far right that you put a kink in the curve; it actually crosses itself. Do that, and play the animation. You will find that your butterfly flies upside down briefly as it negotiates that curve. Fortunately, as I already mentioned, butterflies do that; so it's alright. But if you don't want that, you may want to decrease the tension again. <g> That was T for tension.
 |
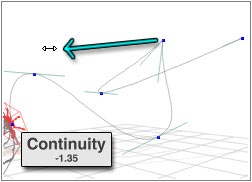 |
| Hold "c" and Drag Right to Break Continuity in a Positive direction | Hold "c" and Drag Left to Break Continuity in a Negative direction |
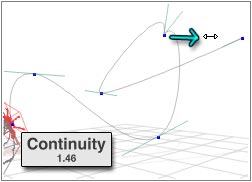
Choose a different Trajectory Handle, and hold down the C key. This time, you will be changing the Continuity. Once more, the numbers increase as you drag right, and decrease as you drag left.
As you see, this causes the Trajectory to come to a point. This is what you would use for a bouncing ball, or a piece of crockery (or a butterfly) hitting a wall and bouncing off. It may look like a high Tension curve, but the effect is much more pronounced. C for Continuity.
 |
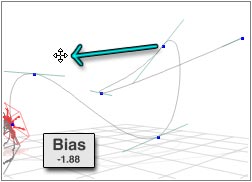 |
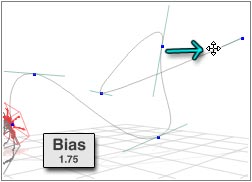
| Hold "b" and Drag Right for Positive Bias | Hold "b" and Drag Left for Negative Bias |
Finally, hold down the B key, and drag on a handle. This time, the bias changes. The tangent will swing lower on the right when you drag right, and lower on the left when you drag left. B for Bias.
In all cases, you can return to the "normal" value for any point by dragging until the numbers read 0.0. As you may have discovered by now, there is no "undo" for these.
Also, of course, you aren't limited to using one of the modifiers at a time. You can use all three on one point, if you feel so inclined.
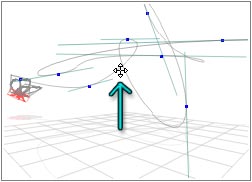
 |
 |
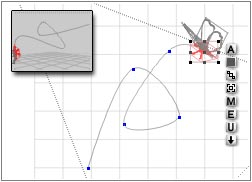
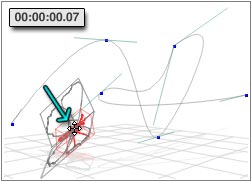
| Drag Butterfly | and Add a Keyframe to get a new Trajectory Handle |
Why don't you spend some time playing with these. Give your butterfly a really interesting trajectory to follow!
Don't forget, while working on it, that you can view it from any camera, or move the Director's camera around, to see the Trajectory from any angle. Also don't forget that you can add more points at any time by simply dragging the butterfly manually to a new spot if you have Auto Key enabled, or by moving and then making a new key if it's disabled.
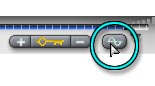
To make sure that the new key is between two existing keys, use the keys on the animation preview to step to the key immediately before or after the place you would like to add a new one, and then use the scrubber to move to the frame where you want to insert a key. (The butterfly, of course, will move along the trajectory as you do this.)
Then, either move him when you get there, or simply hit the + to add a new keyframe. Scrub to a different point, and manipulate the trajectory to your heart's content. (Note the fourth handle in the figure above; all three modifiers have been used on it.)
 Got it? Good. Now we are going to move the whole thing. Don't panic; you aren't about to lose all your hard work. Trajectories, and the objects that are attached to them, can be moved easily.
Just place your cursor exactly on the gray line, and drag. If you caught it, the whole path will move. Move it up so it's not quite so close to the ground. (Don't be alarmed if your butterfly appears to fall off the trajectory. As soon as you hit any of the animation preview buttons, it will hop right back on.)
You will probably want to move the camera, too, so the trajectory is visible; but make sure you are at frame zero, or the camera will be animated. (You don't have to worry about that with the trajectory movement. It can't be animated, so it won't be.)
Okay. That's about all we can do with a Trajectory. But, you ask, what if I want a second butterfly to exactly follow the first one? Or what if I want to twist him around as he flies? Or what if I just want to do more?
Time for Page 5.