Tutorials for Photoshop,
Paint Shop Pro, Blender, and More!
This is the second page of a 2 page tutorial. Click here to go to the first page.
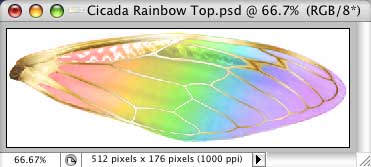
Halos and washed out colors happen because when Photoshop creates the Targa file, it flattens it first. (Remember, Targa files don't support layers.) It does this by dropping all the visible layers onto a white Background layer. Think of it as if your picture were painted in opaque and semi-transparent inks on a stack of acetate sheets. (In our case, a very short stack with a single sheet.)
Flattening the image is exactly the same as placing the stack on a piece of white paper. The opaque ink looks exactly the same, but the transparent ink will appear lighter. Something that was 50% red, for instance, will now appear pink.
To avoid that, we need to flatten our images onto the colors in the image itself.
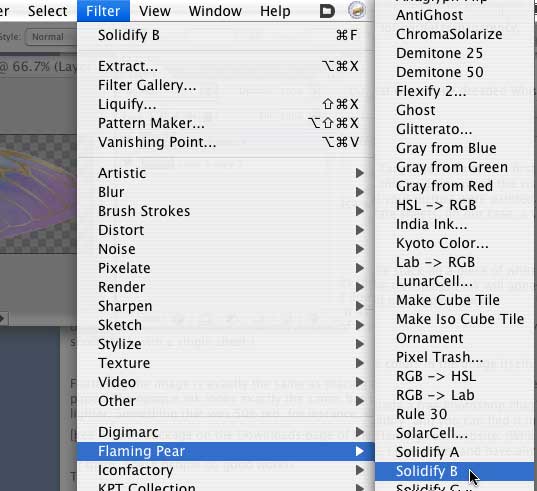
Fortunately, the clever people at Flaming Pear have made a free Photoshop Plug-in that will allow us to do this very easily. It's called "Solidify" and you can find it in the Free Plugins package on the Downloads page of the Flaming Pear website, about 2/3 of the way down. (While you are there, look at the other excellent filters they have. I love them, and have almost all of them. These people do good work!)
Once you have the filter, and have installed it (directions are in the package you download) all you need to do is run it. (Filter > Flaming Pear > Solidify (A, B, or C)
So, once you have your Alpha channel made, drop the selection, and run the filter.
The three filters use different algorithms to determine what colors go where. (There's a manual in the download package, explaining it.) I usually use Solidify B, because it's slightly faster; but it really doesn't matter which one you use.
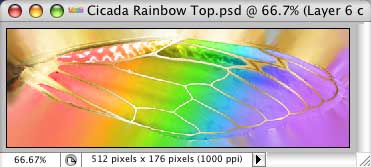
Your image will now be opaque. That's fine, because the transparency is driven by the Alpha Channel. It's in the Channel Palette, not in the Layers Palette. If you want to see it, open the Channels Palette.
The colors go from edge to edge, and are as rich and saturated as they would be if you'd never made any of it transparent.
If that doesn't make any sense to you, please see the tutorial about what Channels are, and why they aren't Layers.
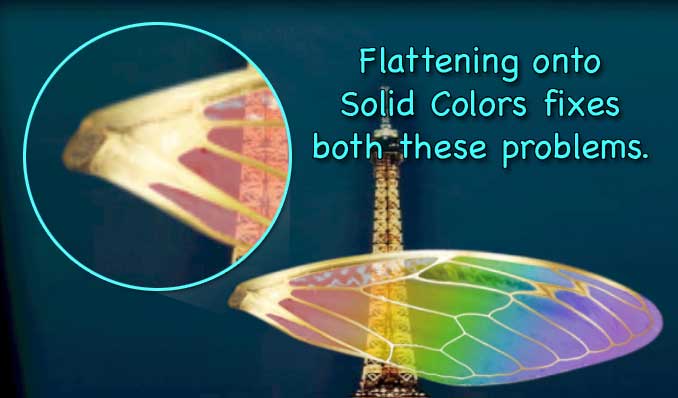
When you bring this image into SL, you'll find that the colors are what you intended to have, and the white halo is gone. (Run your mouse over the image below, to see the difference clearly.)
To recap, here are the steps.
1. Make a copy of the file (so you can keep your layered original.) Click the "Create New Document from Current State" button in the History Palette to do this.
2. Merge the Visible Layers (Shift Command/ctrl E or use the Layer Palette Menu.) Obviously, if you only have a single layer in your document, you can skip this step.
3. Hold down Command/ctrl and click the thumbnail image in the Layers Palette to select the Pixels on that layer.
4. Go to Select > Save Selection.
5. Select the defaults, and you have a perfect Alpha channel, white where you had opacity, black where you had transparency, and gray for partial transparency.
6. Drop the Selection. (Command/ctrl D)
7. Run the Flaming Pear filter.
8. Save as a 32 bit .tga file.
9. Upload to Second Life.
Now, if you are going to be uploading a lot of things into Second Life, it makes sense to automate this process, so you don't have to go through all of these steps every time you need to upload a file. It's lots easier to just open the Actions palette, and click a single button.
I've gone ahead and done that for you. You can download the Actions to make a perfect, non-haloed Alpha channel with a single mouse click here. (Remember to download the Flaming Pear filters as well. The Actions that require it are marked FP.)
There are a bunch of Actions in each file, so you have the maximum flexibility when using them. The instructions are included with the file.
And that's all it takes to make perfect, vibrant, transparent and semi-transparent textures for Second Life!
Enjoy!
By the way, before someone asks, no; I did not upload the images at the size you see. Before upload, I changed them to powers of two. Since I intended to zoom in very closely, I left the long side fairly large. The image was uploaded at 512x256. (I have found that I get better quality by increasing the smaller size, rather than decreasing it.)
Also, you might notice in some of the screen shots that the resolution of this particular image is 1000 ppi. I scanned it at that resolution, to get a very large, crisp scan for some print work I was doing. I didn't bother to change it, because Resolution is meaningless in SL. 512x256 is the same number of pixels, no matter what the resolution is. Only the print size changes, and we're not printing anything.
Chosen Few has an excellent discussion of image size for SL on the Second Life Texturing Tips forum. The thread you want is here. (If you cannot get into the forum, it's because you haven't gone in world, or your account has no payment info on file. Buy a dollars worth of Lindens, and you can have the Payment Info Used tag, which will let you see the Forums, and do all kinds of other things that are otherwise blocked in SL.)