Tutorials for Photoshop,
Paint Shop Pro, Blender, and More!
Years ago there was a discussion on the Second Life forums that inspired me to make a true T-Shirt template, so everyone who wanted to could make a t-shirt quickly and easily. It was originally intended to let people who just wanted a single t-shirt, for an event, or to promote their favorite band, sim, or soft drink, to make one.
It wasn't for people who wanted to really learn to make clothing in SL, although I'm delighted that it's helped with that, too.
But there will be no templates for other clothing types, because if you want to learn to make clothing, you need to make your own templates as well.
But, for all those who just want a shirt or two, and for all those who want to see how I put a shirt together, here you go. You can download the T-shirt template here. It should open in anything that can open Photoshop layered documents. (If you can't get it to open in yours, though, don't ask me how to do that. I don't use the others, and have no clue how to open files in them.)
There's a read-me file in the package, but if you want more instruction about how to use it, read on!
NOTE: In order to use this tutorial you MUST download the "Robin (Sojourner) Wood T-shirt" file. I'll be referring to layers that are in that file, and if you don't have it, you won't be able to follow along.
Note that the "templates" provided by the Lindens, Chip Midnight, and myself aren't actually templates at all. They are UV Maps. This shirt is actually a template. It's all finished, including the Alpha Channel, so all you need to do is slap a picture on the front, change the color, and upload. These instructions will tell you how to do that, and nothing more. It was not designed to teach how to make a t-shirt from scratch, although you are certainly welcome to reverse engineer it and figure that out.
These instructions are written for Adobe Photoshop, with screen shots from PS CS2. If you use something else, you will have to translate the instructions yourself. Please don't write and ask me to do that. I can't. The only raster programs I know how to use are Photoshop and Painter.
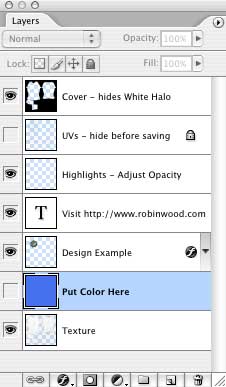
When you open the file, you'll see a number of layers. If that confuses you, it's okay. None of us were born knowing about layers! Just click here to find out what Layers are. If you are comfortable with layers, then we can start to place your image.
For purposes of this tutorial, I'm going to assume that you have your image already prepared. I'm going to use a picture of my cat, taken with a cell phone. (So you know what kind of quality we're talking about, here.)
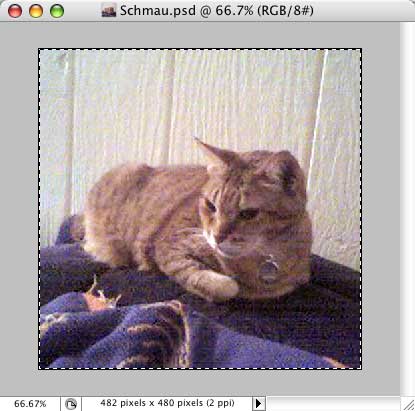
Open the image you want to use, Photoshop will open it in another window. (You can have lots of windows open at the same time.) Tap Command/ctrl A (Hold down Command and tap A if you are using a Macintosh, or hold down ctrl and tap A if you are on a PC.) That selects the entire image. You can tell it's selected because of what are called "marching ants" around the picture. (No joke; that's the actual technical name for them!)
Tap Command/ctrl C to copy the image.
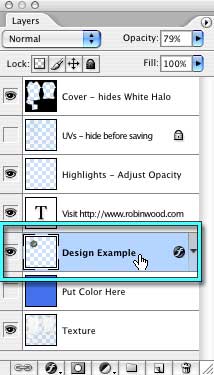
Click on the window with the T-shirt in it, to make it the active one, and then click the Design Example layer to select it. New layers always are added above the currently selected layer, so doing this determines where our new image will be in the stack.
Tap Command/ctrl V to paste.
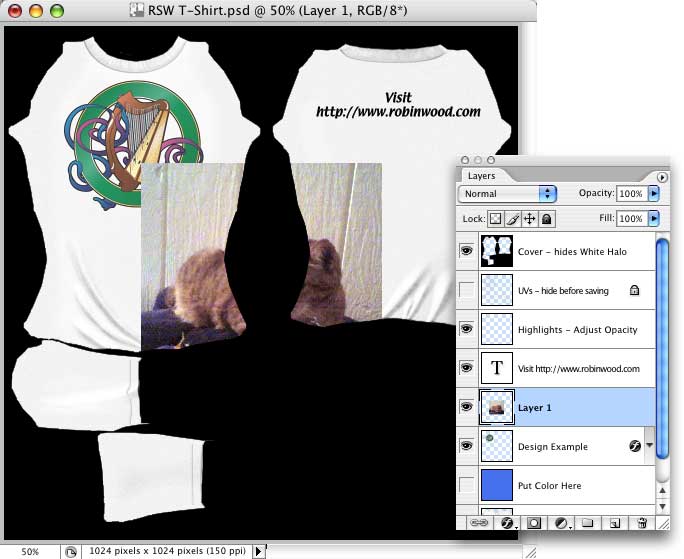
Your picture will appear in the middle of the image, on its own layer. Because it's in the middle, it will be under the Cover layer, and partially obscured, but that's okay. We'll reposition it in a moment.
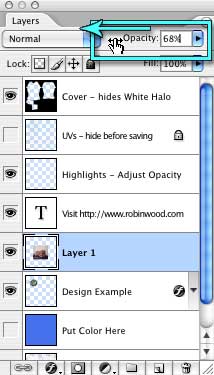
Notice that the new layer, Layer 1, is already selected. (It's highlighted.) This is good, because we need to work with it for the next few steps. Make sure that it stays selected.
We're going to use the Design Example to get the placement right, but it would be easier if we could see through the picture we just placed there..
Fortunately, we can. At the top of the Layer palette, you'll see a line that says Opacity, next to a text box. If you're using PS CS2, just place your cursor on the word, and drag to the left to decrease the opacity interactively. If you're using an older version of Photoshop, or if you prefer, you can type a new opacity into that field. I recommend between 60% and 70%. If you're typing, tap the Enter key when you're done. (That frees the keyboard, so you can use keyboard shortcuts.)
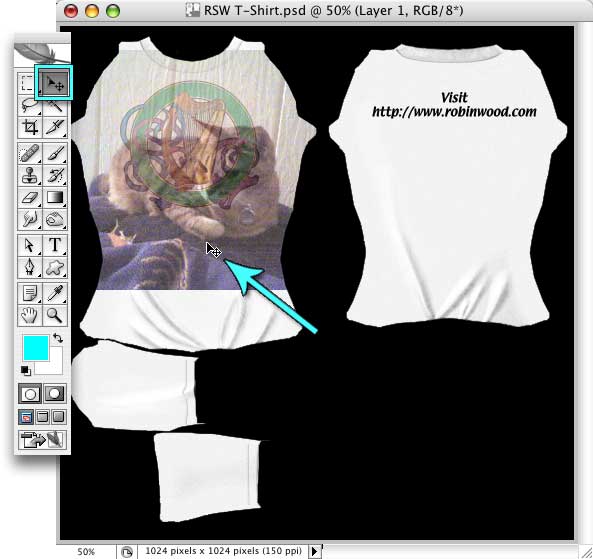
With the new layer (Layer 1) still selected, tap the V key, to get the Move tool (or select it from the toolbar,) click anywhere on the image, and drag it into position in the middle of the shirt, over the harp.
Okay, the placement looks good, but it's too big. We need to change that. (Yours might fit, and if it does, you can skip this step.)
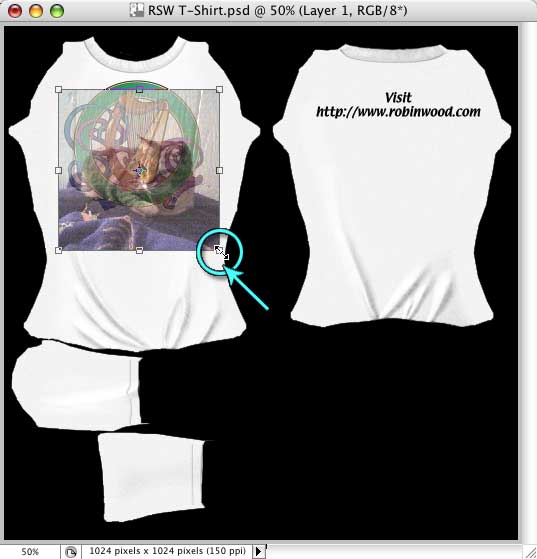
Tap the T key, to move into Free Transform mode. (Or choose Edit > Free Transform from the menus.) Now, hold down the Shift key, to constrain resizing to proportional only, and the Option/alt key, to resize from the middle. Click one of the corner handles, and drag inwards, towards the center of the picture, to shrink it.
(Drag outwards, of course, if it's too small, and you want to enlarge it.)
When you are happy with the size, just double-click inside the bounding rectangle to accept it. (Or tap the Enter key twice.)
Adjust the placement with the Move tool, if necessary (V, remember.)
Now, if you are happy with it this way, you can just change the Opacity back to 100% (the quick way is to tap 0 (zero) on your keyboard or numeric key pad,) click the Eye icon next to the Design Example layer, (to hide it,) and skip to the next page.
But I'm going to do a little more with it, just to show you what is possible.
First, I'm going to make the picture round, not square.

Click and hold on the Marquee tool, in the top left corner of the Toolbar, until the pop-out menu flies out. Then choose Elliptical Marquee Tool from the menu. (Or tap M to choose the Marquee tool, and Shift-M to choose the next tool in that fly out menu. When you see the Elliptical Marquee in the toolbox, you've got the right one.)
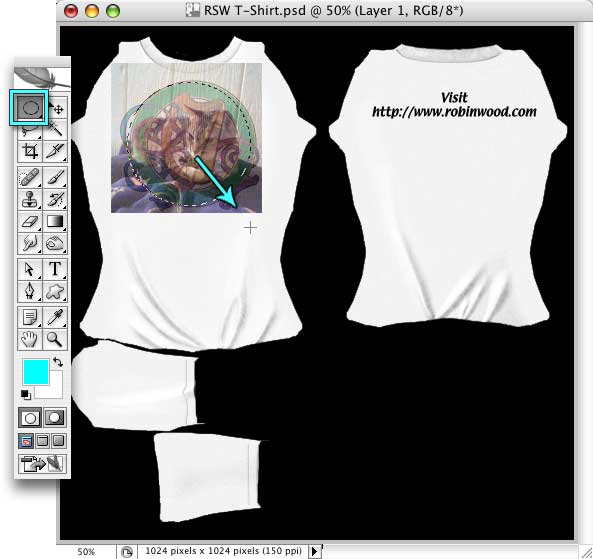
Click where you want the center of the circle to be, hold down the Shift key, to constrain the marquee to a circle (otherwise, it makes all kinds of ovals,) and the Option/alt key, to make a marquee from the middle (notice a pattern here?) and drag the marquee out, until it's roughly the same size as the circle around the harp.
If it's not centered, it's no problem. Switch fingers on the Shift key, reach over with your index finger, and hold down the Spacebar too, and you can slide the marquee anywhere you want it while you are still sizing it. (Yeah, it's a little tricky to do, but well worth the effort of learning. If you drop a key it's no problem, as long as the mouse button is still held down. Just depress the keys again, and the marquee will spring back into shape.)
When you have it the way you want it, let go of the mouse button. That will accept the circle. (If you still need to tweak it, you can move it by just dragging with the Marquee tool, or change it in other ways by choosing Select > Transform Selection from the menus.)
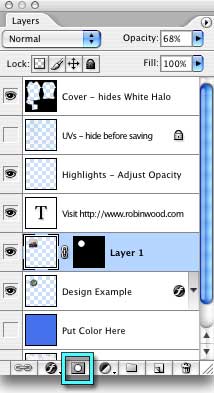
Now, click the Make Mask button, at the bottom of the Layer palette. It's the one that looks like a square with a circle in the middle of it.) You'll see that the edges of the image disappear. They are still there, but now they are hidden, or masked.
You'll also see another thumbnail in the Layer palette, next to the image thumbnail. This one is black, with a white area where the image is. This is the Mask thumbnail.
Tap 0, to make the layer opaque, and reposition it with the Move tool if desired. (The Image and Mask are linked, as shown by the little chain icon between them; so when you move one, the other will move as well.)
Click the Eye icon for the Design Example layer, to hide that layer (and get rid of the harp.)
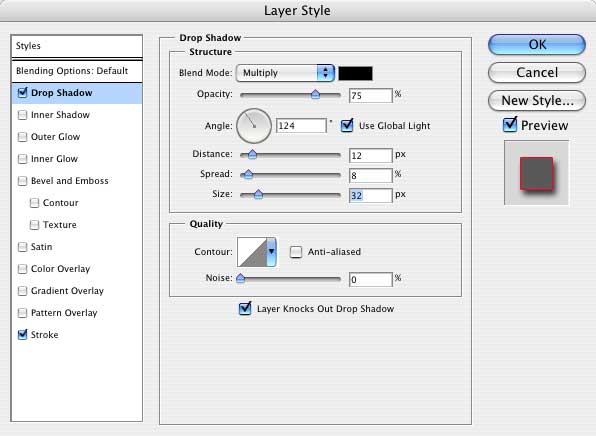
Now, let's add a layer style to the image, to give it a little snap.
Either double click on the layer itself, or click the F (Effects) icon at the bottom of the layers palette, and choose a layer style. Either one will open the Layer Style dialog. (The difference is that if you do it through the icon, it will open to a Style, otherwise it won't. Personally, I find it easier to just double click on the layer.)
Choose a style by clicking on its name on the left side of the palette. When you do, the options for that style will fill the dialog. If you have the Preview enabled (on the right side of the dialog,) you can see the results of the style as you play with the settings.
I'm using both a Stroke and a Drop Shadow. I'll just keep the defaults for the Stroke. For the Drop Shadow, I'm going to use the settings shown here.
Let's move on to Page 2, and we'll finish up.