Note: I haven't used Bryce in years; so these tutorials are archived "as is." I can't accept questions, because I don't remember the answers.
This is page 4. If you haven't finished page 3, please do so before starting this page.
 You have your night scene all set up the way you want it to look. But since we had to disable the sun for the light effects to work properly, the mountains look flat. The reason for that is that there is no actual light on them; they are just glowing a tiny bit because of the Ambient Light setting in their material.
The fix is to put a map in the Ambient Light channel that will fake the light they would get from the moon. In order to do this, you have to have an image editing program. I'll be using Photoshop; but anything will do. (If you don't have one, you can still do this entirely within Bryce, by unrotating your mountain before you enable the sun, and cropping your picture within Bryce, but the results won't be as accurate.)
So, save your scene. Then, just to be safe, save it again with a different name, such as Mountain Ambience. In the new scene, enable the sun, make sure it is toggled to sun, and color it white. Disable the textures, using the render option button on the Control Palette. Make sure the Sky Dome is white, and the Atmosphere is turned off (first thumbnail on the Sky & Fog palette.) Then select the first mountain, and enter Solo Mode. (Click the center button on the VCR controls to hide everything else in your scene.)
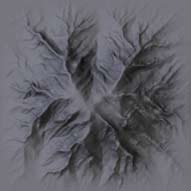
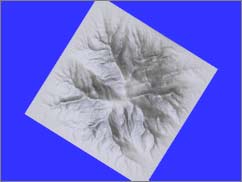 Go to the Top Orthogonal view, zoom out, center your mountain in the picture, and render. (You may want to render this at 2 or 3 times normal size, to make sure there is enough detail to look good in the final picture. Those choices are under File > Document Setup, remember.)
Export the render in whatever format you like.
 Now, enter the Terrain Editor (E on the Icon Column) and hit Command/Ctrl - C to copy the terrain map. Open your image editor, create a new document, and paste it in.
 Open your rendered terrain, crop it so that it is square on the canvas, and check the size in pixels. Change the image size of the Terrain Map to match. Then paste your render on top of the terrain, reduce the opacity of that layer, and match them up. They need to be exactly the same; so rotate, tweak the size, whatever you have to do.
 Return the opacity of the render to 100%, fix the edges, and (if you want to, and have Photoshop) use an adjustment layer to make the darkest areas the value you want for the darkest part of your mountain, and the lightest the lightest. (That can save you time in Bryce.)
Repeat the process for every mountain in your scene, remembering to give the maps names so you can keep them straight.
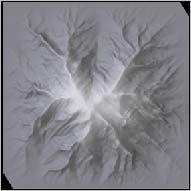
 Open the original Temple scene; the one with your sky, atmosphere, textures and all just where you wanted them. Select your mountain, enter the Material Lab, and use your map as a Picture in the Ambience channel. (Depending on your mountain texture, you may have to enable Texture Component D for this.) You know how to set that up. Just remember that this isn't color, so the map has to go in the Alpha channel, in the middle thumbnail in the Picture Editor.
In the Texture Mapping Mode menu, under the flippy at the bottom right corner of the Texture Component palette, set the Mapping Mode to Object Top. Then, scroll down to the bottom of that menu, and enable Alpha Scaling. (There will be a checkmark next to it when it's enabled.) That will allow you to scale the glow of the alpha map using the slider, so you can have brighter, or dimmer, shadows on your mountain. Make 'em as bright as you like.
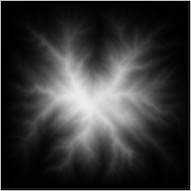
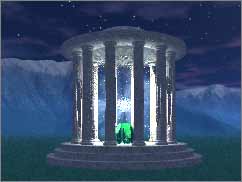
Now render, and you will see that your mountains have perfect shadows, with no actual light involved! (You can, of course, use the same trick on anything, in any channel. See, there are ways around nearly every limitation.)
You can do all that now, or you can wait until you have finished the lesson.
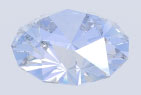
 When you are ready, save the Temple scene, close it, and open a new document. We are going to use an imported faceted jewel resting on the pylons, to shoot a beam of light up through the nimbus and out the hole in the roof.
But, in order to do get the best possible render for the jewel, we need to know something about rendering transparent objects in Bryce.
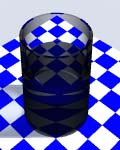
So, we'll begin by making a quick glass of Bryce water to experiment with.
Create a cylinder, name it Water, and duplicate it. Name the duplicate Glass Negative, give it a negative Boolean, and make it just .01 B smaller than the Water on all three axis. Duplicate again, name it Glass Positive, and make it enough larger than Glass Negative that it looks about right for a tumbler. Stretch Glass Negative up on the Y axis, so it's above Glass Positive, and group them all.
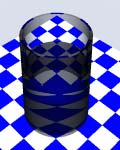
Give the Glass pieces a Glass material from the presets, and the Water a water material, of course. Select both the glass parts, and stretch them on the Y axis so that the water fills about two thirds of the glass. There you go. A lovely cool glass of Bryce water. (Once again, I added the black lines, to make it clearer.)
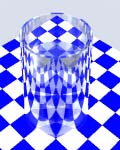 Create a cube for the glass to rest on, and give it a material that uses the CheckBlue texture in the Diffuse and Ambient color channels. Resize the texture to about 20%, and smoosh the cube down until it's almost flat.
Select the Water Glass, land it on the cube, and move the camera so you can see part of the top surface of the water through the glass, and part over the edge of the glass. Render. (This is likely to take a while. Transparency and refraction are expensive in Bryce. You can speed it up by disabling AntiAliasing, or by rendering at half size, both of which you can do with Document Setup under the File menu, remember.)
 Now, I had you make this glass, because it's time to explore some of the Rendering options. The render you just made probably used the default options, (unless you have already changed things.)
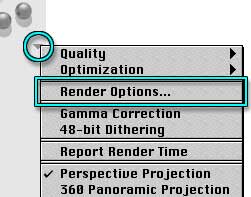
Go to the Render Options triangle, next to the Render Controls, and choose Render Options from the menu there to open the Render Options dialog.
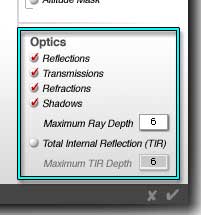 In the lower right hand corner, there is a section labeled Optics. That's the one we are going to be looking at right now.
Bryce uses Raytracing to render images. For every pixel in the picture, Bryce shoots a virtual ray into the scene, and mathematically tracks what happens to it. That's why a render begins with those great big blocks. Bryce starts with huge "pixels," so you can see what is going on in the picture very quickly, and determine if it's worth continuing the render, or if something needs to be changed. As the render progresses, the size of the pixels in each pass is reduced, until it reaches one actual screen pixel.
When the ray hits an object, the color assigned to that pixel changes to the color of that portion of the object, which is determined by its material, the amount of light from each light source hitting it, and so on. Things like reflections, refractions, transmissions, etc. are also accounted for, so it can become very complex very quickly.
The optics portion of the Render options lets Bryce know what to calculate, and what not to calculate. Let's start by turning off Reflections. Click the button to make the check mark vanish, disabling it. Render, and notice what happens. Try this for each of the options, turning each one back on before disabling the next.
 |
 |
 |
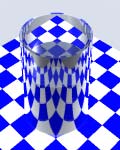 |
| No Reflections | No Transmissions | No Refractions | No Shadows |
You know what reflections are. (Notice that not having them in Bryce makes things very dark.) Transmissions allow light to pass through transparent objects. (Notice that none does if this is disabled.) Refractions, of course, bend the light rays (notice what happens to the checks when this is disabled.) And shadows are shadows.
Notice that each optical option increases the render time. When you are setting up a scene, it can really speed things up if you disable the ones you aren't actually using for that test render. Enable them again when you do need them.
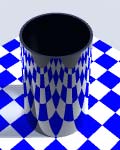 Alright. Notice the text field that says "Maximum Ray Depth?" That determines how far into transparent objects the virtual ray will travel. It looks through that many, and then stops calculating. Anything more is rendered as black. Make sure all the optics are enabled, and type 1 into that field. Render.
Opaque black plastic, with no transmission at all. The ray stopped after going through the first side of the first thickness of glass, and never went through the other side of it.
 Type 2, and try again. You can see through the far side of the glass, but that's all. The front of the glass on that side is one, the back is two. So a ray depth of two passes through a single thickness of glass.
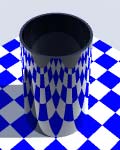
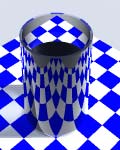
 Type 4, turn off reflections so the next part is easier to see, and then render. You can see through the glass, through the water visible over the edge of the glass, and through the sides of the glass where there is no water, but not through the water that is seen through the glass. That's because with 4 you are looking through four levels of transparency. Two for the front and back of each side of glass, or two for the water, top and side. And then it stops. So you can see through two thicknesses of glass, or one of glass and one of water, but not both.
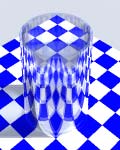
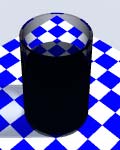
 Type 6, which was the default. This time, you can see through the whole glass, and the water. Two for each thickness of both sides of the glass, and two for the water. (Turn off the shadows if you can't see the checks through the glassful.)
Type 8, and try once more. (You will have to enable Shadows to change the Ray Depth, but you can disable them again after you have.) Notice that there isn't any difference. Six was all you needed, and more won't help.
Whenever you need a ray to pass through transparency, count up how many transparent surfaces it needs to pass through, and enter that number here. Don't forget that, unless you have a 2D surface, you need to count the front and back of each one. So, in order to get through a glass marble inside a glass of water, you would need 8 levels. Two glasses of water would need 12, and so on.
 |
 |
 |
| TIR Disabled | TIR 2 | TIR 4 |
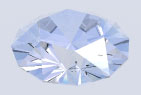
Alright, close this scene, or simply delete the things in it, and import the preset object Gem.obp into your Object presets menu, just the way you imported the lamp last week. (Open the Objects Presets from the Create Menu, click Import at the bottom, find the file, and open it.) This time, the object is a cut diamond, courtesy of 3D Lapidary at http://www.3dlapidary.com, the best source of free virtual cut gems on the Web.
Open the Render options again, and look at the last line of the Optics section. Make sure that Total Internal Reflection is disabled, and render. Take a good look at the gem. Now, enable TIR, and render again. Quite a difference, isn't it?
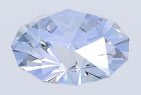
Total Internal Reflections are the number of times a light ray bounces back and forth between two reflective surfaces, such as mirrors which face each other or faceted gems. By default, Bryce doesn't allow this, since the number can reach infinity very easily, and your render would never finish. This option allows you to have some TIR, and still stop at a point you specify. You can change the number to set how many times the light bounces. Try it out at different levels to see the effect.
 |
 |
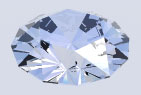
| TIR 8; Ray Depth 6 | TIR 8; Ray Depth 20 |
When you are using it, it's possible to exceed the ray depth that you have specified. If you do, you will notice that there are black areas in your gems or mirrors. If that happens, simply cut back on the TIR, or increase the ray depth. (Unless you decide that you like them, of course.)
 Alright. Rotate this gem 180 degrees on the X axis, center it, and copy it. Open the Temple scene, and paste it in. Shrink it so it will just fit between the pylons, and then move it, constraining the motion to the Y axis until its edge just meets their edges.
 Now, we are going to fake the column of light that rises from the diamond, to save rendering time.
Create a cylinder, name it Beam, center it, and make it the same diameter on the X and Z axis as the Diamond. Back up, and pull the Y control handle to stretch it up through the center of the dome and into the sky.
Take it into the Material Lab, make it white, and change the Shading Mode to Light. Notice that it now glows, and you can see through it a little. At 0 transparency, the light is at 100% intensity. Tone it down a bit, using the transparency slider, if you want to see through it more easily. If you want to color it, you can. Use the Diffuse color channel, though, because this shading mode ignores everything else. Try using a texture that has high contrast. The dark areas will look transparent, and the white will glow. You can get some really nice effects this way, without having to pay the rendering price of actual lights.
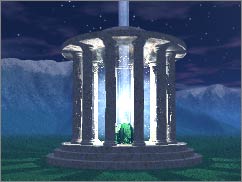 Now, put a fill light into the dome, and one into the temple, about where the Nimbus is. Render, and turn down the Diffusion of the temple, if necessary, so it's not bleached out completely (unless you decide that you like that effect, of course.)
All that remains is for you to finish the sky, perhaps put some trees around, and get the perfect camera angle; but you don't need my help for that.
There are a couple of other render options I want to show you, but let's do it with a simpler scene, so it will render more quickly.
Go to Page 5.