Looking for more?
You'll find instruction for lots of 3D apps at:
Put the Tutorial here.
 Light travels through different substances at different speeds. Generally speaking, the denser the substance, the slower light moves. When light enters a substance at an angle, this change in velocity causes the ray to be deflected, or bent.
This bending is called Refraction. The amount that the substance bends light is its Refraction (or Refractive) Index or RI. (It's determined by using Snell's Law; that is, the sine of the Angle of Incidence (the angle at which light enters) over the sine of the Angle of Refraction (the angle it's bent to) equals the RI of the substance.)
Because the Refractive Index for a given substance at a given temperature and pressure is a constant, Refractive Indices are used in the real world to determine everything from the percentage of water in a sample of honey to the composition and purity of gemstones.
In our Virtual World, we use Refractive Indices to enhance the reality of our renders.
 Refractive Indices for many substances are available on the web. (I've posted a list of Refraction Indices myself.) You can just look them up, and plug them in.
Different programs employ them in different places; but most will allow you to put that number in somewhere.
For instance, in modo (shown here) you open the Shader Tree, click the Material you want, and then go to the Material Trans tab of the Properties tab. Add some amount of Transparency, and that activates the other fields. You just type the Refractive Index into the field shown, or choose one from the Refractive Index menu under the Reveal Triangle at the right side of the field.
In Bryce you have to multiply the RI by 100, and then put the answer into the Refraction slot in the Materials Lab. For Lightwave, you open the Surface Editor, and type the number into the Refraction Index field in the Basic tab. In Cinema 4D, you open the Material Editor, check the Transparency box to activate the Transparency Dialog, and enter the RI into the Refraction field labeled n. Other programs use other methods.
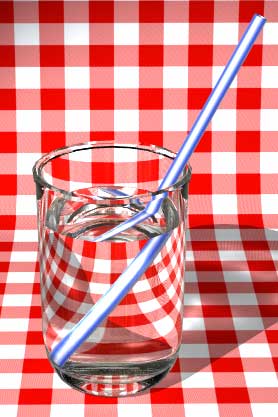
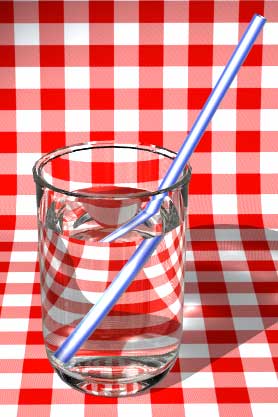 Knowing the correct Refractive Index adds realism to your renderings. For instance, one of these glasses has virtual water in it, and one has an 80% sugar solution. You can probably guess correctly which is water. Even though you may not know the RI of water, you've learned what looks "right" from a lifetime of experience.
For a lot of liquids, you can guess "close enough" to the correct RI by using something similar. For instance, if you know that the RI of water is 1.333 and the RI of an 80% sugar solution is 1.49, you could guess that the RI of a glass of Sweet Tea would be somewhere in between. And you'd be right. The higher you made the RI, the sweeter the tea would be.
If that's not good enough for you, you can't find the RI of the liquid you want on the web somewhere. Or if you like science experiments you can figure it out for yourself. (You can just buy a refractometer, too; but the ones that will measure Index of Refraction (nD) aren't cheap. (The less expensive ones measure Brix, and you would have to convert it.))
 When rendering gemstones, there is more to it than that, because the "life" in a cut stone is dependent on the angle of the cuts and the Refractive Index of the stone.
If the angles of the facets are too low, light escapes before it reflects from the inside cuts. If they are too high, light bounces out of the sides of the stone, and you don't see the reflection.
The angle at which light can escape is called the "critical angle." (Critical Angle = sin-1 (1/RI) where RI is the Refractive Index of the stone.)
For maximum sparkle, the angles of the stone need to be between the Critical Angle and the Angle of Reflection. If you do that math, you will see that the larger the RI, the larger the window you have between these two angles.
 |
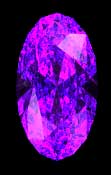 |
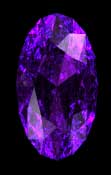
| Quartz RI 1.544 | Crystal RI 2.00 |
So, if you really want to use a certain shape or cut of gem, and you find that you have "bow ties" (dark facets) or "fish eyes" (places in the center of the jewel where there are no reflections,) a quick fix is to increase the RI. I know, it's not accurate; but sometimes it makes sense to sacrifice accuracy for esthetics.
(This model comes from 3dlapidary, by the way.)
 You can figure out the minimum RI needed for a particular model by measuring the most acute angle in the pavilion (the bottom of the stone.) Assume that's the critical angle.
The Refraction Index will be 1 divided by the sine of that angle. So, pull out your Scientific Calculator, make sure you are working in degrees not radians, enter the angle, and tap the sin button. Enter that number into memory, clear, enter 1, hit the division key, recall the memory, and tap the equals button. That's the lowest RI that will give you life in that stone. Setting the RI in the program just a hair higher should assure success.
(If you are interested in learning more about this, see Rockhounds Bow Tie Blues. In fact, look at the whole Gem Design section of the Rockhounds site.)
 |
 |
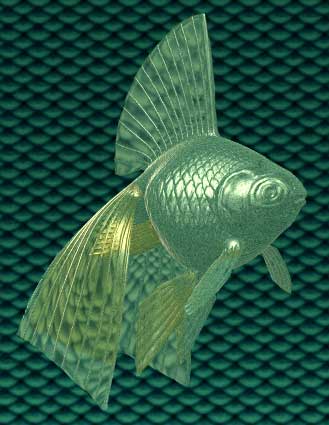 |
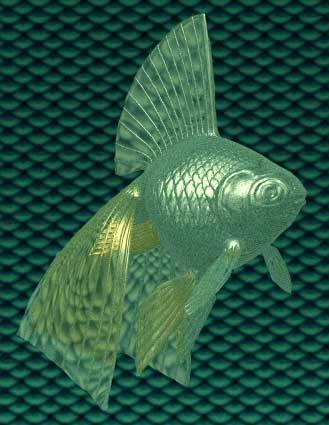
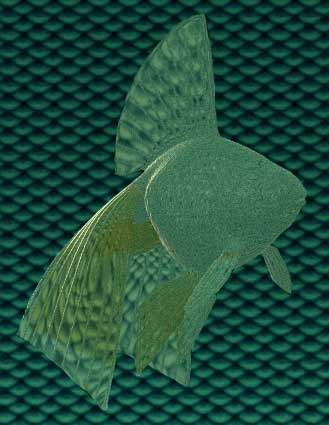
| No Fresnel Effects | LightWave Real Fresnel | LightWave Fast Fresnel |
The other place where I use Refractive Index in modeling is to determine the Glancing Angle of the Fast Fresnel Shader in Lightwave. The "glancing angle" is the angle from the camera where the Fresnel effects (an increase in reflection and decrease in transparency) begin to take effect; so you can use this anywhere in your favorite program where you have a similar control.
For the most realistic effect, this should be set to the Brewster Angle for the material. (When light hits a surface at a particular angle, the reflected rays all have the same polarization. That's the Brewster Angle, and it varies depending on the RI of the surface. If you want to know what all that means, you can read an article about Polarized Light and Brewster Angles. Read the whole page to get a handle on polarization before you get to the Brewster Angle at the bottom. If you already understand the concept of polarized light, there's an excellent interactive Java tutorial that you might enjoy.
As you can see from the Glass Fish, Fresnel Effects add a great deal to the realism, and Fake Fresnel using the Brewster Angle yields the same results as the Real Fresnel (calculated directly from the RI) but with the added benefit of more control over things like highlights. (Thanks to Arnie Cachelin for pointing this out.)
By the way, if you ever wondered how they calculate the RI for things like gold, (which no light is going to penetrate) - they use the Brewster Angle!
And that's it! I hope you enjoyed this tutorial, and that it helps you render better stuff, in less time. Have Fun!