Your donations make more tutorials possible. Thanks!
Looking for more?
I highly recommend:
This isn't strictly a Photoshop Tutorial; but since lots of people who use PS also use Painter, and this is the only Painter tut that I have, I thought I'd put it here.
In Painter, you can Fill areas with Weaves.
Weaves are perfect, of course, for making fabrics to use in other programs; but many of the presets are borked, (the repeats aren't uniform,) and there are no instructions explaining how to use the Edit Weave dialog box to make new ones.
This tutorial will attempt to rectify that problem a bit, and allow you to easily create any kind of plaid pattern woven in simple twill that you can imagine. (Twill is a form of weaving in which each thread crosses several others before it goes under one. You can see it on flannel shirts and blue jeans. Simple twill uses the same weaving pattern for the whole piece of cloth.)
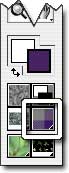 Start by opening Painter, and clicking on the Weave Selector at the bottom of the Toolbox. (These screen shots are from Painter IX, but this part of the program has been constant for some time. To see a pop-up window with larger or more complete views for most of the images on this page, click on the image.)
 This will open the Weave Selector menu, which shows a list of all the weaves currently loaded. Since we are going to be making our own weaves, let's put them in our own library. Click on the Reveal Triangle at the top right corner of the menu, and choose Weave Mover... from the flyout menu you'll find there
 This, of course, opens the Weave Mover Dialog, which allows you to move your weaves around, rename them, delete the ones you don't like, and begin new Weave Libraries, which is what we're going to do. So click on the New button below the empty window on the right, browse to wherever you want to save your Library, and give it a name. (Just like you would for any other new file.)
I save mine in a folder called "Weaves" in my Painter folder, but you can put yours anywhere you like. I'm naming mine "Tutorial Plaids" but once again, call yours whatever makes sense to you.
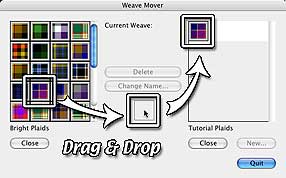 You make new Weaves by editing old ones; so we have to have one to edit. Grab any old plaid Weave from the window on the left (where I have Bright Plaids, from the Painter CD) and drag it to your new Library on the right. Once you've done that, Quit the dialog. (You'll want to use some kind of plaid so the Twill pattern will already be there.)
 Back in Painter, we need to have that library loaded, instead of the one that we had before.
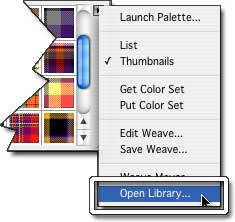
So, go back to the Weaves fly-out menu, and choose Open Library... (You may notice that the menu in this screen shot looks different. This is the Thumbnails view, not the List view, as you can tell from the checkmark. I'm showing both, because I don't know which one you are using.)
Browse your hard drive, and choose the library that you saved in the last step. We're ready to roll!
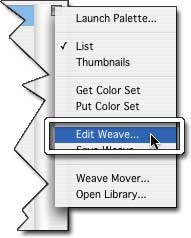 With the one and only Weave in that library selected, choose Edit Weave... from the fly out menu.
 That will open the scary-looking dialog box shown to the left; but don't panic! I'm here, and I'll tell you what all these things do.
The first thing you'll notice is that there are four text boxes, a couple of buttons, and a grid.
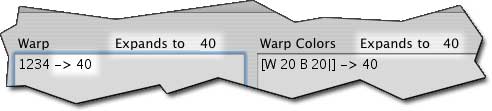
The first text box on the left is labeled Warp. These are the vertical threads. This box should say 1234 -> 'something'. If it doesn't, delete whatever is in there, and type 1234 -> 4. This is the twill pattern, and it tells the software to how to make the weave. The number doesn't have to be 4; but it does have to be a multiple of 4 for the pattern to weave correctly. We'll be coming back to this later.
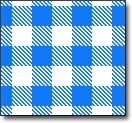 The next box is labeled Warp Colors. This is where you choose how many threads are in each vertical colored stripe. We are going to start with a simple gingham check pattern, like you might find on a picnic table cloth, which has 20 white threads, and then 20 blue ones, with those two colors repeating over and over.
![Type the text, [W 20 B 20|] exactly as shown.](WeaveImages/Weaves09-W20B20.jpg) To enter thread colors, you first type a letter to represent the color, and then the number of threads.
To enter thread colors, you first type a letter to represent the color, and then the number of threads.
You also need the correct formatting, which requires you to put exactly one space between each letter and each number, square brackets ([ or ])at both ends, and the pipe character ( | normally shift backslash) at the end of the line, just before the last square bracket. If you don't do that exactly this way, you'll get an error message.
If that happens, check first to make sure you haven't left out a space, and then to make sure that there is a number after each letter, a | after the last number, and square brackets at the beginning and end. (It won't give you the message unless you've made a mistake in the formatting, so all you need to do is find it and fix it, and it will be all right.)
So clear the numbers between the brackets, and type [W 20 B 20|]
![Move to the part of the expression after the ], and type -> 40 to tell Painter to Expand to 40.](WeaveImages/Weaves10-40.jpg) The next thing in that box tells Painter how many threads to count out before the pattern begins to repeat, (also known as "Expansion.")
The next thing in that box tells Painter how many threads to count out before the pattern begins to repeat, (also known as "Expansion.")
We want it to repeat as soon as it's woven both sets of 20, or 20+20 threads, so type -> 40 into that box. (Or just delete the last zero from the 400 that's probably there. Most of the Painter presets don't change the Pattern Expansion value to match the Color Expansion, which is why they are mostly broken.)
 Remember the 'something' from the Warp text box on the Top Left? That's an Expansion Value, too. It's okay to always leave it at 400, since that's a multiple of 4; but I prefer to use the Color Expansion value if that's a multiple of 4, (or double that, if it isn't,) so it will show up correctly in the Weave Palette. So type -> 40 here, too.
You will notice, as you do, that the text on the right hand side above both fields now reads "Expands to 40".
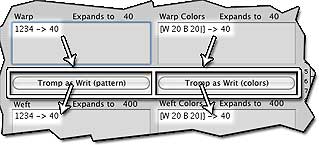 The two lower text fields are the Weft, or horizontal threads. They work exactly the same way the vertical ones do. If you know that you want the same thread colors, like we do here, all you need to do is click the Tromp as Writ (pattern) and Tromp as Writ (colors) buttons. That's just fancy Weave-Speak for "Use the same values in the Weft."
When you click those buttons, and you'll notice the values from the dialogs above repeated below. The 'Expands to' value above the lower fields will also change, as soon as you click somewhere else on the window.
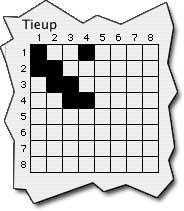 Just one more thing before we leave this dialog. Your 'Tieup' grid should look exactly like the one here. If it doesn't, then you probably didn't use a plaid to start with; but it's okay, because clicking the squares in the grid will toggle the colors from black to white. If yours doesn't look like this one, make it look like this one now.
![]() Click OK to close the Edit Weave dialog.
Click OK to close the Edit Weave dialog.
Cool! We have a new pattern. Go to an empty layer in Painter, and fill 'er up! (Just click on the layer with the Fill Tool (the one with a Paintbucket icon) making sure that your Fill is set to Weaves.)
And there you go! Perfectly repeating gingham checks!
 However, you may find that it isn't white and blue at all. That's okay. The letters that you use in the dialog are just placeholders, to keep track of how many different colors you are using, and what the patterns are for the colors. You can use any letter you like, because it's very easy to replace the colors when we get back into Painter. And that's what we're going to do now.
Open the Weaves fly-out menu, and choose Get Color Set.
 You will notice two color swatches appearing in your Color Sets palette. (If you don't have the Color Sets palette open, get it from the Color Palettes section of the Window menu, or tap Command 3 on a Mac, or ctrl 3 on a PC.)
Color Sets show the colors that are currently used in this Weave.
To replace a color, decide which one you want to replace, get the new color from the Color Picker (or however you like to get colors in Painter,) and then simply hold down the Command key (ctrl key on a PC) and click on the color you want to replace.
Here, I'm replacing the red with blue.
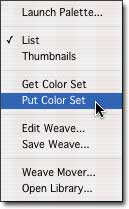 The colors won't actually change, though, until you Put them back into the Weave. So, open the fly-out again, and choose Put Color Set.
Then just Undo the fill with the wrong colors, and Fill again with the right ones. And there you go! Whatever color gingham you wanted.
 We should Save this Weave now, in case we ever want gingham again. So, go back to the flyout One More Time, and this time, choose Save Weave...
A dialog will open that allows you to choose a name. You can't choose a place, because it's always going to go into the open Library (which is why we made a new library in the first place.) Name it, and click OK.
 And there it is, in the Library, all named and safe. If you want it somewhere else, of course, all you have to do is use the Weave Mover to put it wherever you want it.
Easy, huh?
But then, as you know, that was a very easy design. What if you want to do something a little more complex? The good news is that Painter can handle it. The bad news is, it takes a little more math.
But then, as you know, that was a very easy design. What if you want to do something a little more complex? The good news is that Painter can handle it. The bad news is, it takes a little more math.
If you want to see how it's done, though, you'll find it on Painter Weaves Page 2.